author avatar
    Technology Manager of Test Dept.
 

Summary
Learn how to boot your computer and backup in safe mode. Employ alternative methods to safeguard your data effectively.


backup in safe mode

I. About safe mode

1. What is safe mode?

Safe Mode is a diagnostic startup mode in Windows that launches only the essential files and drivers required to run the operating system. This mode allows users to troubleshoot and resolve issues such as instability or spontaneous reboots. Functions of Safe Mode include deleting difficult files or viruses, fixing system errors, restoring settings, and removing malware.

2. How to enter safe mode?

To enter safe mode on systems before Windows 10, press the F8 key during computer startup before the logo appears. For Windows 10, there are two methods to access safe mode.

Steps to enter Safe Mode when Windows 10 starts normally:
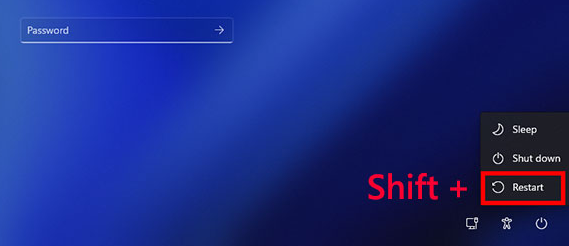
① When the computer is started, press and hold the (Shift) key first, then click the (Start) menu, and click (Power)-(Restart).
Windows, shift + restart
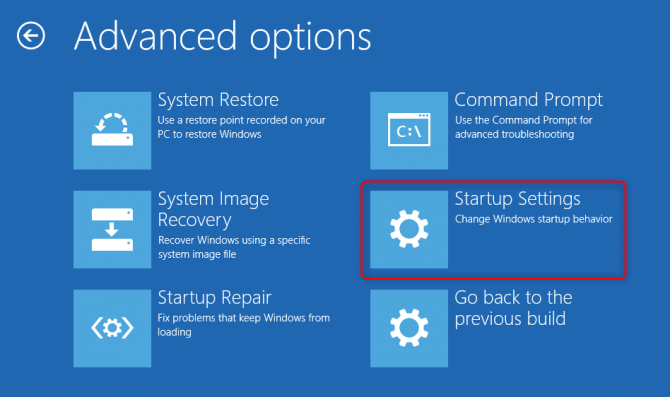
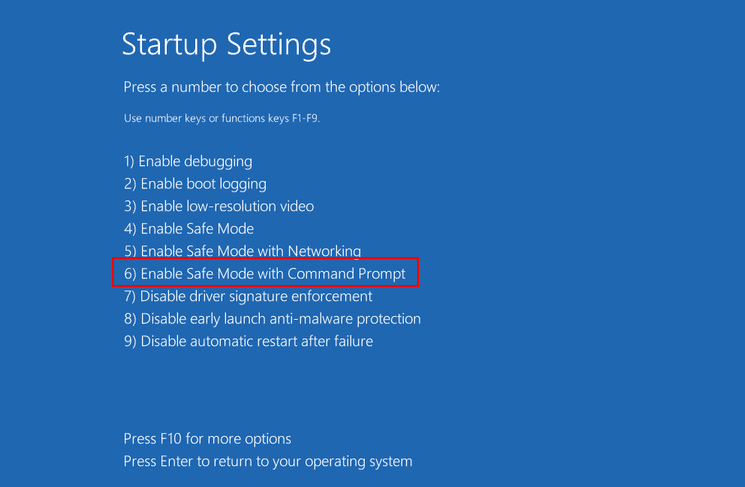
② Upon restarting your computer, choose (Troubleshooting) from the options presented, then navigate to (Advanced Options>Startup Settings>Restart). After the restart, from the startup settings menu, select the desired safe mode by pressing either 4, 5, 6, or the F4, F5, F6 keys. For file backup purposes, it is advised to choose (Start Safe Mode with Command Prompt).

Steps to enter Safe Mode when Windows 10 won’t start normally:
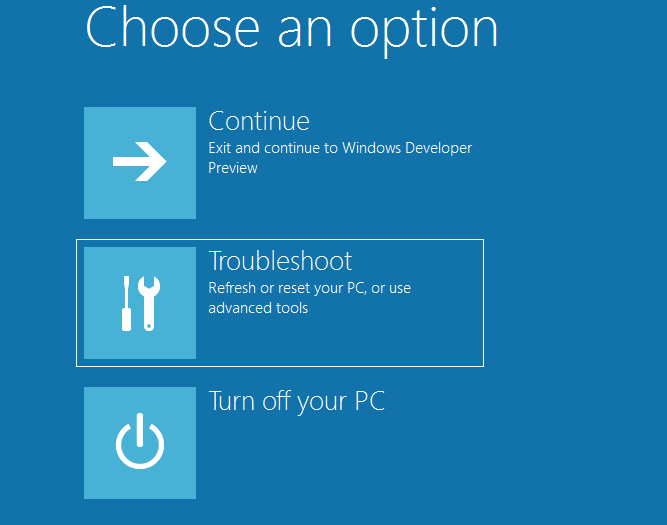
① To begin the troubleshooting process, power on your computer. As the Windows 10 logo displays, immediately press the restart or shutdown button to interrupt the startup sequence. Execute this action three times in succession to compel the system into the Windows 10 Recovery Environment. Once there, select the ‘Troubleshoot’ option.
Troubleshooting
② Then select (Advanced Options) – (Startup Settings), click the (Restart) button in the lower right corner to restart the computer.
select startup settings in advanced options
③ Upon restarting your computer, access the Startup Settings menu and choose the appropriate safe mode for your needs. To back up files in safe mode, it’s advised to select ‘Start Safe Mode with Command Prompt‘ by pressing either the number 6 or F6.
safe mode
There are many ways to enter safe mode, if none of the above methods can successfully enter safe mode, please click here See more ways to get into Safe Mode.

II. How to backup files in safe mode?

When we successfully enter the safe mode with a command prompt, we can use the WBadmin command to back up computer files, but this command needs to be run as an administrator.
① Right-click (Command Prompt) , and select (Run as administrator). If you want to back up the files on drive C and save the backup on drive E, type the following command and press (Enter):
Wbadmin start backup -backuptarget:e: -include:c:
Command description:
Wbadmin start backup: Run a backup.
-backupTarget: Specifies where this backup is stored.
-include: Specifies a comma-separated list of items to include in the backup. Can contain multiple files, folders or volumes. Volume paths can be specified using volume drive letters, volume mount points, or GUID-based volume names.

Enter Wbadmin start backup -backuptarget:e: -include:c:
② If you want to backup all volumes including the operating system, you can enter the following command and press (Enter):
Wbadmin start backup -backuptarget:e: -include:c: -allcritical
The introduction of this command:
-allCritical parameter, which enables backing up all critical volumes, including the operating system state—ideal for bare metal recovery backups. Note that it requires the
-backupTarget parameter; without it, the command will not execute successfully. It can be used in conjunction with the -include option.
For more descriptions of Wbadmin command parameters, please refer to the following two official websites:
https://docs.microsoft.com/en-us/windows-server/administration/windows-commands/wbadmin
https://docs.microsoft.com/en-us/windows-server/administration/windows-commands/wbadmin-start-backup

III. How to backup files when safe mode is inaccessible?

When the safe mode cannot be accessed, you can use other tools to create a startup disk, and then back up files. Here we take Renee Passnow as an example to introduce the specific operation method.

1. Use Renee Passnow to create a boot disk

Renee Passnow is a versatile system rescue software designed for Windows users. It offers a range of functions including disk/memory card data restoration, data recovery post-hard disk formatting, file transfers, and disk scans. Users can also utilize it to reset Windows account passwords, create new admin accounts, and more. Additionally, it troubleshoots Windows system issues such as MBR boot record repairs, DBR error parameters, the 0xc00000e error, startup failures, and the blue/black screen errors. Renee Passnow is fully compatible with various Windows versions, including 10/8.1/8/7/XP/Vista, catering to the system rescue requirements of a diverse user base.
Hot Topic - ADsRenee PassNow – 3 Steps to transfer data from the crashed system

Easy to use 3 steps to transfer the files.

Transfer the files Transfer the important files of the computer without system.

Preview the files Preview the files while transferring the data.

Multifuctional Data recovery, Windows password reset, bootable problem recovery can be run without system.

Highly compatible Windows 10/8.1/8/7/XP/Vista. Also supports UEFI boot mode.

Easy to use 3 steps to transfer the files.

Transfer the files Transfer the important files of the computer without system.

Preview the files Preview the files while transferring the data.

Free TrialFree TrialNow 2000 people have downloaded!
The steps for Renee Passnow to create a boot disk are as follows:
① Download and install Renee Passnow on a functioning computer. Connect a USB drive to this computer, launch Renee Passnow, and select “Create a rescue USB disk” in “Step 1: Choose the creation method.” Ensure all important USB drive data is backed up elsewhere, as this process will erase its contents.
② Next, Select either x64 or x86 corresponding to your system architecture, and then press the Download Now button to obtain the ISO file. Once the download is complete, choose Create Rescue USB. After the USB boot disk has been prepared, select Eject USB.
use renee passnow to create usb to reset passnword
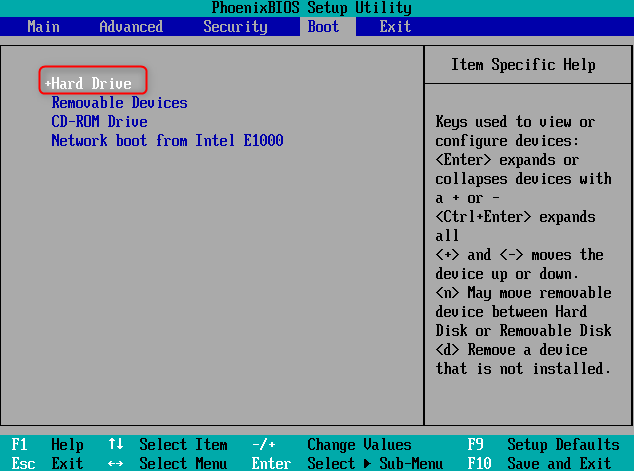
Connect the created boot device to the Windows 10 computer you want to back up files on. Power on the computer, and watch for the BIOS shortcut key prompt on the screen, which may appear for only 1-2 seconds. If you miss it, consult the computer’s manual or official website for the specific key. Press this key repeatedly to access the BIOS settings. Within the BIOS (Boot) interface, prioritize the USB device or CD-ROM drive as the boot item. Save these settings and exit. For detailed instructions, see: How to enter BIOS and modify the boot sequence.
Note: If you create a rescue USB disk, select (Removable Devices) as the first boot item, and if you create a rescue CD, select (CD-ROM Drive) as the first boot item. The BIOS interface varies from brand to brand, please adjust it according to the actual situation.
Boot the PC from hard drive

2. Start the computer through the startup disk and back up the files

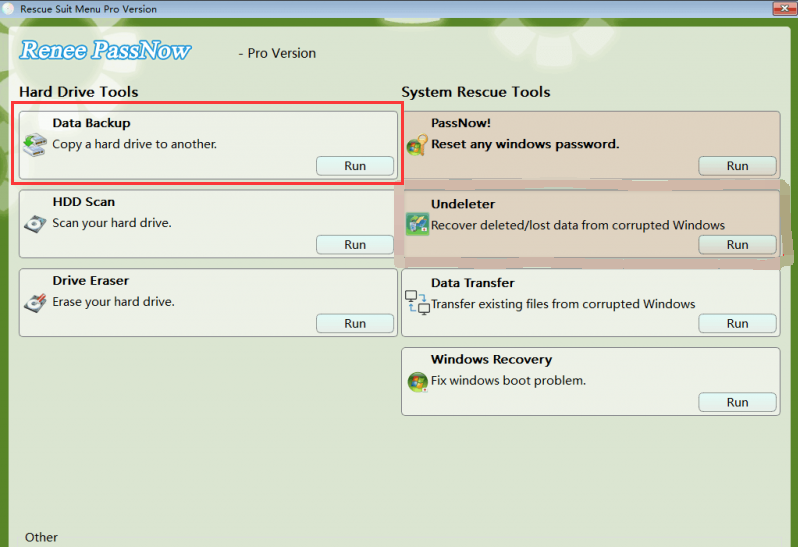
① After starting the computer from the startup USB disk and entering the application program, select the (data backup) option. This option is to completely clone the hard disk to other hard disks.
passnow data backup
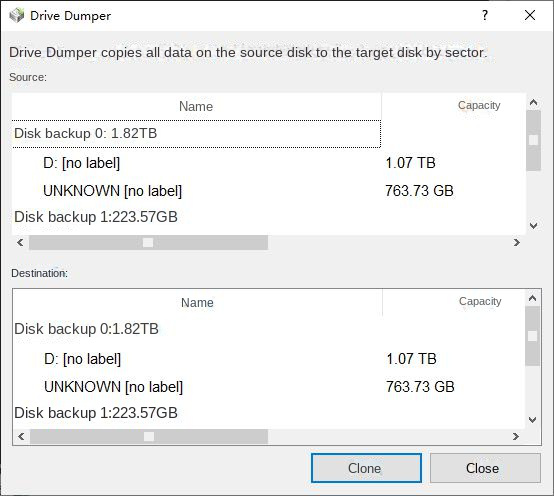
② In the (source) list, select the hard disk to back up the files, in the (destination) list, select the hard disk to save the files, and finally click (clone) and wait for the cloning to complete to successfully back up the computer files.
Select the original disk and destination for data backup
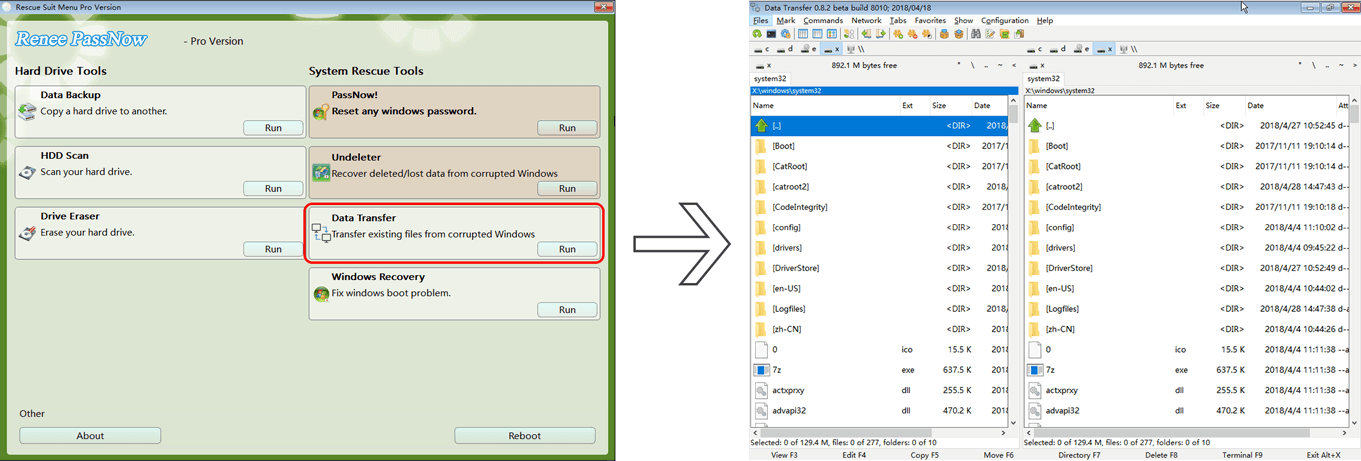
If you only need to back up some important files, you can also choose (Data Transfer) option.
Data transfer function of Renee Passnow
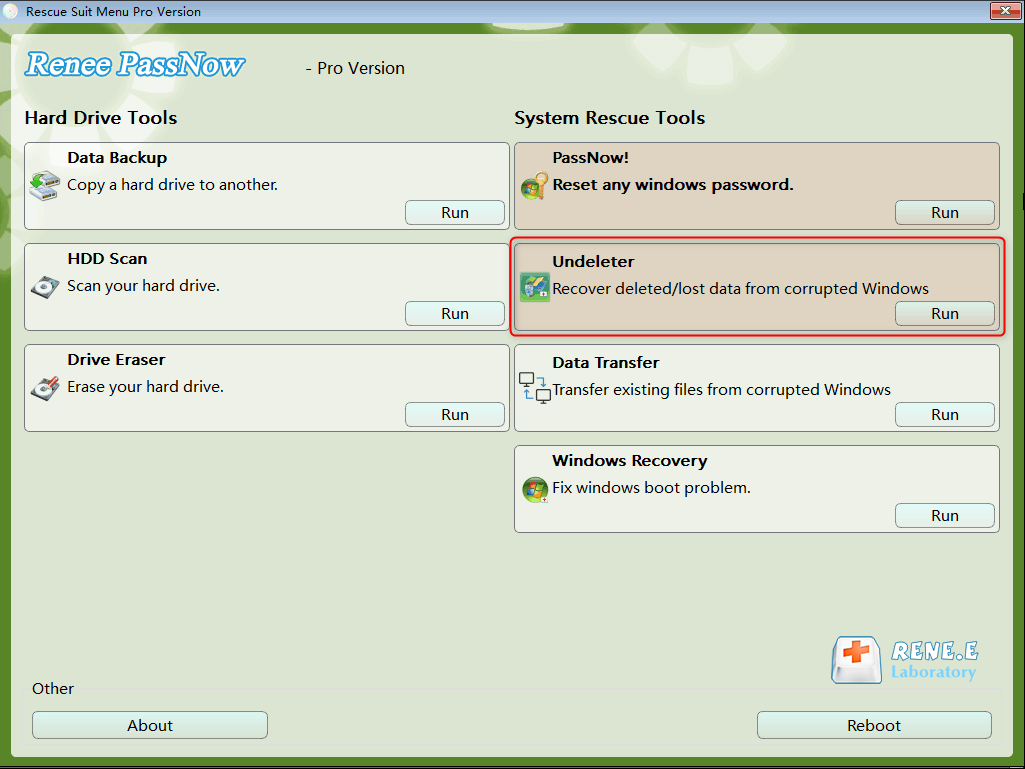
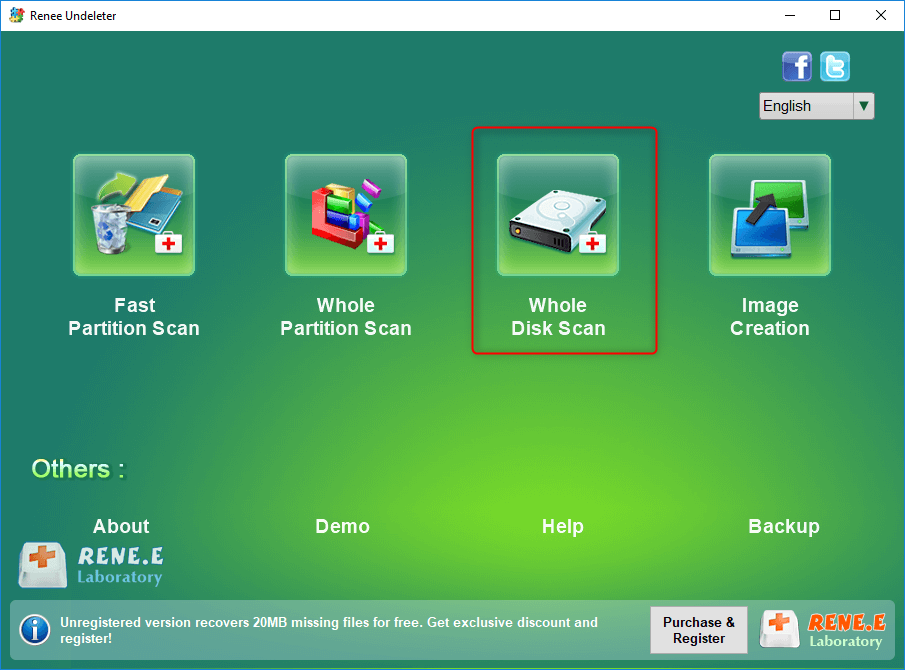
If you only need to recover some important files, you can also choose the (Undeleter) option.
data recovery function in Renee Passnow
select whole disk scan in renee undeleter