author avatar
    Technology Manager of Test Dept.
 

Summary
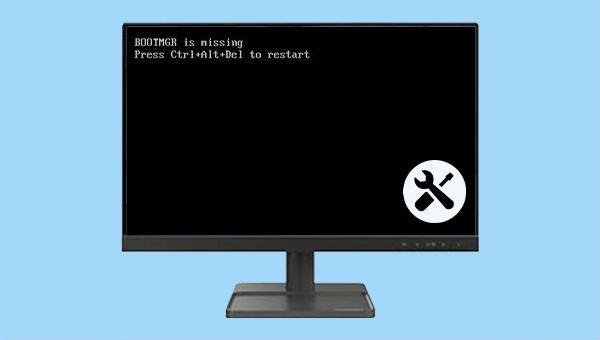
Learn how to solve the error "BOOTMGR is missing" and access important files during system crashes with effective repair methods and data transfer tips. Let's try the methods on this article.


How to solve BOOTMGR is missing

I. About BOOTMGR

1. What is BOOTMGR?

The acronym BOOTMGR stands for Windows Boot Manager. Its primary function is to load the boot code, enabling the Windows operating system to start. Additionally, it executes winload.exe to load the necessary device drivers. Typically, the BOOTMGR file is read-only and can be found in the boot directory of the “active” partition. This partition is often labeled as “system reserved” and does not have a designated hard drive letter. However, if your computer does not have a System Reserved Partition, the BOOTMGR file may be located on your system partition, which is usually labeled as C:.

2. Why does the error that BOOTMGR is missing appear?

There are numerous potential causes for an error stating “BOOTMGR is missing”. However, the most frequently encountered reasons include a damaged Windows boot sector, difficulties with hard drive and operating system upgrades, an outdated BIOS, corrupted BCD (Boot Configuration Data), an incorrectly configured BIOS boot sequence, and a damaged MBR.
After understanding the relevant knowledge points about BOOTMGR, let’s solve the problem when the computer displays “BOOTMGR is missing”.

II. How to solve the problem that BOOTMGR is missing?

1. Perform Windows Startup Repair

Windows Startup Repair is a powerful tool designed to fix any issues that are preventing Windows from loading properly. It is capable of replacing missing or damaged files, including the vital BOOTMGR file. Below, you will find the steps to successfully perform a startup repair:
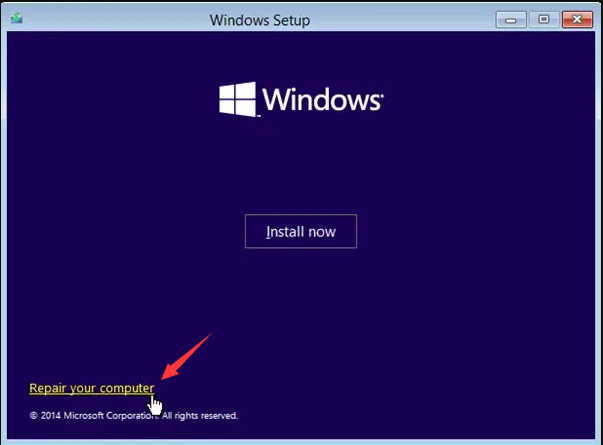
Step 1: To begin, insert the Windows installation disk (DVD or USB disk) into your computer. Then, when starting up, press either F2, F10, DEL, or ESC (depending on your computer brand) to access the BIOS setting interface. In the interface, set the first boot sequence to the Windows installation disk and proceed to start the computer from the disk. In the “Install Now” interface of the Windows installation program, click the “Repair your computer” option to enter the recovery environment.
windows installation repair your computer
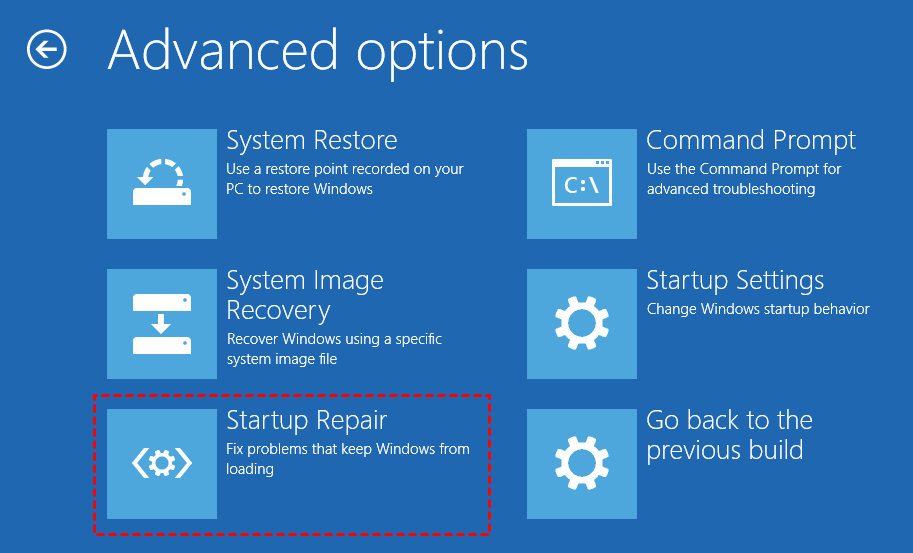
Step 2: After entering the recovery environment, navigate to (Troubleshoot)>(Advanced Options)>(Startup Repair).
startup Repair

2. Use the Bootrec command to fix errors

The Bootrec command can fix damaged master boot records or boot configuration data files. This approach requires accessing the recovery environment to perform the task. Here’s how:
Step 1: To begin, insert the Windows installation disk (DVD or USB disk) into your computer. Then, when starting up, press either F2, F10, DEL, or ESC (depending on your computer brand) to access the BIOS setting interface. In the interface, set the first boot sequence to the Windows installation disk and proceed to start the computer from the disk. In the “Install Now” interface of the Windows installation program, click the “Repair your computer” option to enter the recovery environment.
windows installation repair your computer
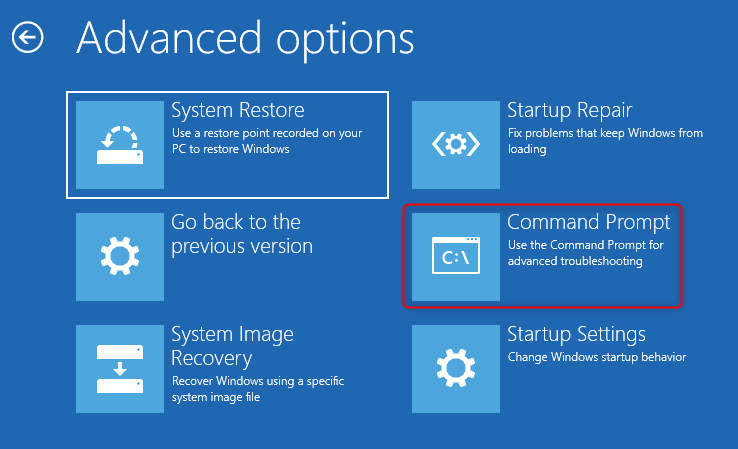
Step 2: After entering the recovery environment, navigate to (Troubleshoot)>(Advanced Options)>(Command Prompt).
command prompt
Step 3: In Command Prompt, enter the following command. Each time you enter a command, you need to press the Enter key. After the repair is complete, restart the computer to see if the problem is resolved.
bootrec.exe /fixmbr
bootrec.exe /fixboot
bootrec.exe /scanos
bootrec.exe /rebuildbcd

3. Change the boot order in BIOS

If the above two methods cannot solve the fault, you can also change the boot sequence in the BIOS to fix the problem of BOOTMGR missing. The specific steps are as follows:
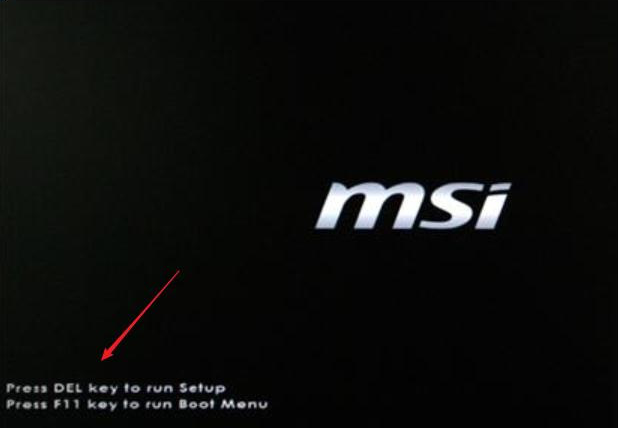
Step 1: Restart the computer and press a specific key, such as F2, F8, F10, F12, ESC, or Del, to enter the BIOS interface. This key may vary depending on the brand of your computer or motherboard.
Click Del to enter the BIOS interface
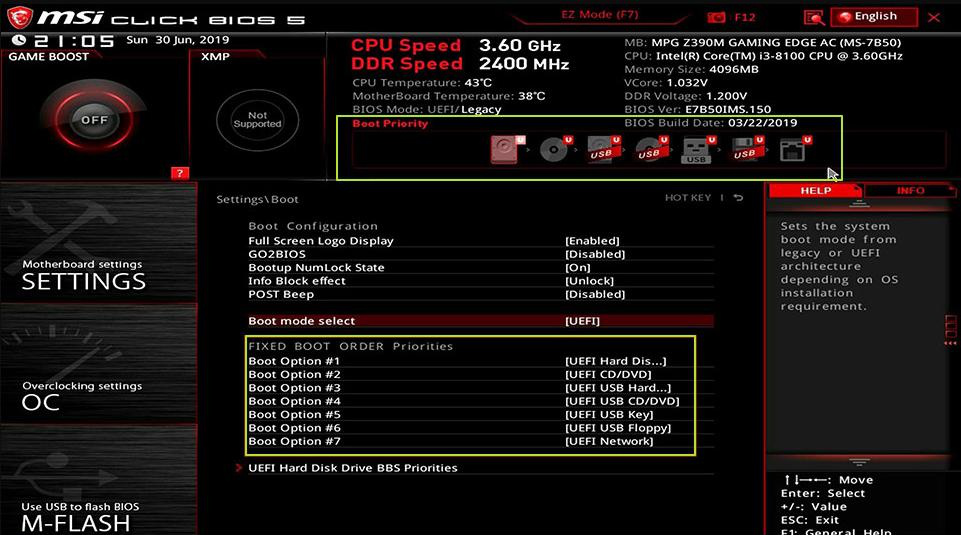
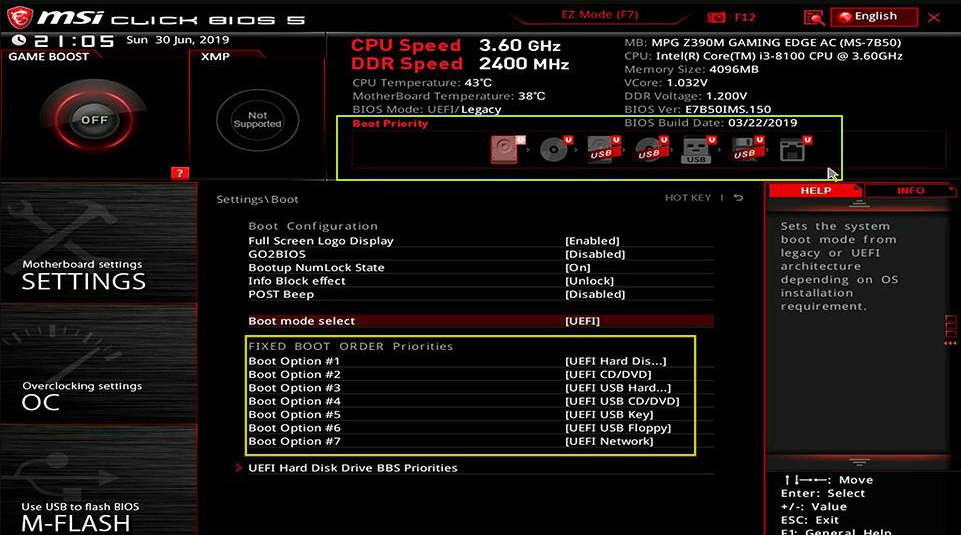
Step 2: When searching for the (Boot Priority) option, keep in mind that each BIOS interface may vary slightly. Look for an option that includes the terms “Priority” or “Priorities”. Check to see if the hard drive with the Windows operating system is listed. It’s important to ensure that this hard drive is at the top of the boot order. Once you’ve made the necessary changes, save the settings and restart your computer.
Make sure the desired hard drive is first in the boot order
The above are the three commonly used methods to fix the “BOOTMGR is missing” error. If none of the above methods can solve the problem and you cannot enter the system normally, you can use a professional system rescue tool to transfer or restore important files in the computer. The following is a detailed operation.

III. Use Renee PassNow to transfer or recover important data

1. What is Renee PassNow?

Renee PassNow is a professional system rescue software, which can help Windows users clear Windows account passwords, create new administrator accounts; restore disk/memory card data, recover data after hard disk formatting; transfer disk files; erase or scan Disk files, etc. In addition, this software also supports repairing Windows system problems, such as: repairing MBR boot records, DBR error parameters, 0xc00000e, Windows system startup failure, and some problems that cause black screen or blue screen, etc. As a system rescue tool with various functions, it is perfectly compatible with multiple systems including Windows 10/8.1/8/7/XP/Vista, and can meet the system rescue needs of different users.
Hot Topic - ADsRenee PassNow – 3 Steps to transfer data from the crashed system

Easy to use 3 steps to transfer the files.

Transfer the files Transfer the important files of the computer without system.

Preview the files Preview the files while transferring the data.

Multifuctional Data recovery, Windows password reset, bootable problem recovery can be run without system.

Highly compatible Windows 10/8.1/8/7/XP/Vista. Also supports UEFI boot mode.

Easy to use 3 steps to transfer the files.

Transfer the files Transfer the important files of the computer without system.

Preview the files Preview the files while transferring the data.

Free TrialFree TrialNow 2000 people have downloaded!

2. How to use Renee PassNow to transfer or recover data?

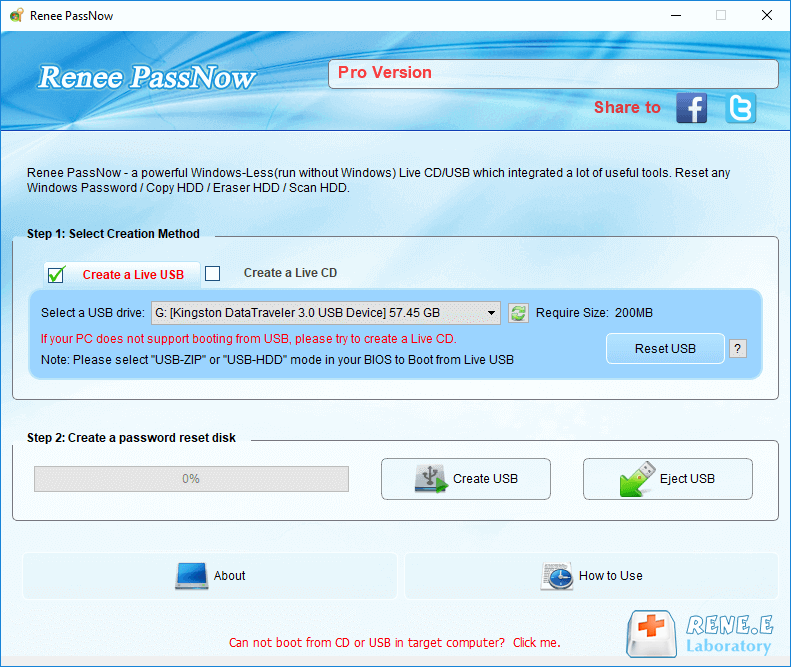
Step 1: Download and install Renee PassNow on another computer that can log in and run normally, then connect the USB disk to the PC.

Please select the (Create a Live USB) option under “Step 1: Select creation method” in the main interface.

Note: Before performing this operation, please make sure that the important files in the USB disk have been saved in other locations because the operation will delete all the data in the USB disk.
create a boot media with renee passnow
Step 2: Next, choose the appropriate system type (x64 or x86) and select the “Download Now” button to obtain the ISO file. Once the download is complete, click the “Create USB” button to initiate the process, and then eject the USB by clicking the “Eject USB” button.
use renee passnow to create usb to reset passnword
Step 3: Connect the boot device you have created to the computer where you want to transfer data. Turn on the computer and a shortcut key will appear on the screen to enter the BIOS (this interface may only appear for a few seconds). Continuously click the BIOS shortcut key to access the BIOS settings. From there, set the boot USB as the first option in the boot sequence under Boot Priority. Save the changes and restart the computer.
select boot order
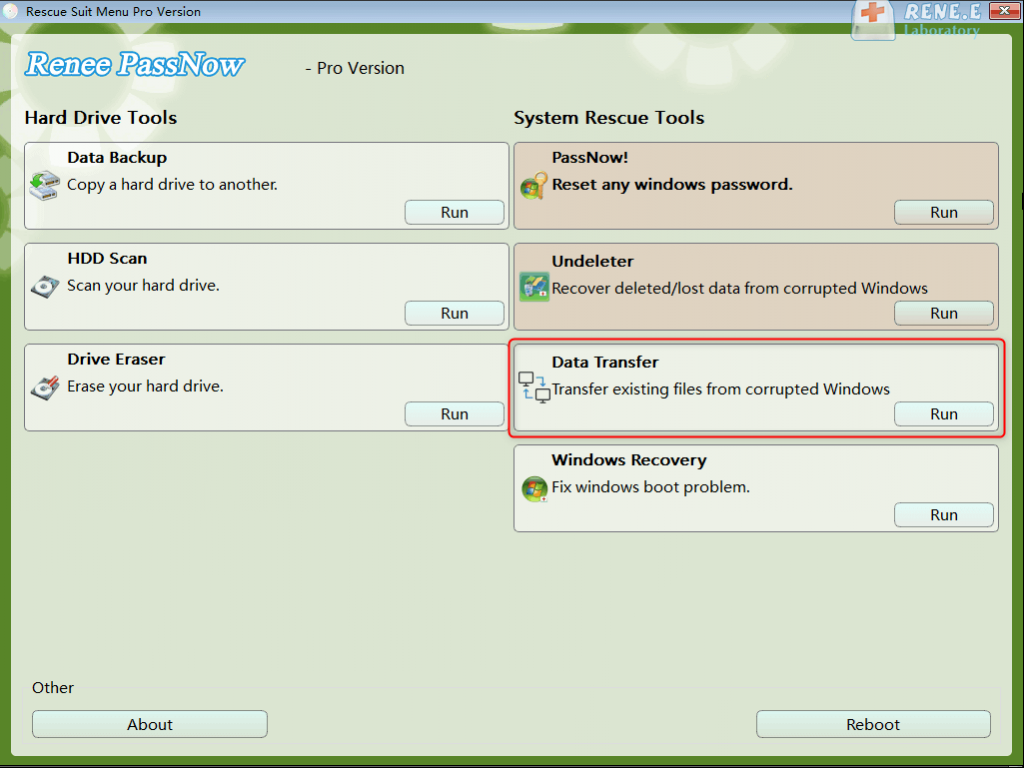
Step 4: Choose the option “Data Transfer”. If you wish to transfer all the data from your hard disk, simply select the “Data Backup” option.
data transfer
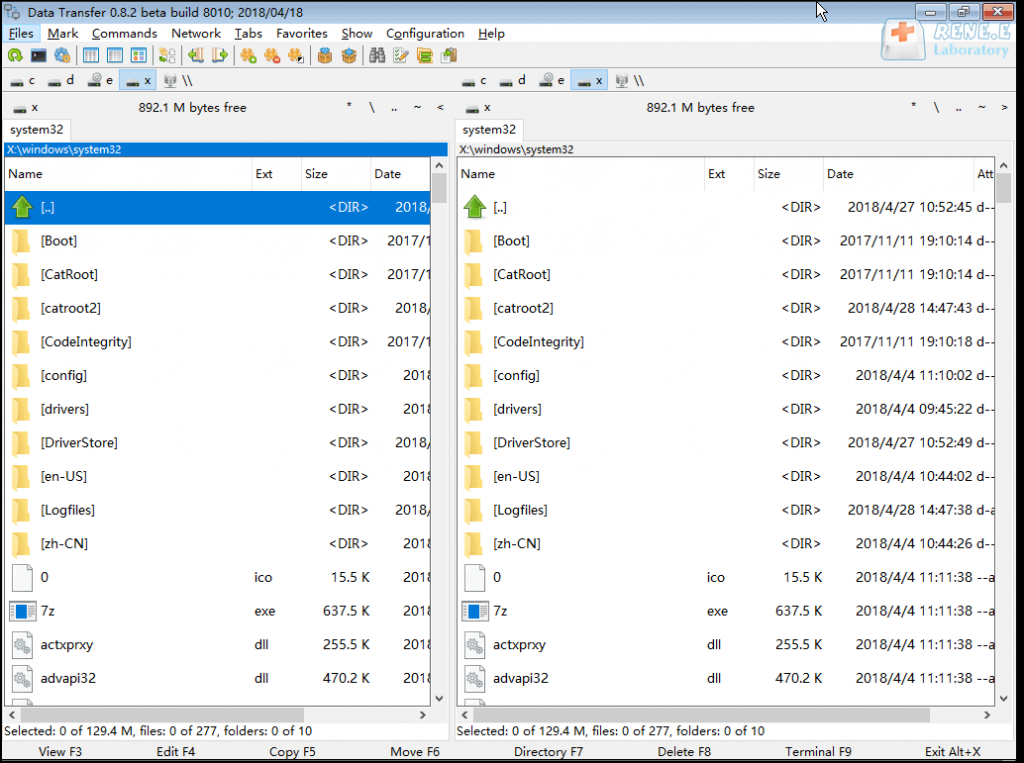
Step 5: You can simply click on each disk drive letter (C/D/E/F, etc.) to check for any potential loss of important files. If there are no missing files, it is highly recommended that you transfer them to an external disk for safekeeping. The process of transferring data is straightforward and effortless. For instance, if you wish to transfer data from the C drive to the G drive, you can easily select the C drive on the upper left, then choose the G drive on the upper right, and finally select the desired files from the C drive. Once selected, click on the Copy function button in the middle to easily transfer the disk data. In case you want to delete a file, you can simply select it and click on the (Delete) button in the middle. However, please note that this action cannot be undone, so proceed with caution.
data transfer in Renee Passnow
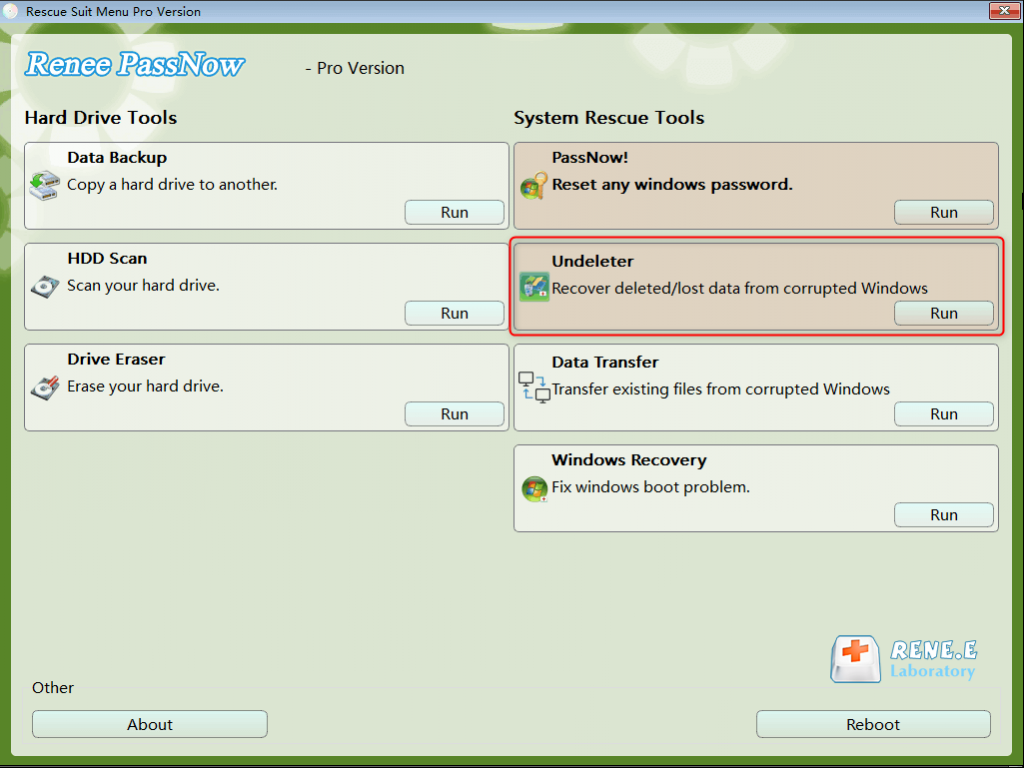
Step 6: If you find that there is data loss, please select the (Undeleter) option on the main interface of the function, and click the (Run) button.
data recovery function in Renee Passnow
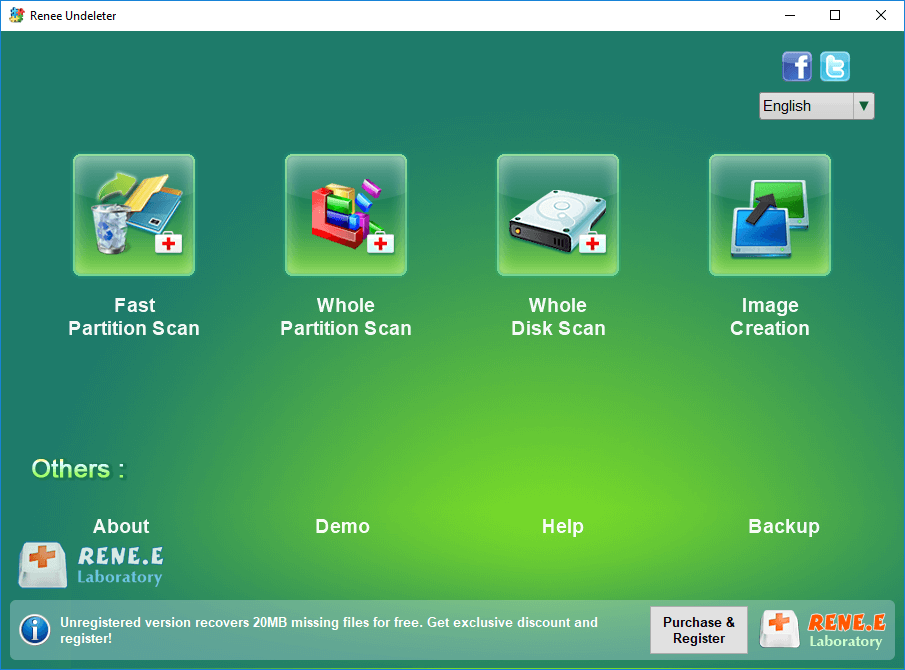
Step 7: Select (Whole Disk Scan) to scan the target hard disk.
select whole disk scan in renee undeleter
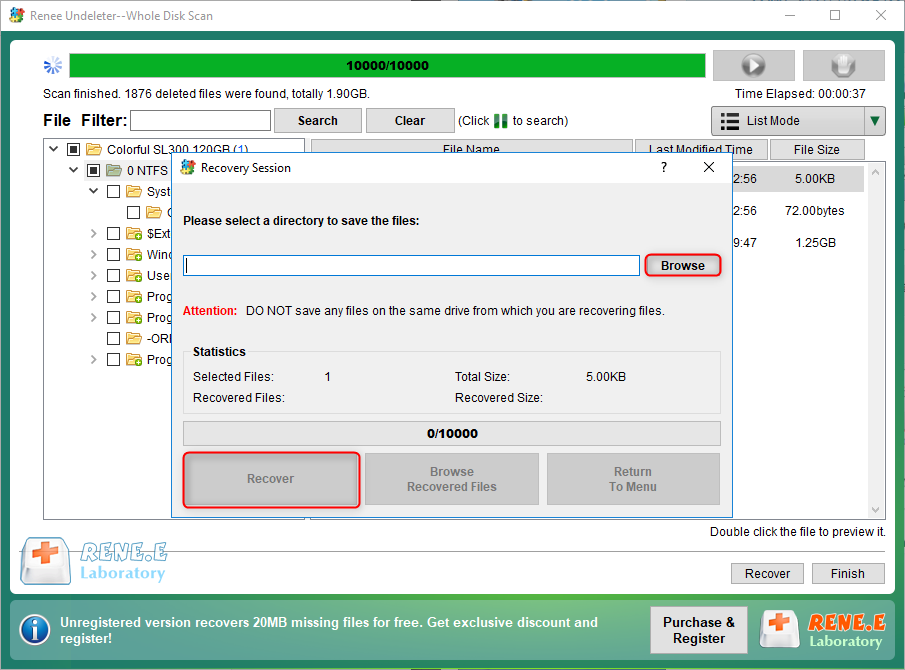
Step 8: After the scan is complete, choose the file you want to recover and click the “Recover” button to start the data recovery. Save the file to an external disk and eject the USB disk once the recovery is finished.
recover files from whole disk scan with renee undeleter