Change Your PIN: A Guide for Windows 10 Users
- Home
- Support
- Tips System Rescue
- Change Your PIN: A Guide for Windows 10 Users
Summary
Upgrade your security with these tips for changing your PIN on Windows 10. Learn the best practices for setting and updating your PIN, as well as troubleshooting common issues. Whether you're an individual user or part of an enterprise, this guide has you covered.
Table of contents
Settings > Accounts > Sign-in options > Windows Hello PIN > Change
In today’s digital age, personal information and sensitive data are becoming increasingly vulnerable to cyber attacks. This is why it is important to take every precaution necessary to protect our devices and accounts. In the case of Windows 10, one of the key security measures is changing your PIN regularly. However, many people do not see the significance of this and often neglect to update their PINs, putting themselves at risk for potential security breaches. In this chapter, we will explore the risks of not changing your PIN in Windows 10 and the potential security vulnerabilities associated with this negligence.
The primary purpose of a PIN is to provide an additional layer of security to your device. By using a unique numerical code, it adds an extra barrier to prevent unauthorized access. However, if this code remains the same for an extended period of time, it becomes easier for hackers or other malicious actors to potentially crack the code and gain access to your device or pertinent information. “A stagnant PIN is like leaving your front door unlocked for months – eventually, someone will find a way in,” explains cybersecurity expert John Smith. This is why regularly changing your PIN is crucial in keeping your device and data safe.
Another risk associated with not changing your PIN is the possibility of a brute force attack. This is when a hacker attempts to guess your PIN by trying different combinations until they get the correct one. This method is especially effective if the PIN remains unchanged, as the hacker has an unlimited amount of attempts. With each wrong guess, the chances of them getting the correct code increases. However, by changing your PIN regularly, you limit the number of attempts a hacker can make, making it more difficult for them to successfully guess the code.
In addition to device security, not changing your PIN in Windows 10 also puts your personal and sensitive data at risk. If a hacker gains access to your device, they can potentially access and steal any stored information, such as credit card numbers, passwords, or personal documents. This can lead to identity theft, financial loss, or even blackmail. By regularly changing your PIN, you are adding an extra layer of protection to your data, making it more difficult for hackers to obtain.
It is clear that not changing your PIN in Windows 10 can have serious consequences. Therefore, it is crucial to make it a regular practice to update your PIN. Microsoft recommends changing your PIN every 30-60 days, but it may be beneficial to do so more frequently. This simple task can greatly enhance the security of your device and protect your personal information.
In conclusion, a simple PIN change in Windows 10 can make a significant difference in protecting your device and data from potential security breaches. The risks of not changing your PIN include easier guessability, higher risk of brute force attacks, and potential data breaches. By regularly updating your PIN, you are taking a proactive step in ensuring the safety and security of your device and personal information. So, take the time to change your PIN regularly – it’s a small but essential step in safeguarding your digital world.
To begin, click on the “Start” button in the bottom left corner of your screen and then click on the “Settings” icon that looks like a gear. Alternatively, you can press the “Windows + I” keys on your keyboard to open the Settings menu.
In the Settings menu, click on the “Accounts” option. This is where you can manage all of your account settings for your Windows 10 device.
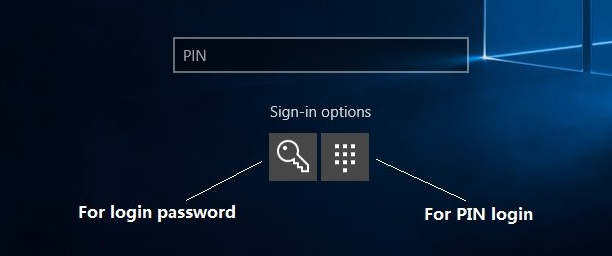
In the left menu, click on the “Sign-in options” tab to view all of the login options available for your device.
Under the “PIN” option, click on the “Change” button to start the process of changing your current PIN.
A pop-up window will appear asking for you to verify your identity. This can be done through various methods, such as entering your password or using a PIN you have set up for your Microsoft account. Choose the method you prefer and complete the necessary steps.
After verifying your identity, you will be prompted to create a new PIN. This can be any combination of numbers, letters, and special characters, up to 127 characters in length.
To ensure you have entered your new PIN correctly, you will be asked to re-enter it a second time to confirm.
Start by downloading Renee PassNow from the official website and install it on a different computer that you can access. You can choose the appropriate version based on your computer’s operating system.

Remove Windows Login Password 3 steps for whole password remove process.
Recover the files Recover the deleted files without Windows system.
Transfer the data Transfer the important files of the computer with system.
Multifuctional Data transfer, data recovery, bootable problem recovery can be run without system.
Highly compatible Windows 11/10/8.1/8/7/XP/Vista. UEFI boot.
Remove Login Password Support Windows 11/10/8.1/8/7/XP/Vista. UEFI boot.
Recover the files Recover the deleted files without Windows system.
Transfer the data Transfer the important files of the computer with system.
Launch Renee PassNow and insert a USB flash drive or blank CD/DVD into the computer. Select the option to create a bootable media. Follow the on-screen instructions to complete the process.
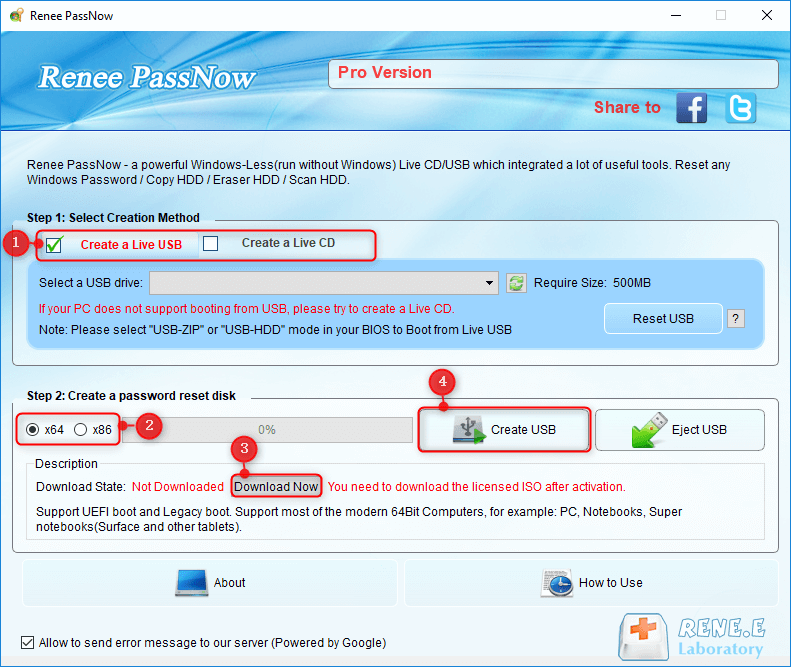
Insert the bootable USB or CD/DVD into the locked Windows computer. Restart the computer and enter the BIOS settings by pressing the appropriate key (usually F2 or Delete). Configure the boot order to prioritize the bootable media.
| Server Type | Enter boot menu method |
|---|---|
| DELL | Press the F12 key repeatedly before the Dell logo appears on the screen. |
| HP | Press the F9 key multiple times when the HP logo is displayed. |
| BIOS Name | Enter boot menu method |
|---|---|
| ASRock | DEL or F2 |
| ASUS | DEL or F2 for PCs/ DEL or F2 for Motherboards |
| Acer | DEL or F2 |
| Dell | F12 or F2 |
| ECS | DEL |
| Gigabyte / Aorus | DEL or F2 |
| Lenovo (Consumer Laptops) | F2 or Fn + F2 |
| Lenovo (Desktops) | F1 |
| Lenovo (ThinkPads) | Enter then F1 |
| MSI | DEL |
| Microsoft Surface Tablets | Press and hold Power and Volume Up buttons |
| Origin PC | F2 |
| Samsung | F2 |
| Toshiba | F2 |
| Zotac | DEL |
| HP | Esc/ F9 for \`Boot Menu\`/ Esc/ F10/ Storage tab/ Boot Order/ Legacy Boot Sources |
| INTEL | F10 |

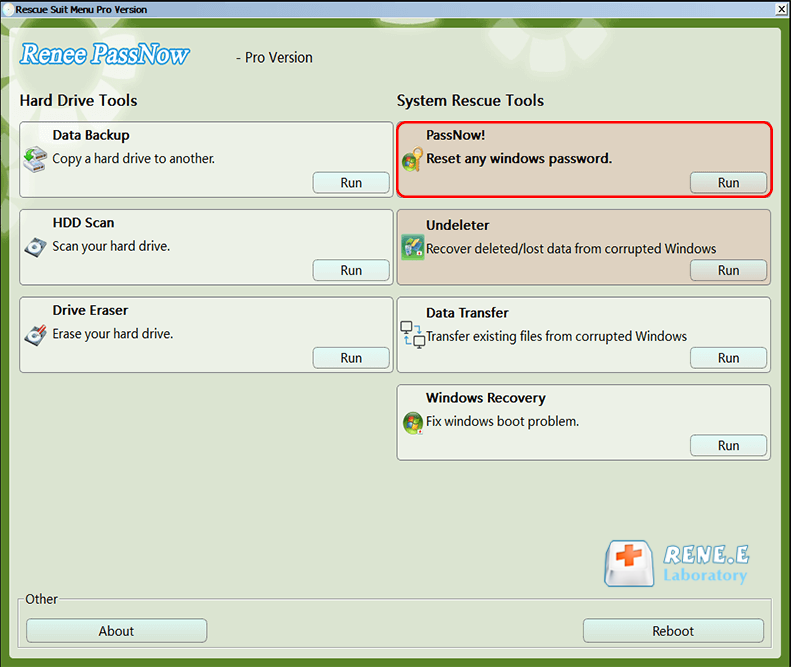
After successfully booting from the bootable media, Renee PassNow will load. Select “PassNow!” function after booting from the new created Windows password reset disk.
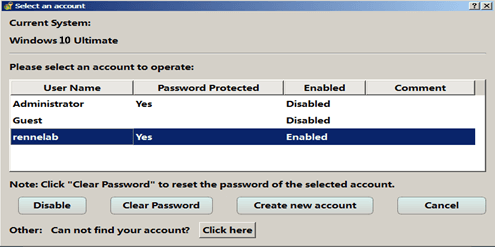
Choose the user account for which you want to reset the password. Then, click on the “Clear Password” button. Renee PassNow will remove or reset the password for the selected user account.
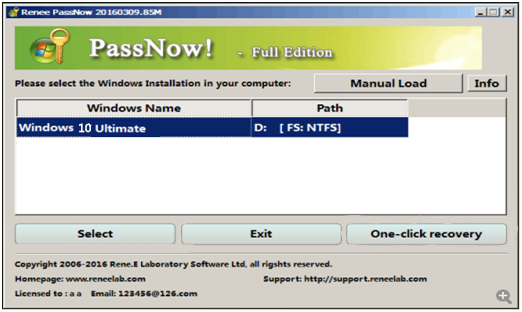
Once the password is reset, remove the bootable media from the PC and restart the computer. You will now be able to log in to Windows Account without a password.
sfc /scannow
ipconfig /flushdns
ipconfig /registerdns
ipconfig /release
ipconfig /renew
Group Policy
PowerShell
Relate Links :
Enjoy Seamless Login: Remove Password and Pin on Windows 11
27-09-2023
Ashley S. Miller : Discover the benefits of removing password and PIN login on Windows 11. Follow our step-by-step guide to configure...
Remove PIN on Windows 11: A Step-by-Step Guide
27-09-2023
Amanda J. Brook : Learn how to remove the PIN login feature on Windows 11 with our step-by-step guide. We also discuss...
Enjoy Seamless Login: Remove Password and Pin on Windows 11
19-12-2023
Amanda J. Brook : Discover the benefits of removing password and PIN login on Windows 11. Follow our step-by-step guide to configure...
Automatic File Backup for Windows 10: Simplified Steps
26-05-2024
Jennifer Thatcher : Discover three effective strategies to set up windows 10 automatic backup, guaranteeing the security of crucial data while...


