author avatar
    Specialist of Customer Service Dept.
 

Summary
Having trouble with resetting the PIN on your Dell laptop? Look no further. This article covers various solutions, including using a Microsoft account, a password reset disk, and the reliable Renee PassNow tool, to help you regain access to your device. Don't let a forgotten PIN stand in your way - check out our guide now!


If you’re a user of a Dell laptop, chances are you’ve encountered the need to reset your PIN at some point. Whether it be due to forgotten PIN or security concerns, this can be a frustrating situation. However, fear not, as there are various methods to reset your PIN and regain access to your device. In this article, we will walk you through the first method – resetting your PIN on your Microsoft account online. This method requires the connection of your account to Microsoft and access to the internet. So, let’s dive in and learn how to regain access to your Dell laptop through this simple process.

Method 1 : Resetting Your Dell Laptop PIN

Resetting your PIN on your Microsoft account online can be a lifesaver if you’ve forgotten it. This method requires your Dell laptop to be connected to your Microsoft Account and have network access.
Step 1: “I Forgot My PIN”
On the login screen, select the option “I forgot my PIN” to initiate the PIN reset process. This will redirect you to the PIN reset page.
dell laptop pin reset
Step 2: Verification Process
To verify your identity, Microsoft may require you to enter the characters displayed on the screen to prove you’re not a robot. After that, enter the email address associated with your Microsoft Account and click on “Next.
Step 3: Email Verification
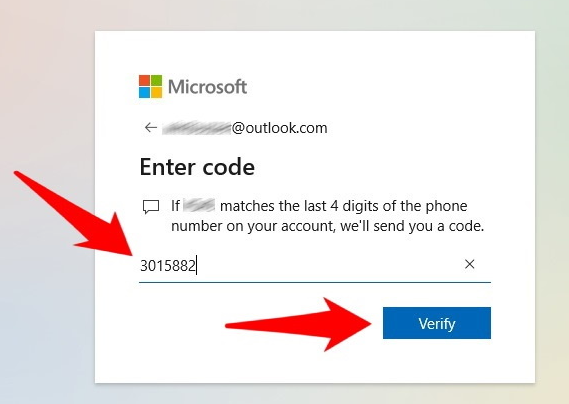
Microsoft will send a security code to the email address associated with your account. Retrieve the code from your email and enter it in the verification box. Click on “Verify” to proceed.
I Forgot My PIN and email verification
Step 4: Security Questions
In some cases, Microsoft may prompt you to answer security questions that you previously set up for your account. Provide accurate answers to the questions to proceed with the PIN reset process. It’s best to complete all the questions if possible. Click on “Submit” once you’ve answered the questions.
Step 5: Waiting for Account Access
After completing the verification and security questions, you may need to wait for Microsoft’s security team to investigate your request. Typically, within 48 hours, they will grant you access to your account, allowing you to reset your PIN.
Step 6: Creating a New PIN
Once you’ve regained access to your Microsoft Account, you can create a new PIN for your Dell laptop. Choose a PIN that is easy for you to remember but difficult for others to guess. After setting your new PIN, you should now be able to log in to your Dell laptop again.
Common Issues and Alternative Methods
Sometimes, users may encounter issues with resetting their Dell laptop PIN using the Microsoft Account online method. If you experience difficulties in selecting the “Other User” option or receive error messages like “Something happened to your PIN,” there are alternative methods you can try. You can use password reset tools or recovery options like Microsoft Account Recovery, Windows Password Recovery Tool, or a password reset disk. Additionally, if your Dell laptop is joined to an AzureAD system or running Windows 10, specific instructions may be required to bypass PIN-related obstacles. In such cases, it is advisable to seek guidance from the manufacturer’s support or consult a professional technician.

Method 2: Trying Password Login Instead of PIN Login

In the previous chapter, we discussed the first method for resetting your Dell laptop PIN. If that method did not work for you, don’t worry, there is another method you can try. In this chapter, we will explore Method 2: trying password login instead of PIN login.
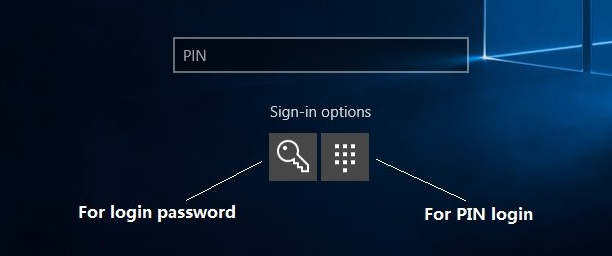
Step 1: Start by turning on your Dell laptop and clicking on the screen to focus on the password field. On this screen, you will see the option to login using your PIN. Do not click on this option, instead, look for the “Sign-in options” link below the password field.
switch to Input password to login Windows
Step 2: Once you have clicked on the “Sign-in options” link, a new window will open with the options to sign-in using a “PIN”, “Password”, or “Picture password”. Click on the “Password” option to proceed.
Step 3: Next, enter your current password in the designated field. If you do not remember your current password, click on the “Forgot your password?” link below the password field. This will take you through a series of steps to reset your password.
In conclusion, if you are unable to reset your Dell laptop PIN using Method 1, try using this second method. It is a simple process and can be done quickly. However, if you continue to have issues with your PIN, it is best to contact Dell customer support for further assistance.

Extra Information : Resolving NGC Folder Issues with a Windows Installation Disk

If you have tried the previous method of removing the NGC folder using a Windows installation disk and were unsuccessful, there are additional steps you can take to resolve the issue. Follow these instructions:
Step 1: Change permissions for the NGC folder.
If the previous method did not work, you can try altering the permissions for the NGC folder. Here’s how:
- Insert the Windows Installation Media into your Dell laptop and restart the computer.
If you do not have a Windows Installation media, you may download Windows Installation Creation Tools here:
Windows VersionDownload LinkRequirement
Windows 7https://learn.microsoft.com/lifecycle/products/windows-7PC with a working Internet connection/ a blank USB flash drive or DVD with at least 8 GB of available storage space/ a product key
Windows 8/8.1https://www.microsoft.com/software-download/windows8Same to above
Windows 10https://www.microsoft.com/software-download/windows10Same to above
Windows 11https://www.microsoft.com/software-download/windows11Same to above
- Press the appropriate key (usually F12) to access the boot menu and select the Windows Installation Media as the boot device.
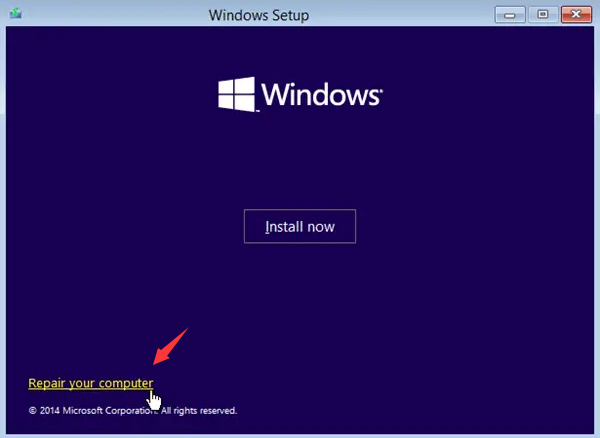
- When the Windows Setup screen appears, choose your language preferences and click “Next“. Then, click on “Repair your computer” in the bottom left corner.

repair your computer windows 10

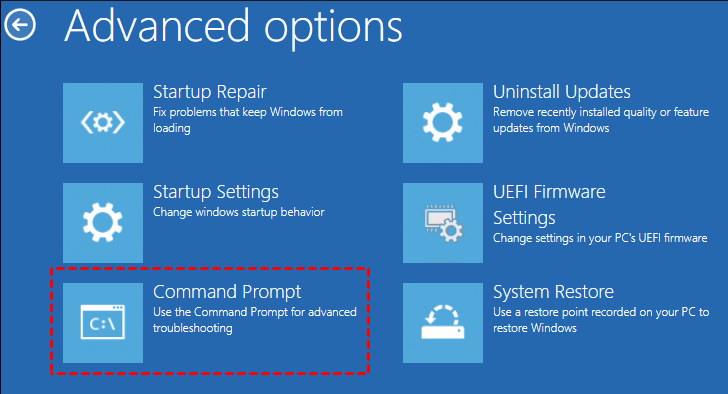
- Select Troubleshoot, followed by Advanced options, and then Command Prompt to open the Command Prompt window.

Select Command Prompt

- Navigate to the following path:

cd C:\Windows\ServiceProfiles\LocalService\AppData\Local\Microsoft\NGC

Step 2: Reset the permissions for the NGC folder.
- In the Command Prompt window, type the command:

del /F /Q /A *

- Press Enter to execute the command and wait for the process to complete.
- Once the process finishes, restart your Dell laptp to check if you can now use the PIN login option on your Dell laptop.
By changing permissions and resetting the permissions for the NGC folder, you may be able to remove the NGC folder effectively and regain access to the PIN login option on your Dell laptop. If you are still facing difficulties with resetting your PIN or need further assistance, keep reading to explore additional solutions.

Method 3 : Resetting Dell Laptop PIN with Windows Built-in Password Reset Disk

In the previous chapter, we discussed how to resolve NGC folder issues with a Windows installation disk as one of the solutions for resetting the PIN on a Dell laptop. However, if you do not have a Windows installation disk, there is another method that you can use – the built-in password reset disk in Windows. In this chapter, we will guide you through the steps on how to use this method to reset your Dell laptop PIN.
To begin with, let’s understand what a password reset disk is. It is a special file that contains an encrypted version of your password. This file can be created and saved to a USB flash drive or a floppy disk. Once created, it can be used to reset your password in case you forget it. Now, let’s see how to use this password reset disk to reset the PIN on your Dell laptop.
Tips:Note: To create a password reset disk for your Windows account, you must be logged in and remember your current password. The password reset disk can only be used to reset the password for your account.
If you forget your password and have not created a password reset disk beforehand, you can use a third-party universal password reset disk, such as Renee PassNow, to reset your password.
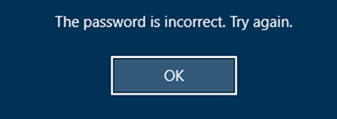
Step 1: Turn on your computer and enter an incorrect password on the login screen.
windows login password is incorrect
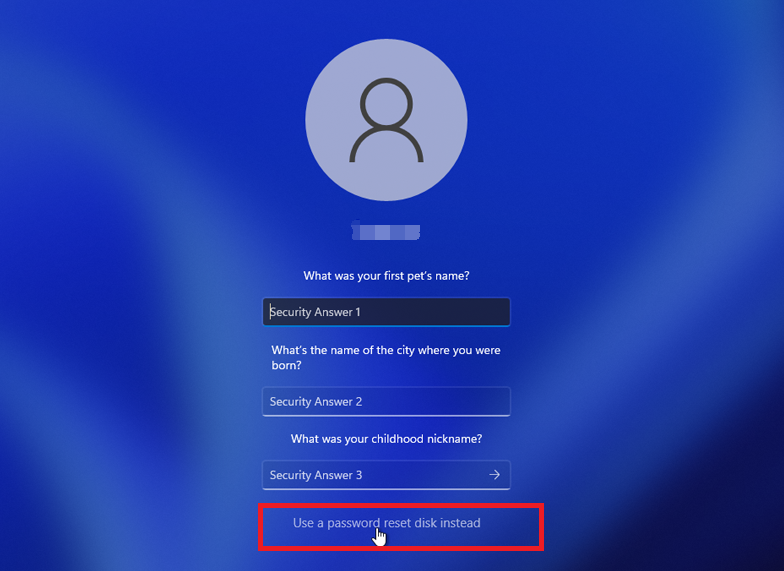
Step 2: After a few failed attempts, a “Use a password reset disk instead” option will appear. Click on it.
windows login Use a password reset disk instead
Step 3: Follow the instructions on the screen, and when prompted, insert the password reset disk you created earlier.
Note: To reset the password of the current account, you must use a password reset disk created specifically for that account. Using a password reset disk created for another account will not work.
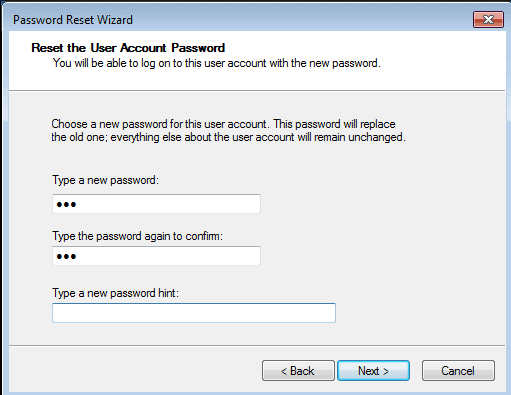
Step 4: Select the password reset disk from the options provided and click “Next”.
Step 5: Enter your new password and confirm it. You can also provide a hint for your new password if desired.
Windows Password Reset Disk Wizard
Step 6: Click “Next” and then “Finish” to complete the password reset process.
It is important to note that the password reset disk can only be used to reset the PIN for the specific user account that it was created for. Therefore, if you have multiple user accounts on your laptop, you will need to create a password reset disk for each account.

Method 4: Using Renee PassNow to Reset Account Password on Dell Laptop

In the previous chapter, we discussed how to reset a Dell laptop PIN using the built-in password reset disk in Windows. However, what if you don’t have a password reset disk or it’s not working? Fear not, there is another method that you can use to reset your Dell laptop account password – using a third-party tool called Renee PassNow.
Renee PassNow is a powerful software that can help you reset forgotten or lost passwords on your Windows computer, including Dell laptops. It works by creating a bootable USB or CD that you can use to reset your account password. So even if you can’t log in to your Dell laptop, this tool can still come to your rescue.
Here’s a step-by-step guide on how to use Renee PassNow to reset your Dell laptop account password:
Tips:If your account is Microsoft Account, Renee PassNow will convert this account to Local account. After resetting login password, you need to connect your account to your Microsoft Account again.
To reset your Windows password using Renee PassNow, follow these steps:
Step 1: Download and Install Renee PassNow
Start by downloading Renee PassNow from the official website and install it on a different computer that you can access. You can choose the appropriate version based on your computer’s operating system.
Renee PassNow – Professional Windows System Rescue Tool

Remove Windows Login Password 3 steps for whole password remove process.

Recover the files Recover the deleted files without Windows system.

Transfer the data Transfer the important files of the computer with system.

Fix Windows startup error Fix various Windows startup failures or crashes.

Erase disk Completely erase disk files which will not be restored.

Remove Windows Login Password 3 steps for whole password remove process.

Recover the files Recover the deleted files without Windows system.

Transfer the data Transfer the important files of the computer with system.

Free TrialFree TrialNow 2000 people have downloaded!
Step 2: Create a Bootable USB or CD/DVD
Launch Renee PassNow and insert a USB flash drive or blank CD/DVD into the computer. Select the option to create a bootable media. Follow the on-screen instructions to complete the process.
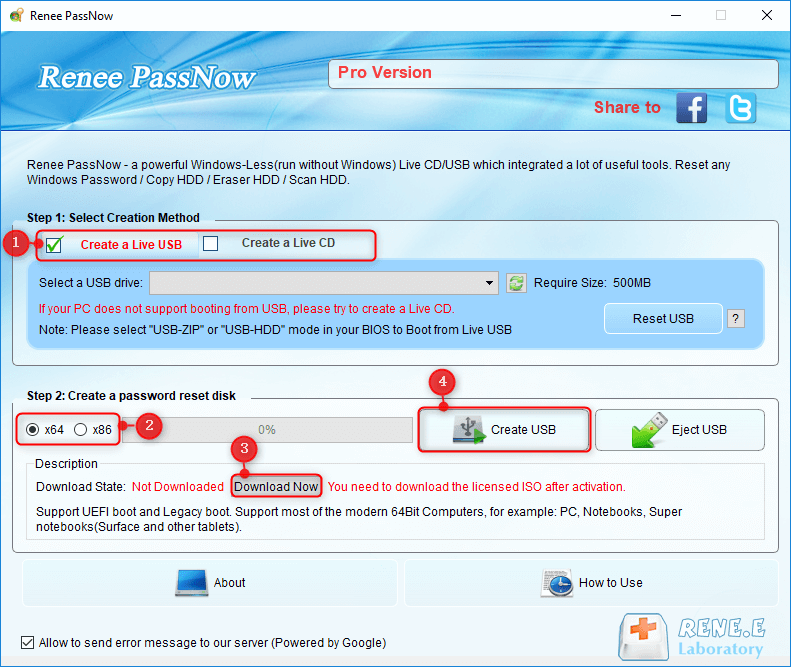
Create New Windows 10 Password Reset Disk with Renee PassNow
Step 3: Boot the Locked Server from the Bootable Media
Insert the bootable USB or CD/DVD into the locked Windows computer. Restart the computer and enter the BIOS settings by pressing the appropriate key (usually F2 or Delete). Configure the boot order to prioritize the bootable media.
Common Server:
Server TypeEnter boot menu method
DELLPress the F12 key repeatedly before the Dell logo appears on the screen.
HPPress the F9 key multiple times when the HP logo is displayed.
Common Computers:
BIOS NameEnter boot menu method
DellF12 or F2
Boot the target PC with the created password reset USB/CD/DVD.
Step 4: Select password reset function
After successfully booting from the bootable media, Renee PassNow will load. Select “PassNow!” function after booting from the new created Windows password reset disk.
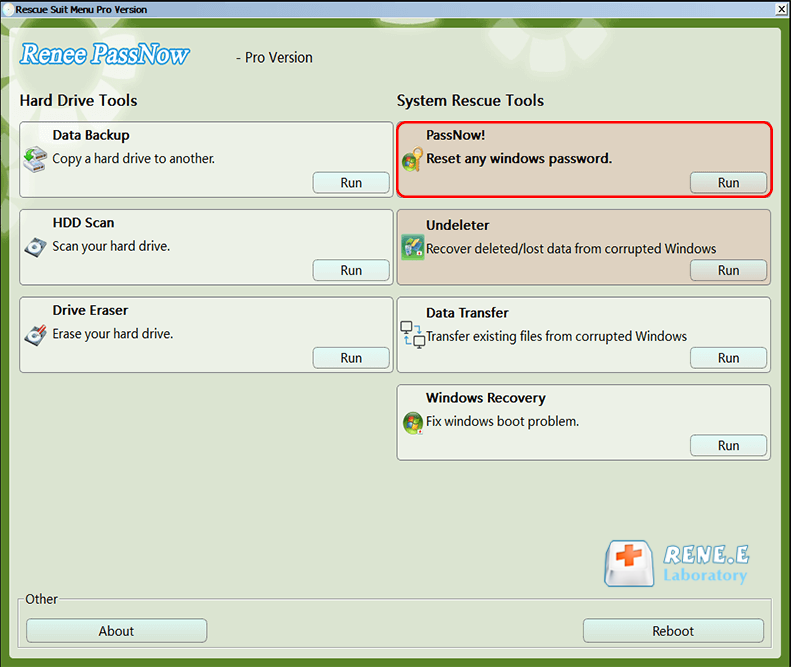
After loading into main interface, please select the “PassNow!” function.
Step 5: Resetting the Password
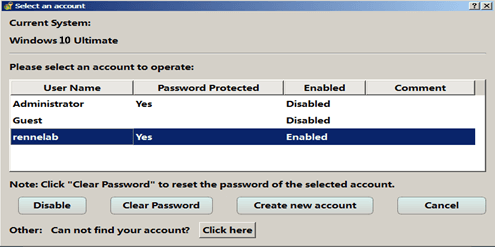
Choose the user account for which you want to reset the password. Then, click on the “Clear Password” button. Renee PassNow will remove or reset the password for the selected user account.
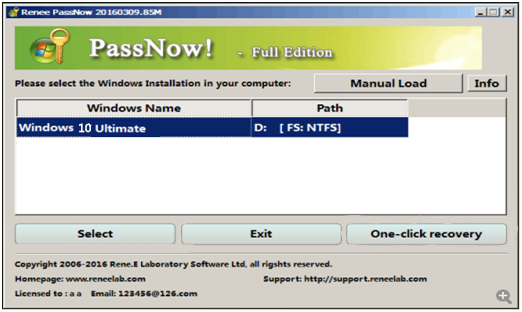
Select target Windows system in the list
Select target user account in the list
Step 6: Reboot the Dell PC
That’s it! You can now remove the bootable medium and restart your Dell laptop. You should be able to log in to your account without any password now. Make sure to create a new password once you are logged in to avoid any security risks.
Using Renee PassNow is a convenient and effective way to reset your Dell laptop account password. However, keep in mind that this tool can only be used on your own computer or with the owner’s permission. It should not be used for any malicious purposes.
If you encounter any issues or errors while using Renee PassNow, you can reach out to their customer support for assistance. They also provide a step-by-step user guide on their website that you can refer to for more information. With this method, you can quickly and easily regain access to your Dell laptop when you forget your account password.
Tips:Renee PassNow is a third-party tool that can be used to reset account passwords on Dell laptops. It creates a bootable USB or CD to reset the password. Make sure to create a new password after resetting to avoid security risks.

Method 5: Using Windows Installation Media to Reset User Password

When faced with the challenge of resetting a user password on a Dell laptop running Windows 11, you can utilize the Windows Installation Media to replace Utilman.exe with CMD.exe. This approach allows you to access the Command Prompt and reset the password without the need for a disk. Here is a step-by-step guide:
Step 1: Boot Windows 11 to Command Prompt
1. Insert the Windows Installation Media into your Dell laptop and restart the computer.
If you do not have a Windows Installation Media, you may download Windows Installation Creation Tools here:
Windows VersionDownload LinkRequirement
Windows 7https://learn.microsoft.com/lifecycle/products/windows-7PC with a working Internet connection/ a blank USB flash drive or DVD with at least 8 GB of available storage space/ a product key
Windows 8/8.1https://www.microsoft.com/software-download/windows8Same to above
Windows 10https://www.microsoft.com/software-download/windows10Same to above
Windows 11https://www.microsoft.com/software-download/windows11Same to above
2. Press the appropriate key (usually F12) to access the boot menu and select the Windows Installation Media as the boot device.
3. When the Windows Setup screen appears, choose your language preferences and click “Next“. Then, click on “Repair your computer” in the bottom left corner.
4. Select Troubleshoot, followed by Advanced options, and then Command Prompt to open the Command Prompt window.
5. If prompted, select the user account you want to reset the password for and provide the necessary credentials.
Step 2: Replace Utilman.exe with CMD.exe
1. In the Command Prompt window, type the following command to navigate to the Windows system directory:

cd C:\Windows\System32

2. Rename the Utilman.exe file to Utilman.exe.bak by entering the command:

ren Utilman.exe Utilman.exe.bak

3. Copy the CMD.exe file and name it Utilman.exe by using the following command:

copy cmd.exe Utilman.exe

4. Close the Command Prompt window and remove the Windows Installation Media from your Dell laptop.
Step 3: Reset Windows 11 Password
1. Restart your Dell laptop and let it boot into the Windows 11 login screen.
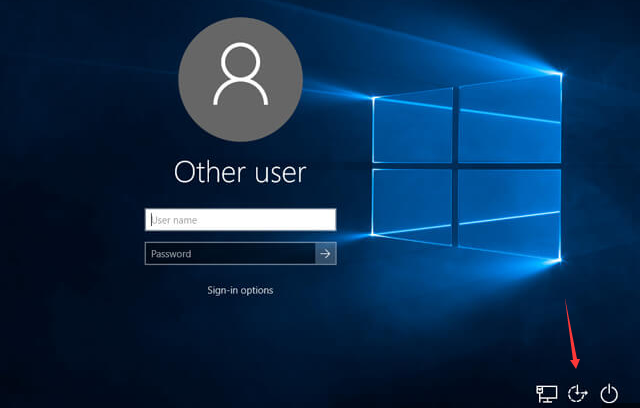
2. Click on the “Ease of Access” icon in the bottom right corner of the screen, usually represented by a person with a wheelchair.
ease of use button in Windows login screen
3. The Command Prompt window will open. In the Command Prompt, type the following command to reset the password for the desired user account:

net user "username" "newpassword"

Replace “username” with the actual username of the account and “newpassword” with the desired new password (without the quotation marks).
4. Once the password is reset successfully, close the Command Prompt window.
By following these steps, you can effectively use Windows Installation Media to replace Utilman.exe with CMD.exe, providing an alternative method to reset the user password on a Dell laptop running Windows 11. It’s important to note that while this method can be useful, it requires proper authorization and responsible usage.

Error codes you may encounter when logging in with your PIN

When logging in to your Dell laptop using a PIN, you may encounter various error codes that can prevent you from accessing your device. These error codes indicate specific issues with the PIN setup process, and understanding their meaning can help you troubleshoot and resolve the problems. In this chapter, we will discuss some common error codes you may come across when logging in with your PIN on a Dell laptop.
Error Code 0×80070032: This error message, “Something went wrong, and we couldn’t set up your PIN,” suggests a problem with setting up the PIN on your Dell laptop. To resolve this issue, you can try a few troubleshooting steps. Firstly, attempt to create a PIN again by following the PIN setup process. If that doesn’t work, sign out of your account and sign back in. Finally, you can also try restarting your device to see if it resolves the error.
Error Code 0x801C03: This error code indicates that you are not authorized to enroll in the PIN. It is essential to confirm if you have permission to set up Windows Hello for Business. If not, request the necessary permission from your IT admin to complete the process.
Error Code 0x8009002A: This error suggests that your computer is running out of memory. To mitigate this error, close any large programs that might be consuming memory, and then try running the PIN setup process again.
Error Code 0×80090036: This error indicates that the user canceled an interactive dialog during the PIN setup process. The recommended solution is to try the setup process again and ensure that you complete all the necessary steps without canceling any dialogs.
Error Code 0x8009002D: This error message, “Something went wrong, skip now, and try again in some time,” implies an internal error during the PIN setup. In such cases, it is advised to try the setup process again after waiting for some time. If the issue persists, you may need to contact Microsoft Support for further assistance.
Error Code 0×80090029: This error code relates to issues with the Trusted Platform Module (TPM) on your device. To resolve this, sign in to your Dell laptop using an administrator account and open the Microsoft Common Console Document by typing “tpm.msc” in the Start menu. From the Actions pane, select “Prepare the TPM” to complete the TPM setup. If the error persists, try rebooting the device or running the Clear-TPM command to reset the TPM.
Error Code 0×80090035: This error occurs when your organization’s policy mandates TPM, but your device does not have TPM. To resolve this, you need to change the Windows Hello for Business policy to not require a TPM. This step will allow you to create a PIN without the TPM requirement.
Error Code 0x801C03EB: This error code suggests that the server response HTTP status is not valid. To resolve this, sign out of your account and sign back in. If the issue persists, it is recommended to contact Microsoft Support for further assistance.
Error Code 0x801C03EC: This error code indicates an unhandled exception from the server. The recommended solution is to sign out of your account and sign back in. If the error persists, contacting Microsoft Support might be necessary.
Error Code 0x801C03ED: This error code suggests that multi-factor authentication is required for a “ProvisionKey” operation, but it was not performed. To resolve this, sign out of your account and sign back in. If the issue persists, unjoin the device from Azure AD and then rejoin. Make sure that the user has permissions to join Azure AD.
Error Code 0x801C03EE: This error code indicates that the attestation process failed. The recommended solution is to sign out of your account and sign back in. If the error persists, further troubleshooting might be required.
Error Code 0x801C03EF: This error code suggests that the AIK (Attestation Identity Key) certificate is no longer valid. To resolve this, sign out of your account and sign back in. If the error persists, additional troubleshooting steps might be needed.
Error Code 0x801C03F2: This error code implies that Windows Hello key registration failed. It could be related to duplicate attributes preventing Dirsync or other issues. To resolve this, refer to the duplicate attributes preventing Dirsync documentation and make sure the necessary changes have been made. If no sync conflict exists, verify that the “Mail/Email address” in Azure Active Directory and the Primary SMTP address are the same in the proxy address.
Error Code 0x801C044D: This error code suggests that the authorization token does not contain the device ID. To resolve this, unjoin the device from Azure AD and rejoin. If the issue persists, check the network and credentials and sign out and sign back in.
Error Code 0x801C044E: This error code indicates a failure to receive user credentials input. The recommended solution is to sign out of your account and sign back in. If the error persists, further troubleshooting might be required.
Error Code 0x801C0451: This error code suggests a user token switch account. To resolve this, delete the Web Account Manager token broker files located in %LOCALAPPDATA%\Packages\Microsoft.AAD.BrokerPlugin_cw5n1h2txyewy\AC\TokenBroker\Accounts\*.*\ and reboot your device.
Error Code 0x801C03EE (Additional Solution): If none of the above methods work, you can also try enabling the hidden Built-in Administrator account
Tips:Ensure that you have permission to set up Windows Hello for Business. Additionally, if you encounter a user token switch account issue, try deleting the Web Account Manager token broker files and enabling the hidden Built-in Administrator account as alternative solutions.

Conclusion

In conclusion, resetting a Dell laptop PIN can be a frustrating and time-consuming process. However, with the solutions outlined in this article, you can overcome common issues and successfully reset your PIN. From using the Microsoft account online to the Windows built-in password reset disk, there are various options to choose from depending on your situation. For those facing the PIN login option as the only available option, removing the NGC folder through a Windows installation disk can be an effective solution. And for a reliable and efficient solution, Renee PassNow is highly recommended. Don’t let a forgotten PIN slow you down, try out these methods and get back to using your Dell laptop with ease.