author avatar
    Senior Program Developer
 

Summary
Learn about common reasons for external hard disk damage and discover practical external hard drive repair software to restore it. Protect your valuable data and minimize loss.


external hard drive repair software

I. What are the common causes of damage to the external hard disk?

The common reasons for the damage of the external hard disk are as follows:
●Malicious software or virus attack: The external hard disk may be connected to many different computer devices, and the probability of virus infection is high.
● Bad sectors appear on the hard disk: As the usage time increases, bad sectors may appear on the hard disk.
●Sudden shutdown of the computer system: Sudden power failure will cause the external hard disk to exit abnormally, so it is very easy to cause equipment damage.
●Physical damage to equipment caused by human factors: such as equipment falling or being bumped.
●Using external hard disk in extreme environment: When the external hard disk is used in an environment higher than 60 degrees Celsius, it is extremely prone to failure.
After understanding the reasons that may cause damage to the external hard drive, let’s recommend several practical mobile hard drive repair tools.

II. What are the practical external hard disk repair software?

1. Windows built-in hard disk repair tool

When the external hard disk fails, you can first try to use Windows built-in tools to check and repair hard disk errors. Here’s how to do it in detail:
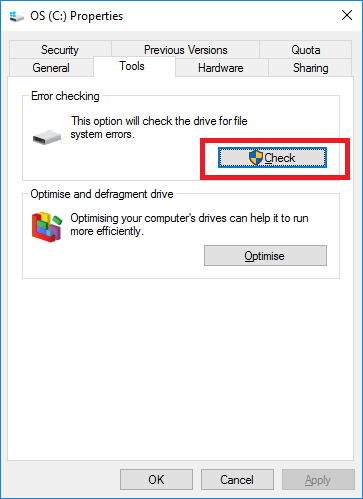
Step 1: Open “My Computer/This Computer”, right-click the removable hard disk to be repaired and select (Properties). Switch to the (Tools) option in the Properties window and click the (Check) button.
check disk
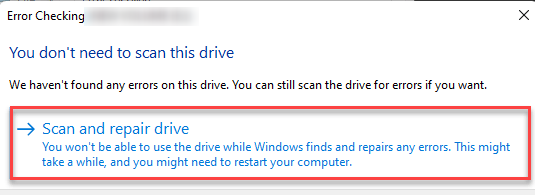
Step 2: Next, select the (Scan and repair drive) option in the Error Checking interface, then wait for the scan and repair.
scan and repair SD card

2. Chkdsk utility

If your external hard disk has been damaged due to bad sectors, Chkdsk is the solution you need. Click here to access more information about Chkdsk. In order to use the Chkdsk utility on a removable drive, simply follow these steps:
Step 1: Connect the external hard disk to the computer, directly search (cmd) in the search box in the lower left corner, and select (run as administrator) to open the command prompt tool.
run as administrator
Step 2: In the opened command prompt window, enter the command chkdsk X: /r /f (X refers to the letter of the drive; /r and /f are the chkdsk parameters). Then, press (Enter) to fix the error.
run chkdsk

3. Professional third-party external hard disk repair software

Currently, there are numerous options available for professional third-party external hard disk repair software on the market. These include popular choices like HDD Regenerator, SpinRite, DiskInternals Partition Recovery, and EaseUS Partition Master. While you have the freedom to select whichever one suits your personal preferences, it is advisable to first try the first two methods for safety purposes. If the issue persists, you can then turn to third-party tools for assistance.
Given the potential reasons for external hard disk failure and common remedies, it is wise to take preventative measures beforehand to mitigate personal losses and avoid being taken by surprise when a malfunction arises.

III. (Extended reading) How to prevent hard disk damage and restore lost data on hard disk?

1. How to prevent hard disk damage?

The hard drive is a delicate piece of computer hardware that is susceptible to damage and failure for various reasons. To ensure its longevity, there are certain precautions you can take to prevent damage and potential data loss.
● Frequently run the CHKDSK command to check and repair hard disk errors.
●Clean up viruses with antivirus software in time.
● Frequently defragment mechanical hard drives.
●When the computer is in normal use, avoid using the power button to force shutdown.
●Back up important data on the hard disk regularly. (It is recommended to use an external storage device to save the backup file)
●In the case of data loss, it is vital to promptly utilize specialized data recovery software to retrieve lost data from the hard drive. It is crucial to avoid using the hard disk after experiencing data loss, as storing new data can lead to data overwriting and hinder the successful recovery of old data.
If you are experiencing data loss due to a hard disk failure, consider using professional data recovery software to retrieve your lost data. One highly recommended option is Renee Undeleter. This software is not only fully functional, but also user-friendly. Let’s delve into its features below.

2. How to restore the lost data in the hard disk?

Renee Undeleter is a software specially used to restore various data files. When you accidentally delete important files, empty the recycle bin, or format the disk/storage, you can use this tool to retrieve the lost data. The software covers four functional modules, including file recovery, format recovery, partition recovery and image creation. Therefore, it can help you solve all possible data loss problems that may occur during system use in an all-round way, which is very convenient.
Hot Topic - ADsRenee Undeleter – Simple & Powerful Software for Data Recovery

Easy to use Recover data by 3 steps;

Multiple scan modes Fast partition scan, whole partition scan and whole disk scan;

Supported file types Image, video, audio, text, email and so on;

Image creation Create a partition image to read and back up data;

Supported devices SD card, SDHC, SDXC, USB flash drive, hard disk and computer.

Easy to use Recover data by 3 steps;

Multiple scan modes Fast partition/whole partition/whole disk scan;

Supported devices SD card/USB/hard disk.

Free TrialFree TrialFree Trial 800 people have downloaded!
Restoring data with Renee Undeleter is very simple, the steps are as follows:
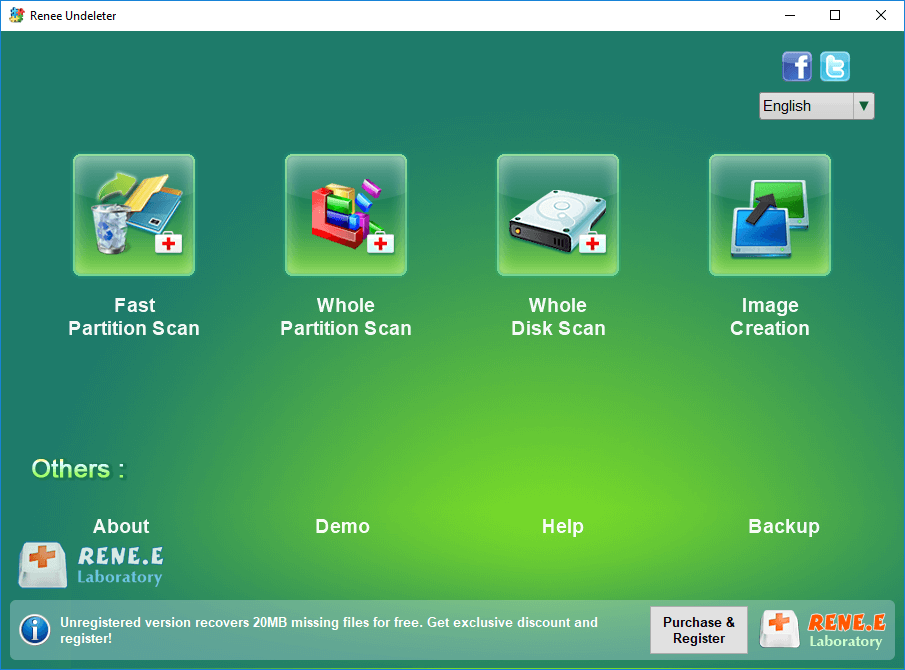
Step 1: Download, install, and run Renee Undeleter, select the (Whole Disk Scan) option on the main interface.
Note: Do not install on the disk that needs to restore data, so as not to cause data overwriting.
select whole disk scan in renee undeleter
Data recovery function introduction:
Fast Partition Scan – Quickly retrieve files lost due to accidental deletion or emptying the recycle bin.
Whole Partition Scan – Quickly recover files lost due to inaccessible or formatted partitions.
Whole Disk Scan – Analyze and get partition information and perform a full scan of the entire partition.
Image Creation – You can create a mirror image for a partition to back up the current partition state.
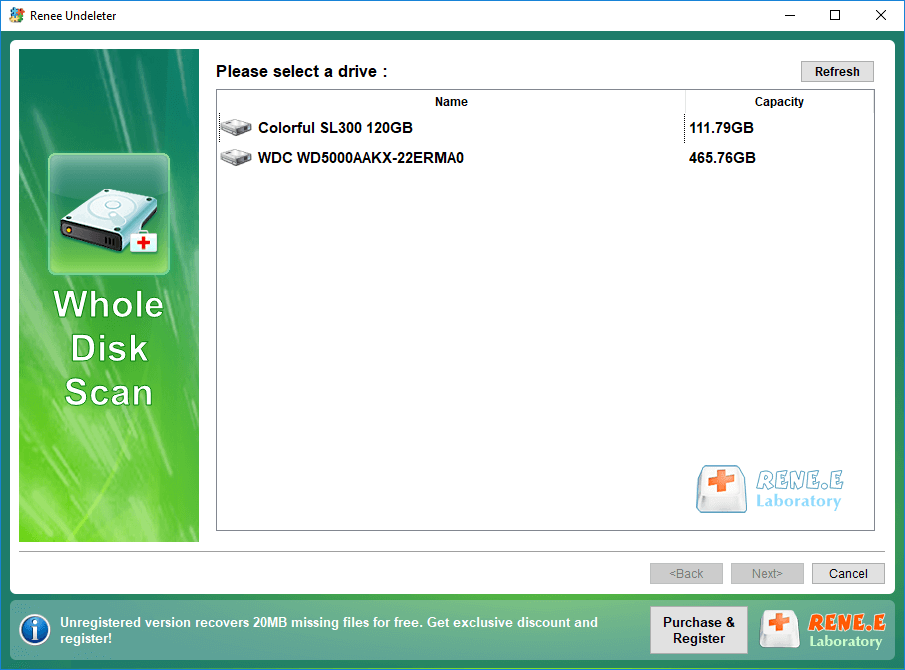
Step 2: Select the disk to be scanned, and click (Next).

Choose the (default) option on the advanced setting interface.

select a disk to recover in renee undeleter
Step 3: After that, the software will analyze the disk device. After the analysis, a prompt window of “Select the partition you need to scan” will pop up.

You can select the corresponding partition according to your needs. If you don’t select it, all partitions will be scanned, which will take longer.

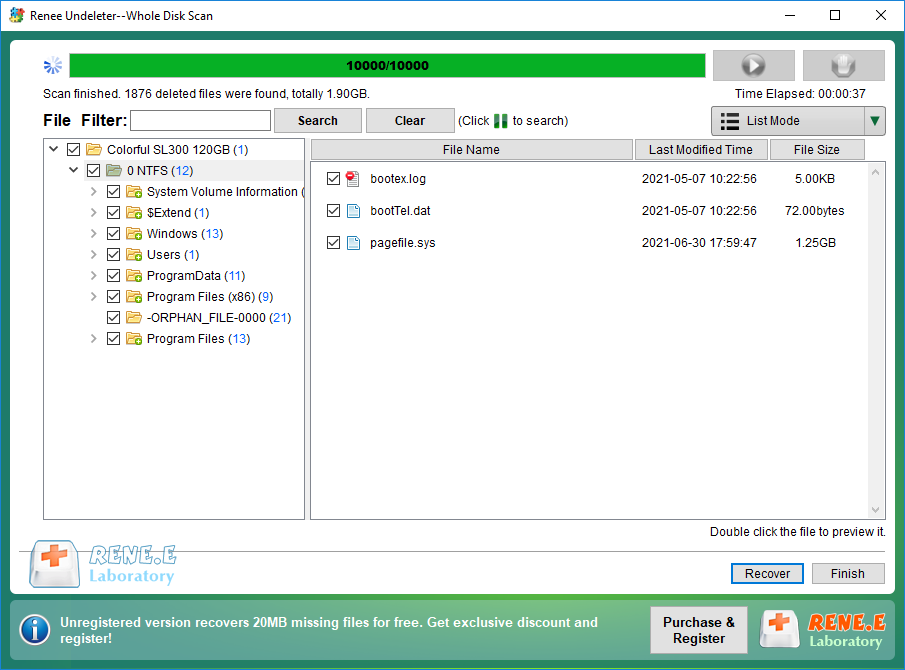
After scanning, you can preview the files on the right, select the files you need to restore, and click the (Recover) button in the lower right corner to restore the selected files.

select taget files to recover with renee undeleter
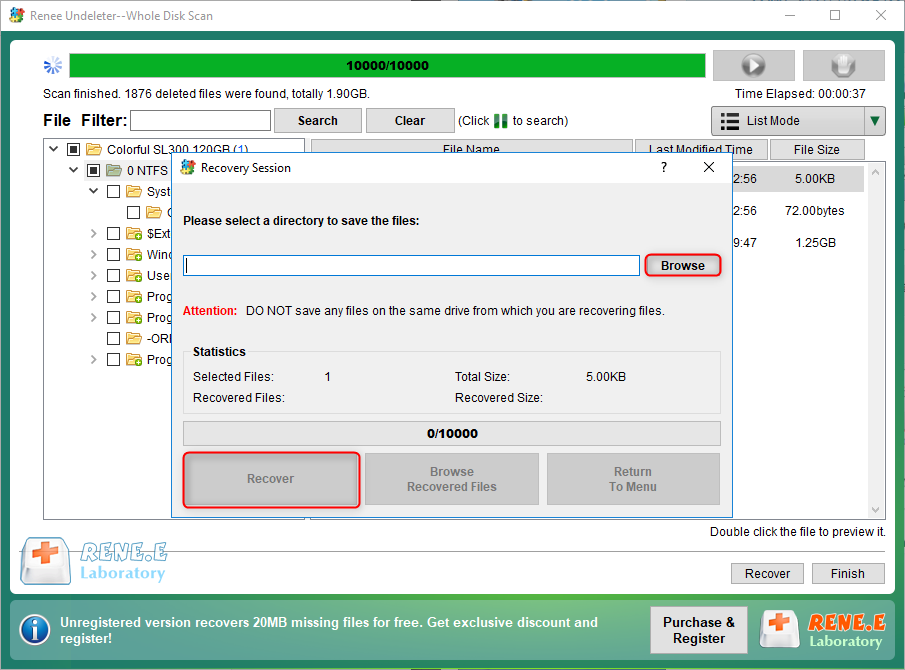
Step 4: Next, select the target folder, click (Browse) to select another disk to save the recovered files, and then click the (Recover) button to start the file recovery.
recover files from whole disk scan with renee undeleter