author avatar
    Specialist of Customer Service Dept.
 

Summary
Learn how to analyze and solve hard drive wont power up issues and restore lost data with the help of this article. Keep reading for more information.


hard drive wont power up

I. What are the reasons why the hard disk cannot be started?

The hard disk, a consumable computer accessory, is prone to failure in starting up due to a variety of reasons. This failure may present itself in the form of the hard disk not receiving power, being unable to turn on, or failing to start the computer through the hard disk. In such situations, troubleshooting the root cause can be done by considering the following factors.
●Power failure: When the data cable and power cable of the hard disk are loose, oxidized or broken, the hard disk may fail to start or power off. The easiest way at this time is to try to re-plug the hard disk data cable and power cable, or replace the power cable, data cable and the corresponding interface.
●The driver is not updated: When you do not update the hard disk driver in time, there may also be problems that the hard disk cannot be started or turned on. At this time, you only need to update the driver of the hard disk to the latest.
● Hard drive or SATA interface not enabled: If the BIOS disables the SATA interface or the hard disk drive, then the hard disk with the SATA interface will not be able to start or be opened. At this time, you only need to enable the hard disk drive or the SATA interface in the BIOS. .
●The hard disk is not the first boot device: When you migrate the system to a new hard disk but cannot boot from the new hard disk, it may be caused by not setting the new hard disk as the first boot device, just set it as the first boot device in the BIOS.
●Physical damage: When the hard disk is damaged by external force, such as dropping, impact, etc., it may also fail to start normally. At this time, you need to get a professional maintenance organization to solve it. In order to avoid data loss problems that may be caused by such reasons, it is recommended that you develop a good habit of regularly backing up the data in the device.

II. How to repair the unbootable hard disk?

In addition to replacing the power cord, data cable and the corresponding interface, you can also try the following methods to solve the problem.

1. Update the hard disk driver

If the hard disk cannot be started, it indicates that it has power but is unable to be opened and used properly. To resolve this, you can attempt to update the hard disk driver. Here’s a guide on how to update the driver in a few simple steps.
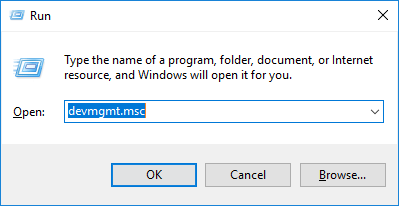
Step 1: Run the Windows computer, connect the hard disk to the computer, and then press the (Windows+R) keys on the keyboard at the same time to open the running window. After entering (devmgmt.msc), click the (OK) button to enter the Device Manager.
open device manager
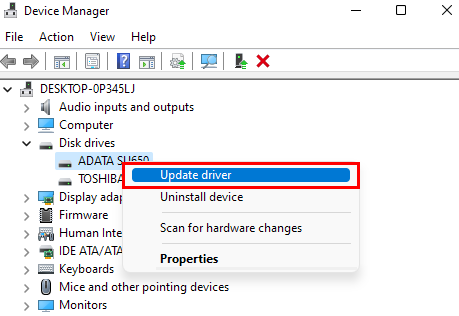
Step 2: Next, in the “Disk Drive”, right-click to select the target hard disk, and select the (Update Driver) option.
update driver-disk
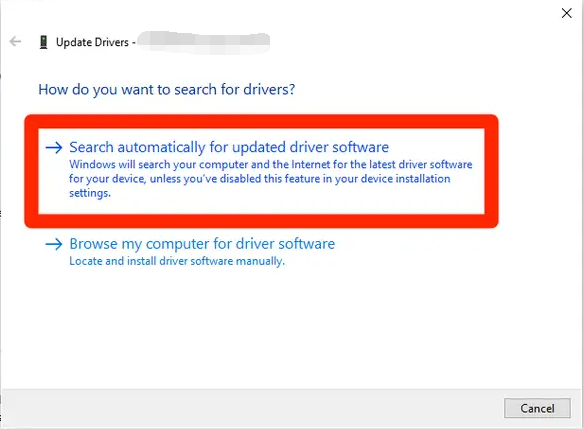
Step 3: Next, select the (Search automatically for updated driver software) option, and then follow the instructions to complete the update. After the driver is updated, restart the device to see if the problem is resolved.
update Driver Confirm

2. Enable hard drive or SATA interface in BIOS

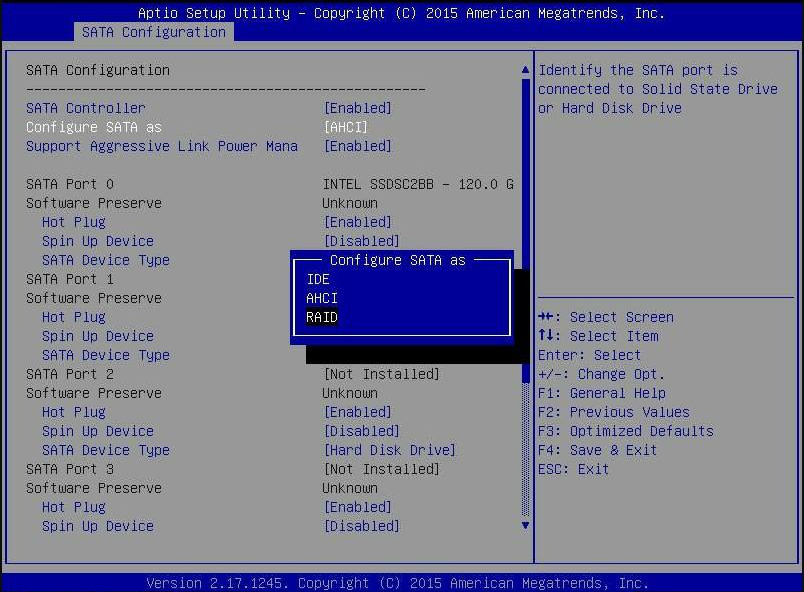
When the hard disk fails to start, the computer is unable to detect it, or it cannot be accessed, you can simply restart the computer and press the BIOS shortcut key (usually F2/Esc/Del) before the Windows lock screen appears. You can refer to different brands of computers enter BIOS and modify the boot sequence. This will allow you to access the BIOS interface and modify the boot sequence. From there, navigate to the (SATA Configuration) section and check if the (SATA Controller) is enabled. You should also ensure that the target hard disk is listed under SATA Port 0/1/2/3 and that the SATA mode is properly configured. If the hard disk still cannot be accessed, you can try switching between (IDE) and (ACHI) modes to determine which one is suitable for your hard disk.
Supplement: IDE is the most compatible mode among the three; AHCI means advanced serial interface, which can give full play to the best performance of the disk, and has functions such as hot swap, NCQ, and TRIM (for solid-state drives); RAID is a disk array mode, which is used to combine multiple physical hard disks into a logical hard disk. If there is only one hard disk, this mode can be ignored.
Enter the SATA Configuration interface
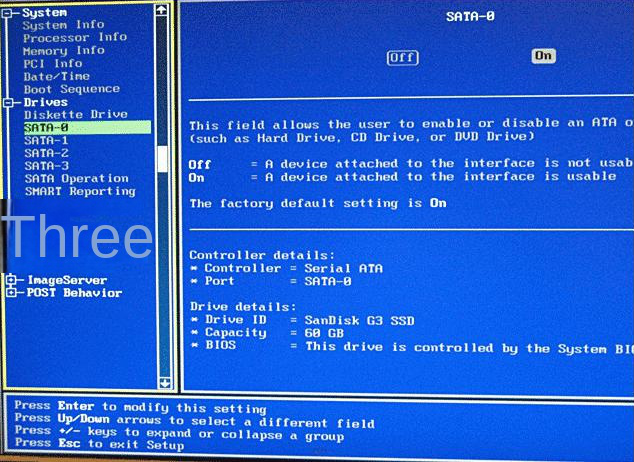
Since the BIOS interface varies with different brands, your BIOS interface may also look like the one below. Please find (Drives)-(SATA-0/1/2/3), and set SATA-0/1/2/3 to (On) to enable the SATA interface, so that the hard disk can be recognized by the computer system.
Set SATA interface

3. Change the boot order in BIOS

After installing the system on a new hard disk, if you are unable to boot from the new hard disk, it could be due to the target hard disk not being set as the first boot option. This issue can be resolved by adjusting the boot sequence in the BIOS. The following steps outline the specific actions to take:
Step 1: Connect the hard drive to the computer, then restart the computer. Press the BIOS shortcut key before the Windows lock screen appears. You can refer to: How to enter the BIOS and modify the boot order of computers of different brands.
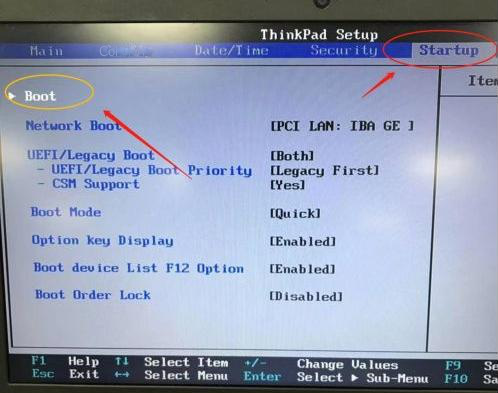
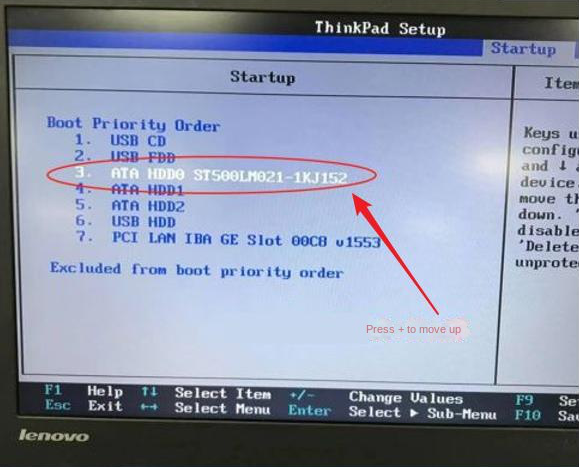
Step 2: On the BIOS page, press the right arrow on the keyboard to move right to the (Startup) tab, then move down to (Boot) and click (Enter).
Enter the bios page
Step 3: After adjusting the target hard disk to the first boot sequence, press (F10) to save, and then press (ESC) to exit the BIOS interface. Finally, restart the computer to see if it can be booted from the target hard disk.
Adjust first boot order

III. How to recover hard disk data?

If it cannot be started/opened normally due to a hard disk failure, and the data in it may be lost, then you can use professional data recovery software to solve the problem. We recommend you to use Renee Undeleter , which supports both Windows and Mac systems, and is easy and effective to operate.

1. What is Renee Undeleter?

Renee Undeleter is a software specially used to restore various data files. When you accidentally delete important files, empty the recycle bin, or format the disk/storage, you can use this tool to retrieve the lost data. The software covers four functional modules, including file recovery, format recovery, partition recovery and image creation. Therefore, it can help you solve all possible data loss problems that may occur during system use in an all-round way, which is very convenient.
Hot Topic - ADsRenee Undeleter – Simple & Powerful Software for Data Recovery

Easy to use Recover data by 3 steps;

Multiple scan modes Fast partition scan, whole partition scan and whole disk scan;

Supported file types Image, video, audio, text, email and so on;

Image creation Create a partition image to read and back up data;

Supported devices SD card, SDHC, SDXC, USB flash drive, hard disk and computer.

Easy to use Recover data by 3 steps;

Multiple scan modes Fast partition/whole partition/whole disk scan;

Supported devices SD card/USB/hard disk.

Free TrialFree TrialFree Trial 800 people have downloaded!

2. How to recover hard disk data with Renee Undeleter?

Restoring data with Renee Undeleter is very simple. The specific steps are as follows:
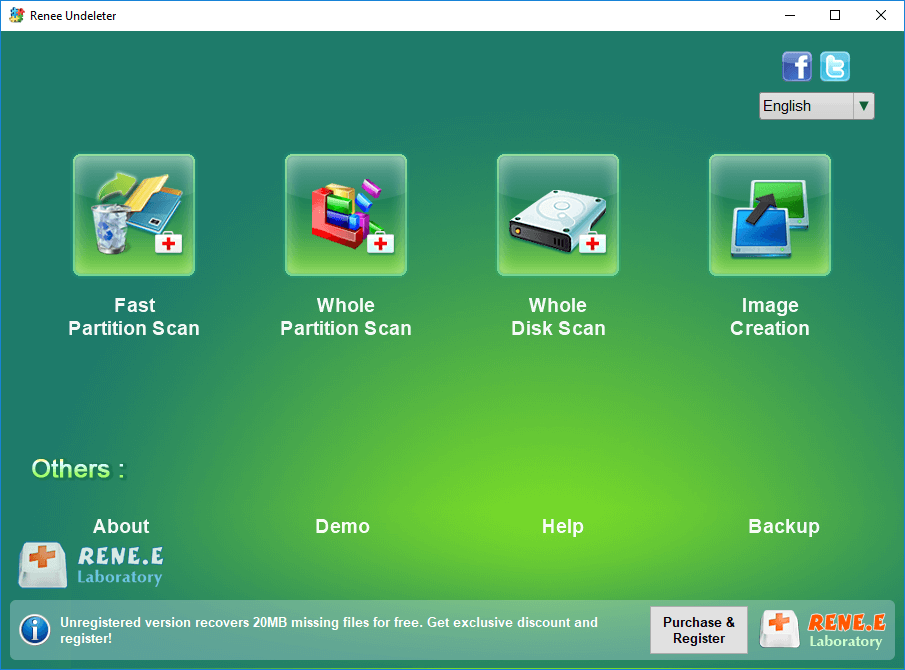
Step 1: Download, install, and run Renee Undeleter. Select the (Whole Disk Scan) option on the main interface.
Note: Do not install on the disk that needs to restore data, so as not to cause data overwriting.
select whole disk scan in renee undeleter
Data recovery function introduction:
Fast Partition Scan – Quickly retrieve files lost due to accidental deletion or emptying the recycle bin.
Whole Partition Scan – Quickly recover files lost due to inaccessible or formatted partitions.
Whole Disk Scan – Analyze and get partition information and perform a full scan of the entire partition.
Image Creation – You can create a mirror image for a partition to back up the current partition state.
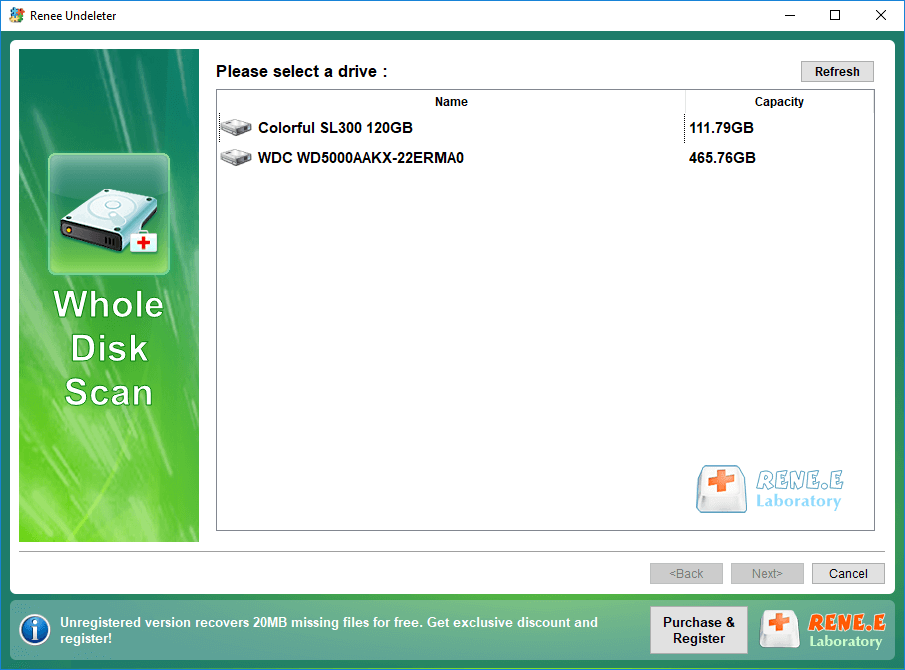
Step 2: Next, select a drive to be scanned, and click (Next).
select a disk to recover in renee undeleter
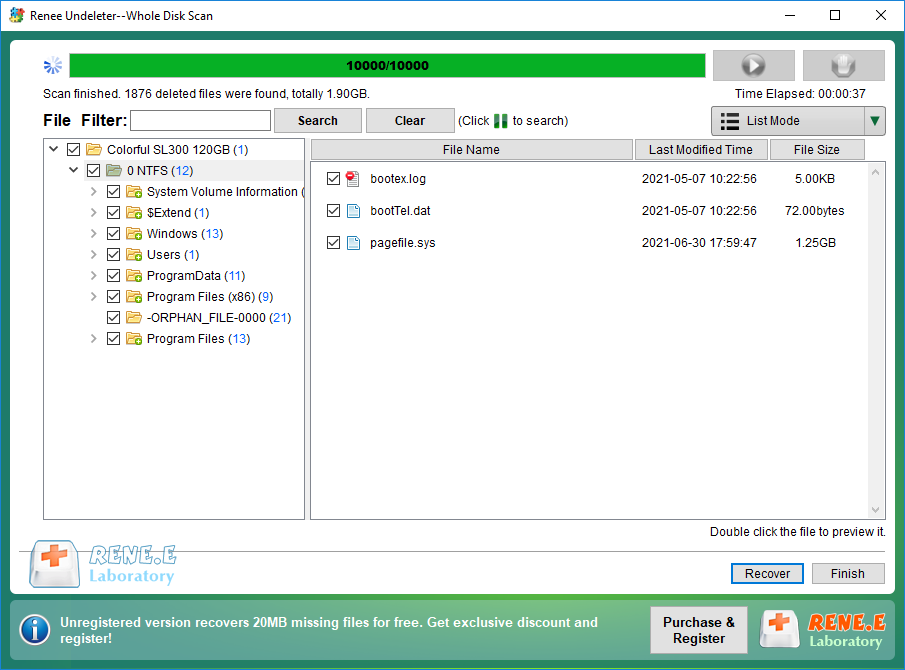
Step 3: The software will analyze the hard disk. After that, a prompt window of “select the partition you need to scan” may pop up. You can select the corresponding partition according to your needs. If you don’t select it, all partitions will be scanned, which will take longer. After scanning, you can preview the files, select the files you need to restore, and click the (Recover) button in the lower right corner to restore the selected files.
select taget files to recover with renee undeleter
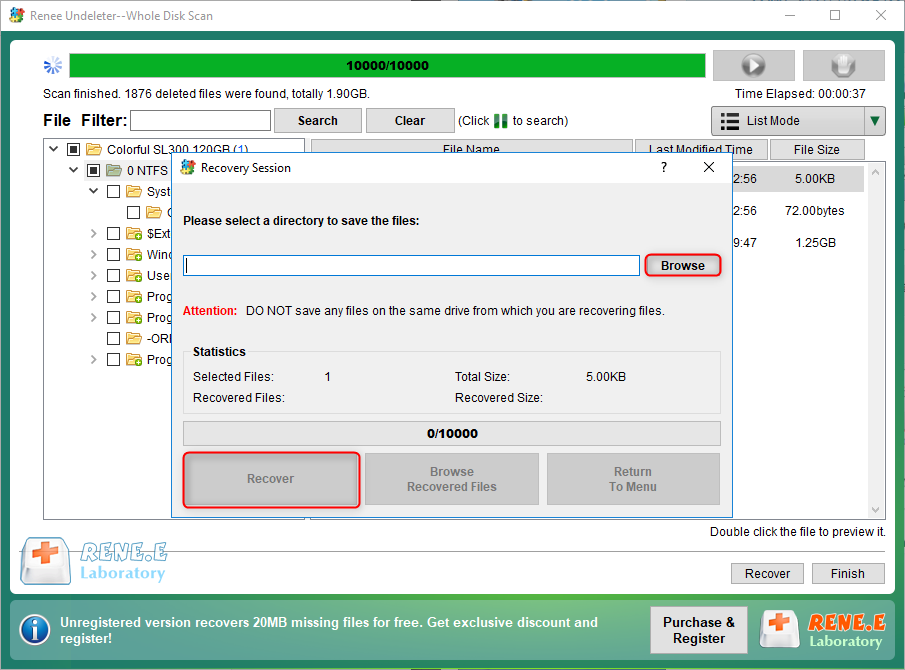
Step 4: Next, select the target folder, click (Browse) to select another disk to save the recovered files, and then click the (Recover) button to start the file recovery.
recover files from whole disk scan with renee undeleter