author avatar
    Senior Product Manager
 

Summary
Discover how to remove the PIN login option for multiple user accounts in Windows 10 with this comprehensive guide. From manual methods to third-party tools, we'll show you the best ways to streamline your login process and enhance security on shared devices.


Windows 10 has quickly become one of the most popular operating systems, with its user-friendly interface and advanced features. However, one major issue that many users face is the need to constantly enter a PIN every time they log into their account. This can be frustrating, especially for those who have multiple user accounts on shared devices. In this article, we will discuss the importance of removing the PIN login option for multiple user accounts on shared devices, and provide a step-by-step guide on how to do so. By following these simple steps, you can save time and make the login process more convenient for all users sharing the same device. So let’s dive in and discover how to remove the PIN login option on Windows 10 for multiple user accounts.

Risks and Concerns with PIN Login for Multiple User Accounts

The use of personal identification numbers (PINs) for login on Windows 10 devices has become increasingly popular due to its convenience and efficiency. However, with multiple user accounts on a single device, there are several risks and concerns that users should be aware of before implementing a PIN login system. In this chapter, we will discuss the potential security risks, privacy concerns, and issues with multiple users accessing the same PIN login.
Potential Security Risks
While PIN login may seem like a secure method of authentication, it actually poses some risks for multiple user accounts. Unlike passwords, which typically require a combination of letters, numbers, and special characters, a PIN is limited to only a few digits. This makes it easier for hackers to guess or brute force their way into a device. Additionally, if a user chooses a simple and easy to remember PIN, it could be easily compromised.
To mitigate these risks, it is important for users to choose a complex and secure PIN, just as they would with a password. This means avoiding obvious combinations, such as birthdates or common number sequences, and using a combination of letters and numbers if possible. Regularly changing the PIN can also add an extra layer of security.
Privacy Concerns for Shared Devices
Another concern with using a PIN login for multiple user accounts is privacy. When a PIN is used to log in, it automatically gives access to any user account associated with that device. This could be problematic for shared devices, such as family computers or work devices. It may allow unauthorized users to access personal or sensitive information, potentially leading to privacy breaches.
To address this concern, it is recommended to use a unique PIN for each user account or to use a different method of authentication, such as a password or fingerprint scan. This will ensure that each user has their own level of privacy and can access their own individual accounts without compromising the security of others.
Issues with Multiple Users Accessing the Same PIN Login
In addition to potential security and privacy concerns, using a PIN login for multiple user accounts can also create issues with user access. As mentioned before, a PIN automatically gives access to all user accounts on a device, which can create conflicts if multiple users are trying to access the device at the same time.
If one user is already logged in with their PIN, another user may be prevented from logging in or may log into the wrong user account accidentally. This can lead to frustration and potential data loss if the wrong user has access to sensitive information. To prevent this, it is important for users to log out of their accounts when they are finished using the device.

Option 1 : Manual Method - Removing PIN Login Option

The PIN login option has become a popular way to access Windows 10, with many users finding it more convenient and secure than traditional password logins. However, for those who share their computer with others or simply want to switch up their login method, removing the PIN option may be necessary. In this chapter, we will discuss the manual method for removing the PIN login option on Windows 10.
Before we dive into the steps for removing the PIN login, it’s important to address the risks and concerns that come with using this type of login for multiple user accounts. As mentioned in the previous topic, there are security concerns with using the same PIN for multiple accounts, as well as the potential for accidental access to sensitive information by other users on the same computer.
Step 1: Accessing the Settings Menu
The first step in removing the PIN login option is accessing the Settings menu on your Windows 10 system. This can be done by clicking on the Windows icon in the bottom left corner of your desktop and then clicking on the gear icon, or by using the keyboard shortcut Windows key + I.
Step 2: Navigating to the Sign-in Options
Once in the Settings menu, click on the “Accounts” tab and then select the “Sign-in options” from the menu on the left side of the screen.
Step 3: Removing the PIN Option
Under the “Sign-in options” section, locate the “PIN” option and click on “Remove” below it. This will prompt a confirmation window asking if you are sure you want to remove the PIN. Click on “Remove” to confirm.
Step 4: Entering Your Password
After confirming the removal of the PIN option, you will be prompted to enter your password to confirm your identity. This is an important security measure to prevent unauthorized changes to your login settings.
Step 5: Sign in with Password
Once you have successfully entered your password, the PIN login option should be removed and you can now login using your password for all user accounts on the computer.
Conclusion
The manual method for removing the PIN login option on Windows 10 is a quick and easy process. It’s important to regularly review your login options and make adjustments as needed for the security and convenience of your user accounts. By following these steps, you can easily remove the PIN option and continue using your password to access your Windows 10 system.

Option 2 : Using Group Policy Editor

If you prefer to use a more advanced method to remove the PIN login option in Windows 10, you can utilize the Group Policy Editor. This tool allows you to make changes to the system settings and policies on your computer. However, please note that this method is only available for Windows 10 Pro, Enterprise, and Education editions, and not for Windows 10 Home.
To get started, press the Windows + R keys on your keyboard to open the Run dialog box. Type

gpedit.msc

and press Enter to open the Group Policy Editor.
Step 1: Accessing the Local Group Policy Editor
On the left pane of the Group Policy Editor, navigate to

"Computer Configuration" > "Administrative Templates" > "System" > "Logon"

Then, on the right pane, locate and double-click on the policy

“Do not display the password reveal button”

Step 2: Enabling the Policy
In the Do not display the password reveal button Properties window, click on the “Enabled” option and then click “Apply” and “OK” to save the changes.
Step 3: Removing the PIN Login Option
After enabling the policy, restart your computer for the changes to take effect. Upon restarting, you will no longer see the option to set up a PIN during login or in the account settings.
Step 4: Reverting the Changes
If you wish to revert back to the default settings and allow the PIN login option to appear again, simply follow the same steps above and select the “Not Configured” option in the Do not display the password reveal button Properties window.
Using the Group Policy Editor is a more efficient way to remove the PIN login option in Windows 10 for users who are comfortable navigating through system settings and policies. However, it is important to note that changes made through Group Policy Editor can have a significant impact on the system, so it is important to exercise caution and follow the steps carefully.

Option 3 : Using Renee PassNow to Remove Login Password and PIN for Administrator Account

In the previous chapter, we discussed an alternative method of using the Group Policy Editor to remove the PIN login in Windows 10. However, if that method does not work for you, or if you are unable to access the Group Policy Editor, there is another solution you can try. This involves using a third-party software called Renee PassNow, which specializes in removing login passwords for Windows accounts.
The first step in using Renee PassNow is to download and install the software on a different computer. This is because you will need to create a bootable USB or CD to run the software on the Windows computer you want to remove the login password from.
Tips:If your account is Microsoft Account, Renee PassNow will convert this account to Local account. After resetting login password, you need to connect your account to your Microsoft Account again.
To reset your Windows password using Renee PassNow, follow these steps:
Step 1: Download and Install Renee PassNow
Start by downloading Renee PassNow from the official website and install it on a different computer that you can access. You can choose the appropriate version based on your computer’s operating system.
Renee PassNow – Professional Windows System Rescue Tool

Remove Windows Login Password 3 steps for whole password remove process.

Recover the files Recover the deleted files without Windows system.

Transfer the data Transfer the important files of the computer with system.

Fix Windows startup error Fix various Windows startup failures or crashes.

Erase disk Completely erase disk files which will not be restored.

Remove Windows Login Password 3 steps for whole password remove process.

Recover the files Recover the deleted files without Windows system.

Transfer the data Transfer the important files of the computer with system.

Free TrialFree TrialNow 2000 people have downloaded!
Step 2: Create a Bootable USB or CD/DVD
Launch Renee PassNow and insert a USB flash drive or blank CD/DVD into the computer. Select the option to create a bootable media. Follow the on-screen instructions to complete the process.
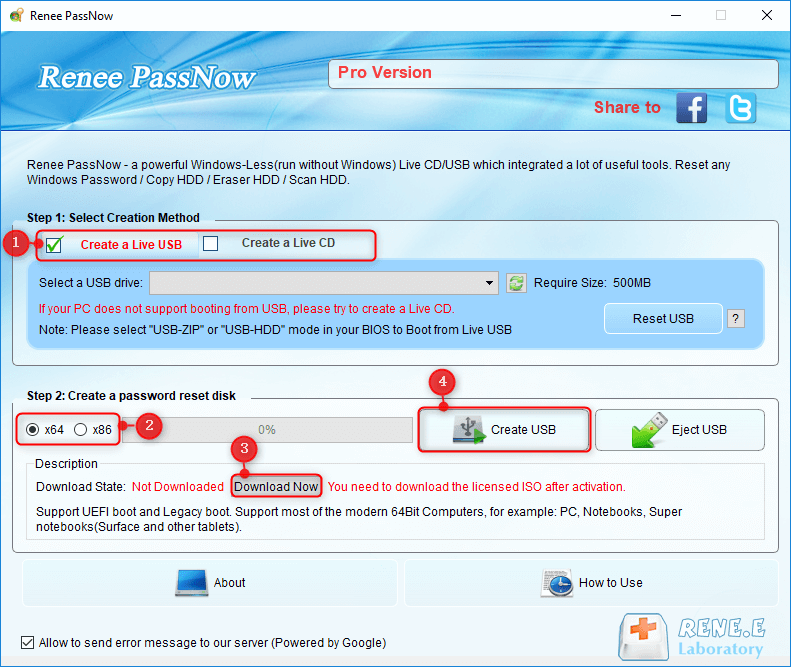
Create New Windows 10 Password Reset Disk with Renee PassNow
Step 3: Boot the Locked Server from the Bootable Media
Insert the bootable USB or CD/DVD into the locked Windows computer. Restart the computer and enter the BIOS settings by pressing the appropriate key (usually F2 or Delete). Configure the boot order to prioritize the bootable media.
Common Server:
Server TypeEnter boot menu method
DELLPress the F12 key repeatedly before the Dell logo appears on the screen.
HPPress the F9 key multiple times when the HP logo is displayed.
Common Computers:
BIOS NameEnter boot menu method
ASRockDEL or F2
ASUSDEL or F2 for PCs/ DEL or F2 for Motherboards
AcerDEL or F2
DellF12 or F2
ECSDEL
Gigabyte / AorusDEL or F2
Lenovo (Consumer Laptops)F2 or Fn + F2
Lenovo (Desktops)F1
Lenovo (ThinkPads)Enter then F1
MSIDEL
Microsoft Surface TabletsPress and hold Power and Volume Up buttons
Origin PCF2
SamsungF2
ToshibaF2
ZotacDEL
HPEsc/ F9 for \`Boot Menu\`/ Esc/ F10/ Storage tab/ Boot Order/ Legacy Boot Sources
INTELF10
Boot the target PC with the created password reset USB/CD/DVD.
Step 4: Select password reset function
After successfully booting from the bootable media, Renee PassNow will load. Select “PassNow!” function after booting from the new created Windows password reset disk.
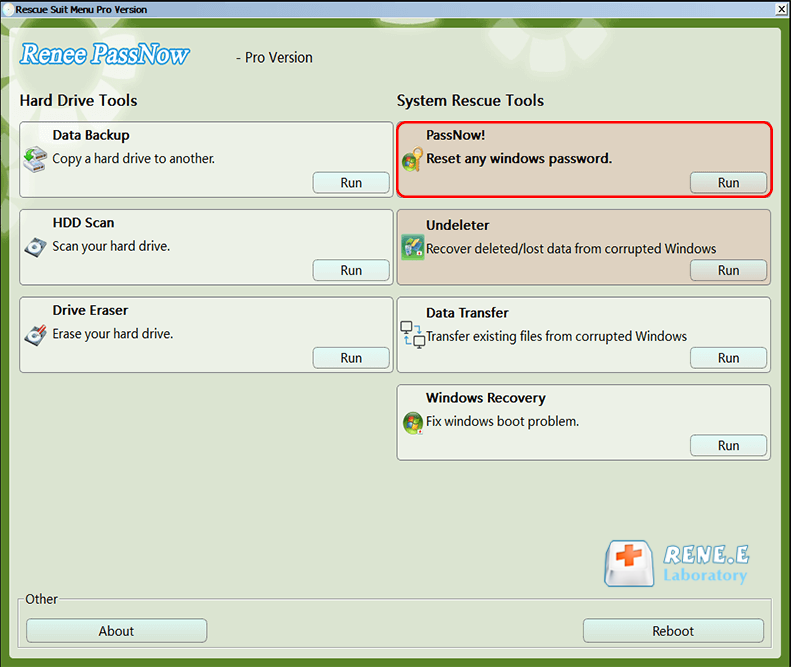
After loading into main interface, please select the “PassNow!” function.
Step 5: Resetting the Password
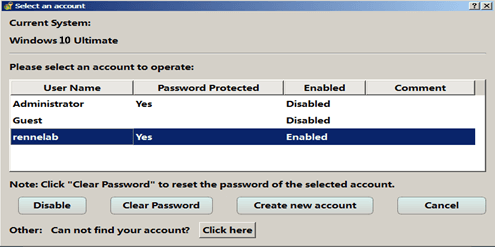
Choose the user account for which you want to reset the password. Then, click on the “Clear Password” button. Renee PassNow will remove or reset the password for the selected user account.
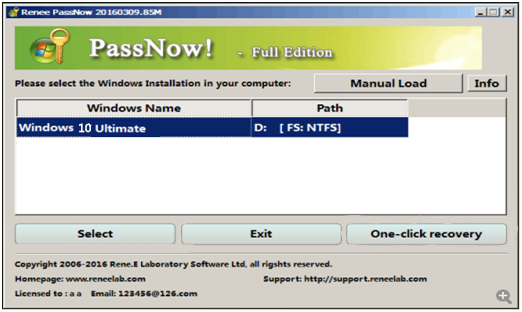
Select target Windows system in the list
Select target user account in the list
Step 6: Reboot the PC
Once the password is reset, remove the bootable media from the PC and restart the computer. You will now be able to log in to Windows Account without a password.
Step 7: Use Option 1 or Option 2 to remove the PIN login
Note: If you do not have an existing Administrator account, you can use Renee PassNow to create a new one and then use it to remove the PIN login.
Using Renee PassNow can be an effective solution for removing the PIN login in Windows 10, especially if you are unable to access the Group Policy Editor. However, it is important to keep in mind that this method involves using a third-party software and it is always recommended to proceed with caution when using such tools.
Pros:
  • Effective solution for removing PIN login in Windows 10
  • Can be used when unable to access Group Policy Editor

Cons:

  • Involves using third-party software
  • Need to purchase a license

Conclusion

In conclusion, the PIN login feature in Windows 10 provides a convenient way for users to access their devices. However, it can pose potential security risks and privacy concerns in shared devices with multiple user accounts. Fortunately, there are various methods to remove the PIN login option, such as the manual method, using Group Policy Editor, and using a reliable tool like Renee PassNow. With Renee PassNow, the process can also be automated, making it a convenient and efficient solution for PIN removal. Overall, it is important to carefully consider the risks and concerns associated with PIN login for multiple users on shared devices and take necessary steps to ensure the security and privacy of your device and data.