I. What are the methods to sync photos from iPhone to Mac
1. Use the phone's own memo to synchronize photos
“Memo” is a built-in application of Apple devices. When you log in with your Apple ID on iPhone and Mac at the same time to ensure that the photos in the device are consistent, you can use “Memo” as a tool for quickly synchronizing and transferring photos.
To add photos to a note on your iPhone, open the Memo app, create a new page, and tap the screen to reveal the Insert Photo option. Select it to import your images from the album into the note. Later, you can quickly access these photos on your Mac by launching the Notes application.
This method allows for the synchronization of photos from a Mac to an iPhone. Simply drag the photos into a note on the Mac, then open the “Notes” app on the iPhone, press and hold the photo for one second, and choose “Save Image” to save it to the iPhone’s photo album.
2. Sync photos via iMessage
iMessage is an application for sending text messages between iPhone devices for free, similar to the SMS function of the carrier. Use iMessage to send photos to yourself, which has the function of synchronizing photo transfer between two devices.
In addition, it should be noted that before photo synchronization, you must first turn on the iMessage function in your iPhone device, that is, find “Settings“-”Information“-”iMessage” and turn on the back button, and at the same time, ensure that the two transfer devices Signed in with the same Apple ID and iCloud is turned on.
The specific operation method is:
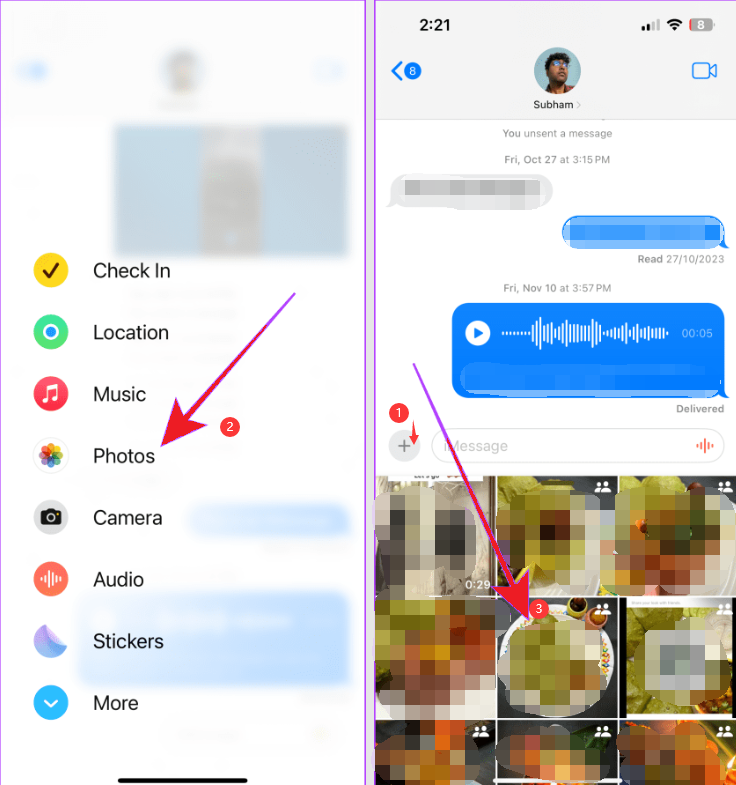
Write your own Apple ID or phone number, name in the recipient’s place, and click the “+” icon in the lower left corner to check the photos to be synchronized in the “Photo Gallery“, and then send it.
At this time, you can go back to your Mac, click on the system’s built-in application “Information”, and you can see the iMessage photos you sent to yourself. Also, this method is suitable for two-way operation, that is, inserting the photo on the Mac into the “Messages” of the application, sending it to yourself, and then receiving it back on the iPhone.
3. Use the iCloud photo function
“iCloud Photos” means that when your device is in a wireless network environment, all photos you take will be automatically uploaded to iCloud, and you can access your photo gallery or download from any device at any time.
Also, if you make any changes to your personal photos on one device, those changes will also appear on your other devices. That is to say, once this function is turned on, the photos are automatically synchronized between the devices, and we can directly view or download any photos on the iPhone from the Mac, eliminating the complicated steps of the synchronization operation.
Before enabling the function, make sure that your iPhone device has been updated to the latest version, and that this device and the Mac that will receive synced photos use the same Apple ID to log in to iCloud.
Turn on the iPhone and find my “AppleID name” at the top of “Settings“, select “iCloud” – “Photos” – “iCloud Photos“. At the same time, go to the Mac, go to “Preferences” – “iCloud“, find “Options” next to “Photos” and select “iCloud Photos“.
Because the photos on both ends of the device are synchronized in real time, if you want to download photos from your Mac, just go to “iCloud.com”, click “Photos”, then select one or more photos to download and click Like Cloud The small icon for .
4. Use third-party cloud applications
This method is actually to borrow third-party cloud applications (such as: Google Drive, Dropbox, Evernote, etc.), just like the use of the “iCloud photo” function, that is, install the third-party cloud platform App on the iPhone and Mac respectively, and synchronize the photos After saving to the above, you can quickly access photos on iPhone and Mac
5. Use the AirDrop function
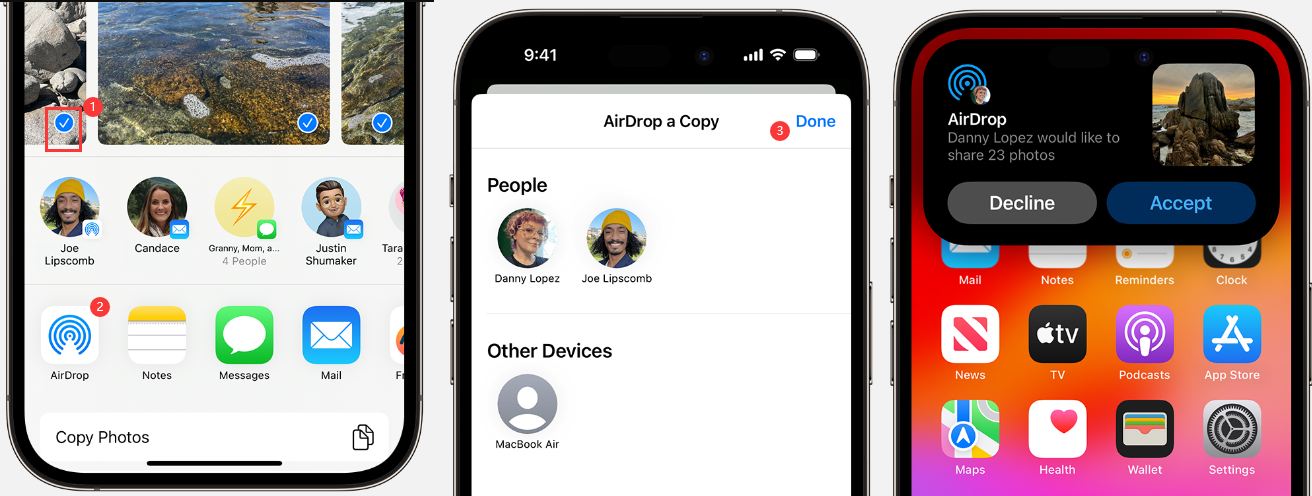
It is very simple to use this method of synchronously transferring photos, let the devices be in the same WiFi network environment, and open the AirDrop search function in the control center on the iPhone.
After finding (Air Teleportation) in the phone (Settings)-(General), select “Contacts Only” or “All People”. Click “Share” in the “Photos” of the iPhone, and you will see your Mac icon appear in AirDrop. Select the photo and click on yourself to transfer the photo to the Mac.
Of course, this method can also be reversed. Go to the Finder sidebar of the Mac and select “AirDrop”, and your iPhone will be searched, and you can drag the photo to your profile picture to transfer it to your iPhone.

