author avatar
    Technology Manager of Test Dept.
 

Summary
Learn how to fix the problem of USB recognized as CD drive when the USB drive is inserted into computers. You can also find the method for recovering lost data by using professional data recovery tools.
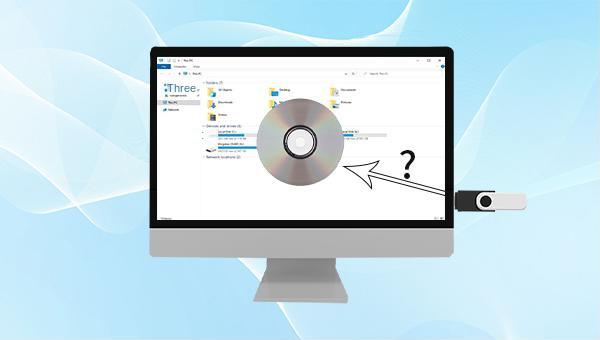


Usb recognized as CD drive

I. Why is there a fault that the USB drive is recognized as a CD drive?

As a portable storage device, the USB flash drive is often plugged and unplugged between different devices, such as media players, projectors, and computers with varying operating systems. This frequent usage can lead to various issues. There are several potential causes for the USB stick appearing as an empty CD drive, including outdated drivers, a corrupted USB drive, or a malfunctioning operating system.
When faced with this issue, you can safely remove the USB flash drive, restart your computer, and then reinsert the USB flash drive to see if the problem is resolved. If the issue persists, you can refer to the second part of this article for solutions. Let’s explore the different ways to fix a USB drive appearing as a CD drive.

II. How to solve the problem that the USB drive is recognized as a CD drive?

1. Use disk management to format the USB drive

Disk Management in Windows is a built-in system utility that helps users perform tasks such as initializing new drives, expanding or shrinking volumes, and formatting. Next, let’s format the USB drive from the disk management program.
Step 1: Connect the USB flash drive to the computer, and press the (Windows+X) keys on the keyboard at the same time. Then in the pop-up list, select the (Disk Management) option.
open windows disk management
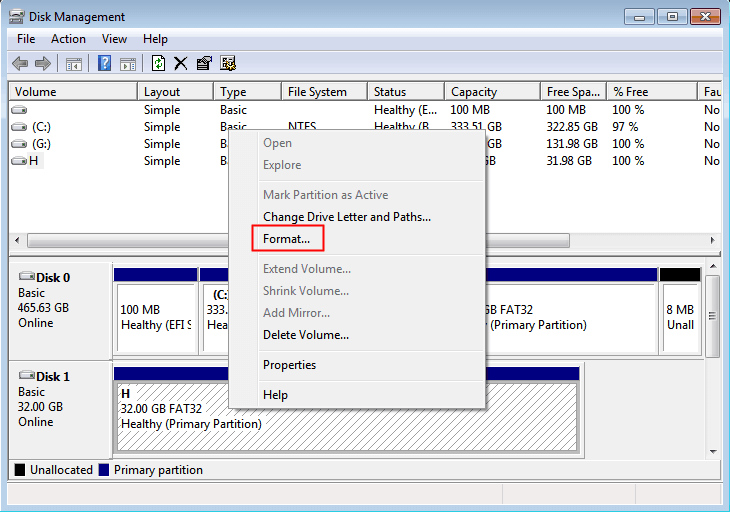
Step 2: Next, find the USB flash drive that needs to be formatted, right-click it and select the (Format) option.
format USB flash drive
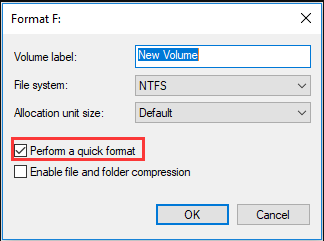
Step 3: Select the required file system: FAT32, NTFS or exFAT, check (Perform a quick format), click (OK), and follow the instructions to complete the formatting process. After the formatting operation is completed, the problem that the USB disk is displayed as a CD can generally be repaired.
quick Format
Description of each file system:
NTFS: It is an advanced file system that focuses on protecting file and directory data while also saving storage resources and reducing disk usage. It is compatible with all versions of Windows, but can only be read on Mac and some Linux distributions. Due to its logging requirements, NTFS is not recommended for use on mobile storage devices like USB disks.

FAT32: This file system is supported by the majority of personal computers and boasts excellent compatibility. This makes it an ideal choice for floppy disks and SD cards. However, when writing new data, it does not organize the file into complete fragments before writing, resulting in scattered data and slower read and write speeds. Additionally, it has a maximum file size limit of 4GB.

exFAT: Designed specifically for flash memory, exFAT offers improved interoperability between desktop computers and mobile devices compared to FAT32. It also enhances the allocation performance of remaining space. exFAT is compatible with both Windows and Mac OS computers for reading and writing.

2. Run the Diskpart command to format the USB drive

In addition to using disk management to perform formatting operations, you can also try to use the diskpart command to perform formatting operations. The specific steps are as follows:
Step 1: Run the Windows computer, enter (cmd) in the “search box” in the lower left corner and open the command prompt program.
run as administrator
Step 2: Next, enter the (diskpart) command in the command prompt window and press the (Enter) key. Then enter (list disk) to view the disks connected to the current computer.
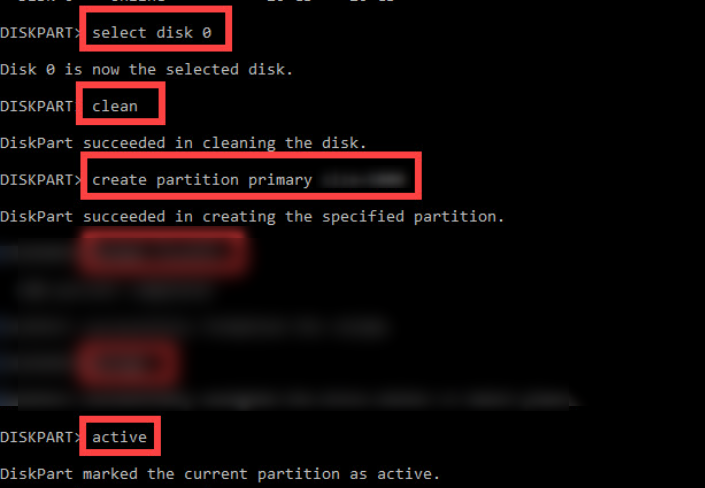
Step 3: Then enter (select disk 1) (1 refers to the number of the USB disk). Then enter the (clean) command to clear the configuration information and other data in the USB drive.
Step 4: Enter (creat partition primary) to create a primary partition, and enter (active) to mark the partition as an active partition.
create primary partition
Step 5: Finally, enter the command (format fs=FAT32 quick) (perform a quick format on the USB drive, set the file system of the USB drive to FAT32) and (Assign) (assign the drive letter), and then type (Exit) to close the command prompt character window. Afterwards, check if the problem is resolved.
perform a quick format on the USB

3. Update outdated drivers

The method of updating the USB drive is relatively simple, and the specific operation steps are as follows:
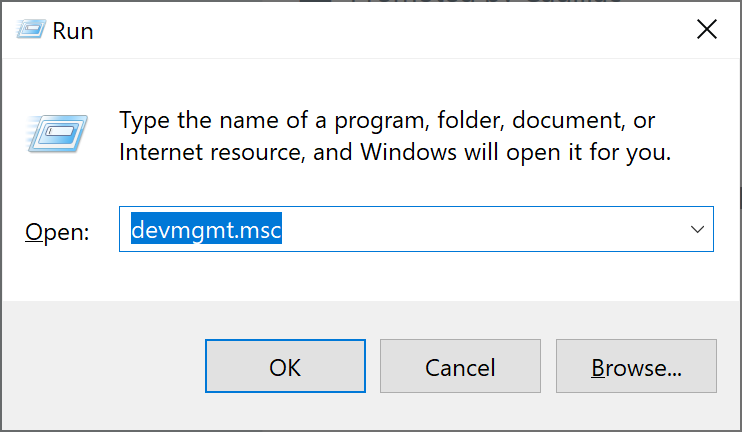
Step 1: Run the Windows computer, connect the USB drive to the computer, and then press (Windows key + R) on the keyboard at the same time to open the running window. After entering the command (devmgmt.msc), click the (OK) button to enter the Device Manager.
run the command devmgmt
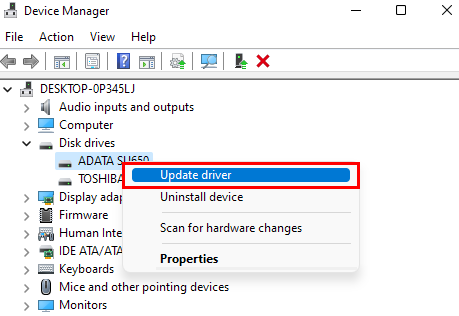
Step 2: Next, in the “Disk Drive”, right-click the USB flash drive you want to update the drive and select the (Update driver) option.
update driver-disk
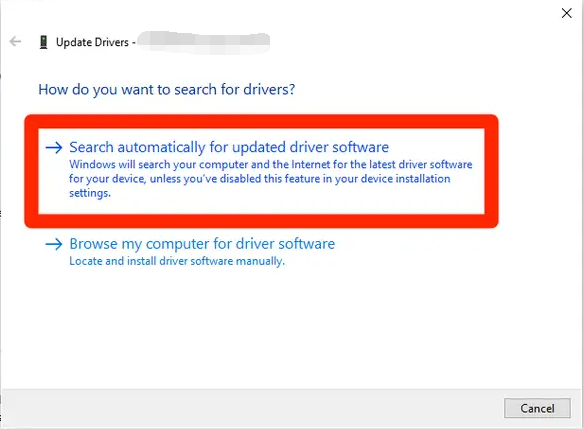
Step 3: Next, select the (search automatically for updated driver software) option, and then follow the instructions in order to update the USB drive. After the driver is updated, restart the computer and connect the device to see if the problem is resolved.
update Driver Confirm
The above is the solution when the USB drive is displayed as a CD drive. It is worth noting that when you format the USB drive important data in the device may be cleared, so you can use the following methods. Try to scan and restore important data in the USB flash drive.

III. Recover USB drive data with Renee Undeleter

If you want to recover lost data from a formatted USB flash drive, you need to use a professional data recovery tool to operate. Here we recommend you to use Renee Undeleter, which has comprehensive functions, easy operation, and supports Windows and Mac systems.

1. What is Renee Undeleter?

Renee Undeleter is a software specially used to restore various data files. When you accidentally delete important files, empty the recycle bin, or format the disk/memory card, you can use this tool to recover the lost data get it back. This software covers four functional modules, including file recovery, format recovery, partition recovery and image creation, so it can help you solve many data loss problems that may occur during system use in an all-round way, which is very convenient.
Hot Topic - ADsRenee Undeleter – Simple & Powerful Software for Data Recovery

Easy to use Recover data by 3 steps;

Multiple scan modes Fast partition scan, whole partition scan and whole disk scan;

Supported file types Image, video, audio, text, email and so on;

Image creation Create a partition image to read and back up data;

Supported devices SD card, SDHC, SDXC, USB flash drive, hard disk and computer.

Easy to use Recover data by 3 steps;

Multiple scan modes Fast partition/whole partition/whole disk scan;

Supported devices SD card/USB/hard disk.

Free TrialFree TrialFree Trial 800 people have downloaded!

2. How to recover lost data in the USB flash drive with Renee Undeleter?

It is very simple to restore lost data in the USB flash drive with the help of Renee Undeleter. The specific operation steps are as follows:
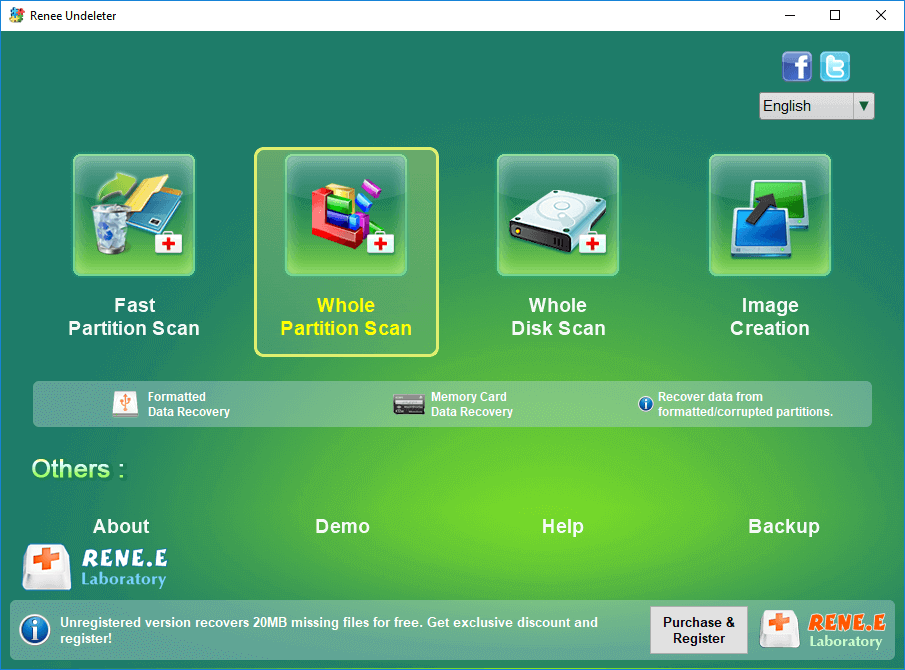
Step 1: Connect the USB drive to the computer, download and install Renee Undeleter on the computer, run Renee Undeleter, and select the (Whole Partition Scan) option on the main interface.
select whole partition scan in renee undeleter to recover deleted video from sd card
Data recovery function introduction:
Fast Partition Scan: Quickly retrieve files lost due to accidental deletion or emptying the recycle bin.
Whole Partition Scan: Quickly recover files lost due to inaccessible or formatted partitions.
Whole Disk Scan: It can analyze and obtain partition information, and fully scan the entire partition.
Image Creation: You can create a mirror image for a partition to back up the current partition state.
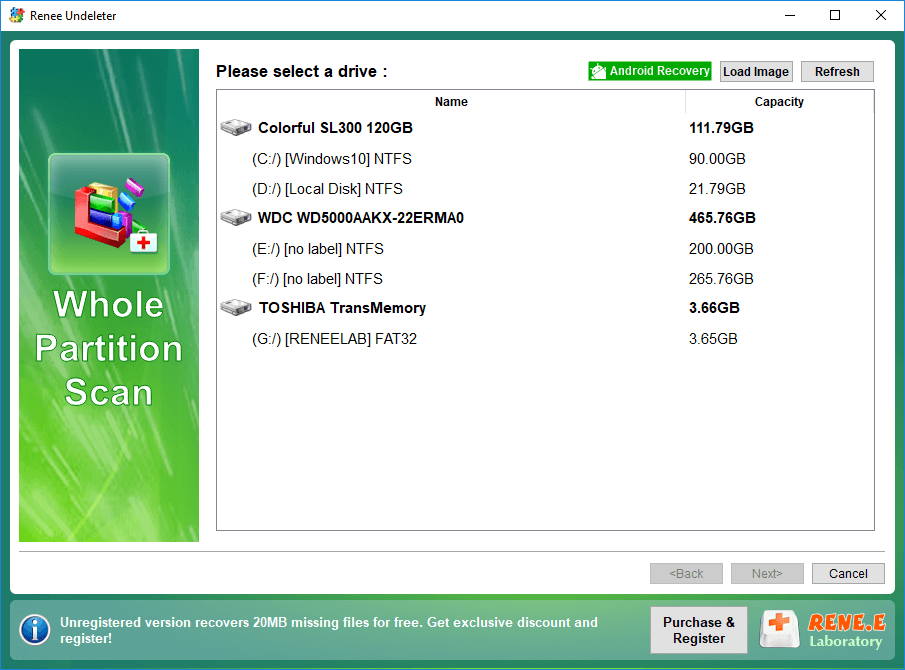
Step 2: Next, select the USB drive and click (Next). Then enter the scanning process, please wait patiently.
select the target drive to scan in renee undeleter
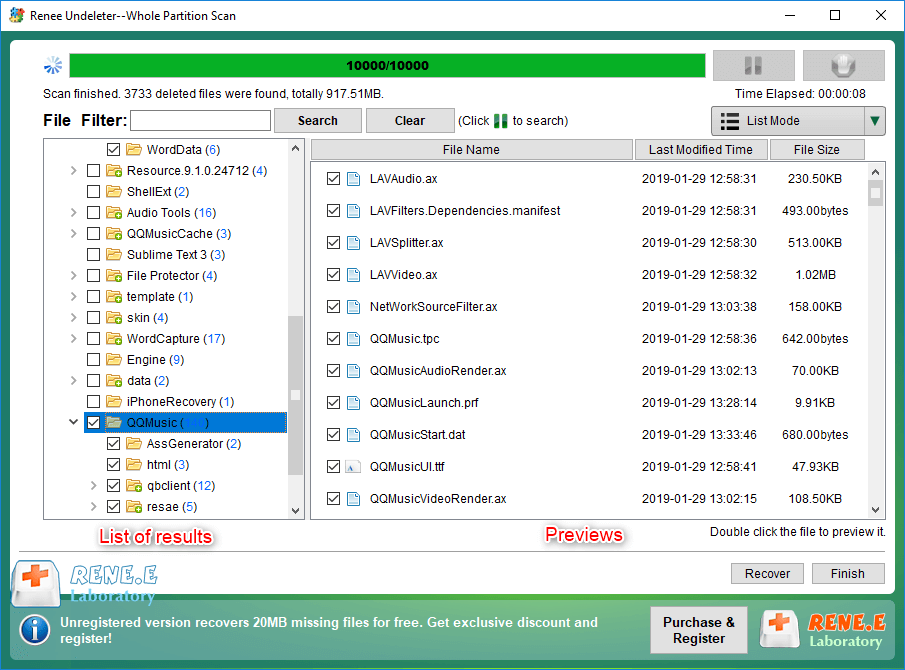
Step 3: After the scan is over, you can preview and select the files to be recovered, and click the (Recover) button. Please choose another disk or partition to save the recovered files, not the original disk where the data was lost, to avoid data overwriting.
preview and select the files to recover in renee undeleter