author avatar
    Senior Program Developer
 

Summary
When you update Windows, you may meet the error like "Windows cannot open the required file install.wim". Learn the causes and common solutions in this article. Plus, you can find data recovery tips.


Windows cannot open the required file install.wim

I. Why is there an error message that Windows cannot open the required file install.wim?

The full name of Wim is Microsoft Windows Imaging Format, which is a Windows file-based image format, which is used to store one or more copies of Windows systems (that is, mirror images). The main file of the Microsoft ISO image is install.wim, which contains all the data of the operating system we want to install, that is to say, we only need the file install.wim, and then cooperate with related tools to complete the system installation.
But why do I get the error that the required file install.wim cannot be opened when installing Windows? In fact, there are many reasons for this error, and the summary generally includes the following points:
Windows cannot open the required file install.wim You are here: HomeSupportTips Data Recovery
Wrong selection of system installation disk: Usually, the system installation disk labeled Windows Install CD or Windows Recovery can help users install the operating system correctly. But some disks do not have some files needed to install the operating system, and their function is only to repair or restore the system. Therefore, if you use the wrong system installation disk, you may get an error message that the required file install.wim cannot be opened.
Disk problem: When there is dirt, fingerprints or scratches on the disk, because the system cannot recognize the device normally, an error message that the required file install.wim cannot be opened may appear. If this is the case, you can clean the surface of the disk with a soft cloth or rubbing alcohol, then try reconnecting the device to the computer to see if the problem persists.
Driver Issues: When the disk driver is outdated, the error that the required file install.wim cannot be opened may occur due to system incompatibility with it. Therefore, you can try to solve this problem by updating the driver.
The install.wim file is larger than 4GB: When the install.wim file is larger than 4GB, and the U disk file system storing the file is Fat32, because Fat32 limits the size of a single file to less than 4GB, it may cause the install stored in the U disk. Part of the data in the wim file is damaged, so the file cannot be opened. The solution is to use the DISM command or a third-party DISM tool to split the install.wim file.
After understanding the possible causes of the failure, the editor will introduce the detailed repair plan for these points, and we will continue to study.

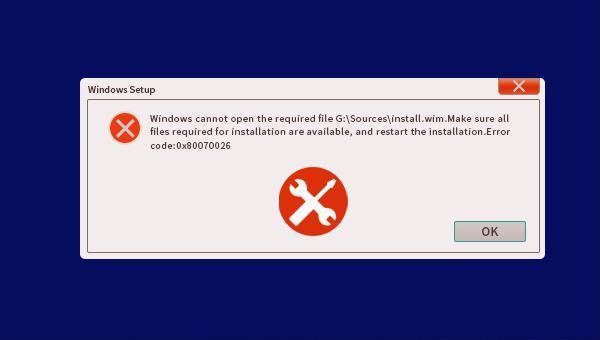
II. How to solve the problem that Windows cannot open the required file install.wim?

1. Recreate the system installation media

If you are using the wrong installation media or the ISO file on the installation media is damaged, you may receive an error message that the required file install.wim cannot be opened. Therefore, you can try to recreate the system installation medium to solve the current problem. The specific steps are as follows (taking Windows 10 system as an example):
Before creating, you need to pay attention to the following two points:
● The important data in the computer has been backed up to other storage devices (such as U disk, SD card or mobile hard disk) or backed up to OneDrive. (Click here to see how to back up your data.) Please note that if you use an external storage device to back up your files, make sure it is a different device than the one from which you downloaded the Windows installation media.
● The storage device used to create the installation media should have at least 8GB of free space, and make sure the drive is empty. Because during the process of making the installation disk, all content stored in the device will be deleted.
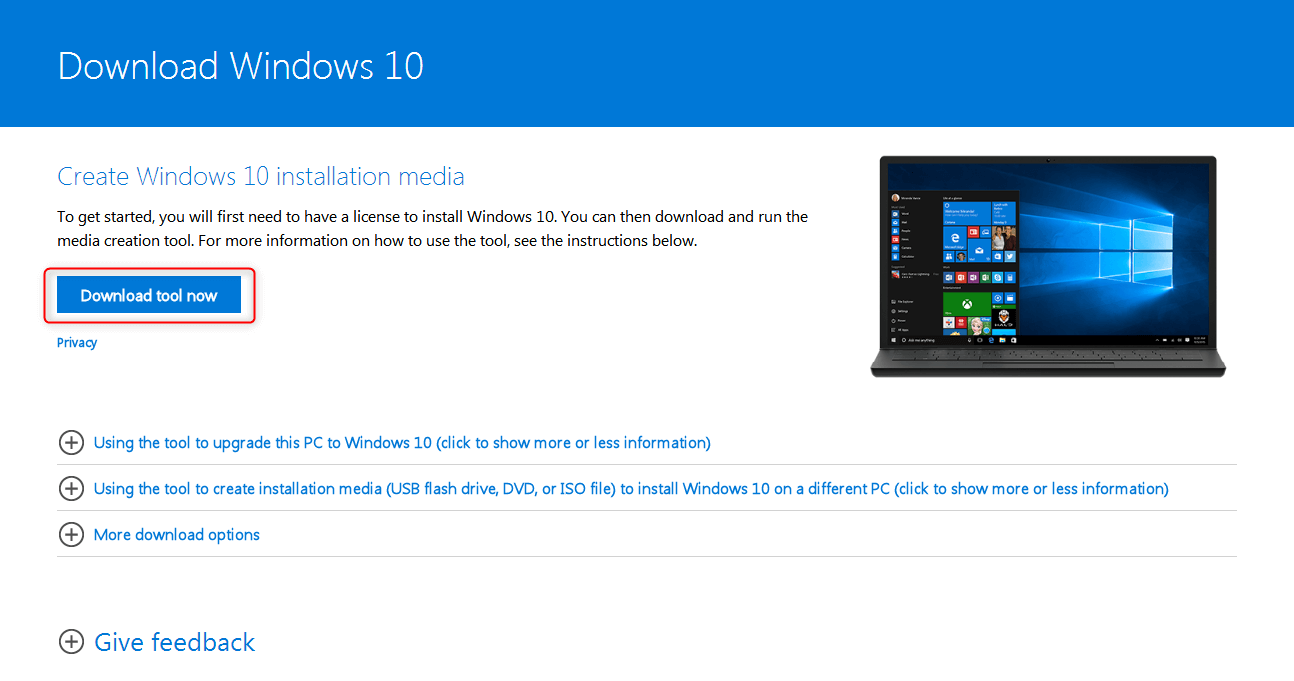
Step 1: First download the production file from the official website of Microsoft – Media Creation Tool for Windows 10. Download address: https://www.microsoft.com/en-us/software-download/windows10. After opening the web page, click Download Tool Now.
windows media creation tool
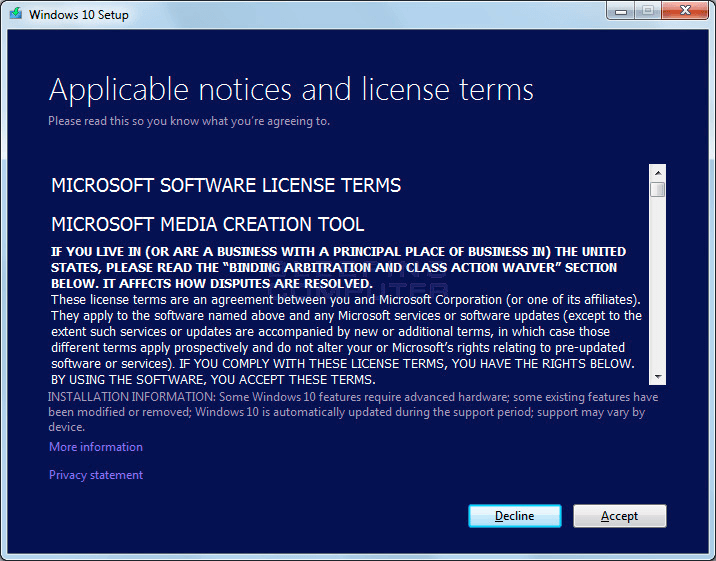
Step 2: Once the download is complete, open the tool and select Yes when asked if you want to use the app to make changes to your device. Then, when the Windows 10 Installer Setup Guide appears, tap Accept the License Terms and Agreement.
media creation tool license
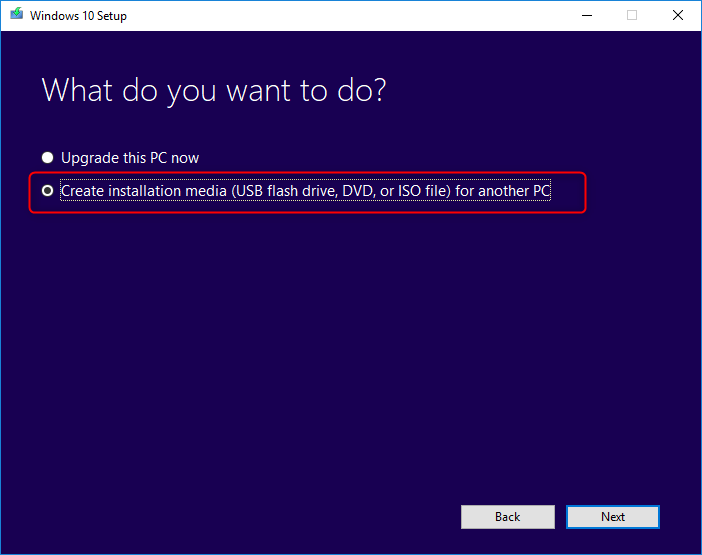
Step 3: To create an installation disk, select Create installation media (USB flash drive, DVD, or ISO file) for another PC and click Next.
create media Windows 10
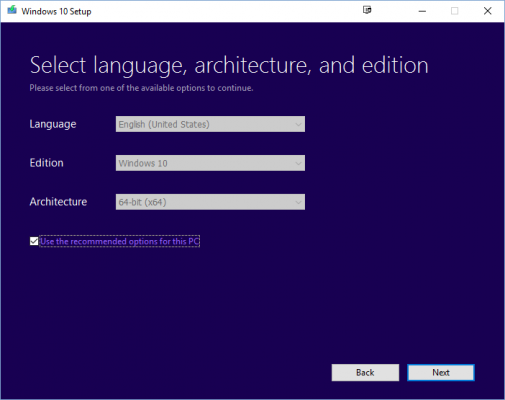
Step 4: Then set the language, version, and architecture (64-bit or 32-bit) of the Windows 10 system, and click Next after the operation is complete. By default, it is checked Use the recommended option for this PC.
media creation tool select architecture
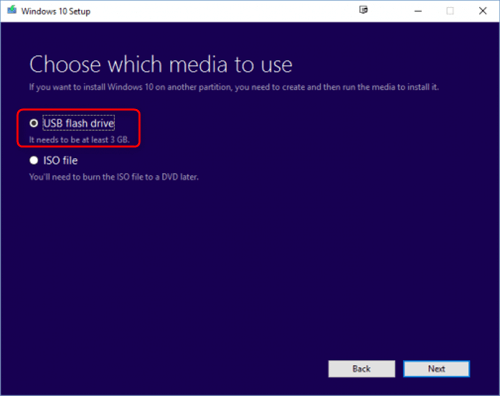
Step 5: Select the medium for installing the system image. If you want to create a USB disk installation disk, please select USB flash drive and click Next.
select media type
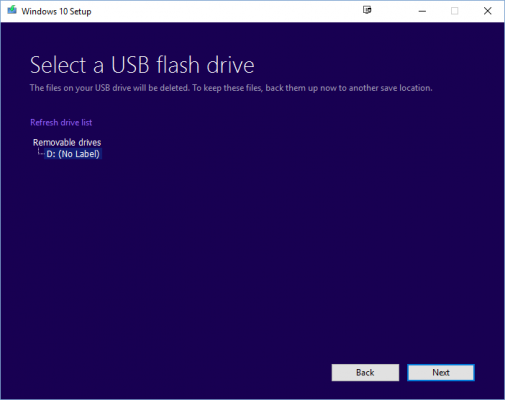
Step 6: Select the pre-inserted U disk and click Next. Finally, wait for the installation media to be created and click Finish. After the installation media is created, use the media to reinstall the system and see if the problem is resolved.
refresh the USB list

2. Update the driver

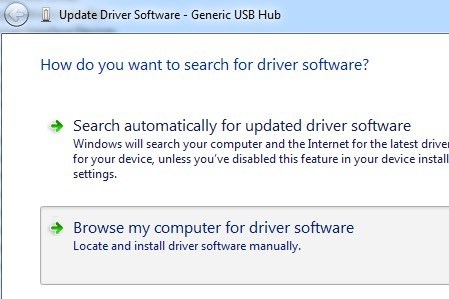
When the disk driver installed with the install.wim file is not updated in time, there may be a problem that the install.wim file cannot be opened due to incompatibility with the system. If the computer connected to the disk with the install.wim file can start normally, you can directly download and update the disk driver locally, just right-click Start, select Device Manager, expand Disk Driver List and right-click the corresponding disk. Select Update DriverSearch automatically for updated driver software. If the computer cannot start normally, it is difficult to update the disk driver in this case, so it is recommended to replace other storage devices to save the install.wim file for system installation.
update usb driver automatically

3. Split the install.wim file

When the install.wim file in the installation medium is larger than 4GB, and the file system of the installation medium (such as a USB flash drive) is FAT32, it can only store a single file smaller than 4GB. In this case, the install.wim file may also fail to open. We can try to use the DISM command to split the install.wim file to solve this problem. The specific steps are as follows:
Step 1: Decompress the ISO image file, and move the install.wim in the decompressed sources folder to any local disk of the computer, such as the E drive. The path of the install.wim file is E:\windows\sources\install .wim, this path needs to be used when entering commands later.
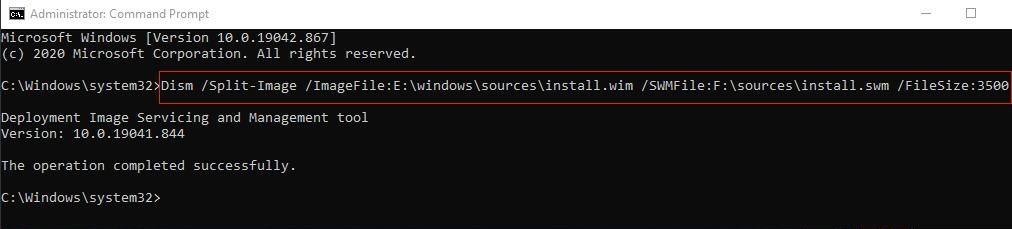
Step 2: Enter (CMD) in the taskbar search box, then open the command prompt as an administrator, and enter the following command:
(Dism /Split-Image /ImageFile:E:\windows\sources\install.wim /SWMFile:F:\sources\install.swm /FileSize: 3500). Then press (Enter) and wait for the command to complete.
● E:\windows\sources\install.wim refers to the name and location of the install.wim file to be split. It can be modified according to the actual situation.
● F:\sources\install.swm refers to the split target name and the location of the swm file. The first file will be named install.swm. The filenames of the next files contain numbers, for example, install2.swm, install3.swm, etc.
● FileSize: 3500 refers to the maximum size (in MB) of each swm file to be created, and 3500MB is about 3.4GB.
Dism Split-Image command
Step 3: Copy the generated file with the suffix swm to the sources folder of the installation medium, and delete the original install.wim file. Then try to install Windows again.
Kind tipsIf you are using a DVD as your installation medium, see the instructions for splitting an image file at docs.microsoft.com for more information. In addition, you can also try to use a third-party DISM tool to split the image file. The entire operation process may be simpler, but you need to carefully screen reliable software to avoid downloading malicious software.
The above is the solution to the prompt that the required file install.wim cannot be opened after installing Windows. If data loss occurs during the process of repairing this error, you can also use professional data recovery software to retrieve the lost data. It is recommended that you use 
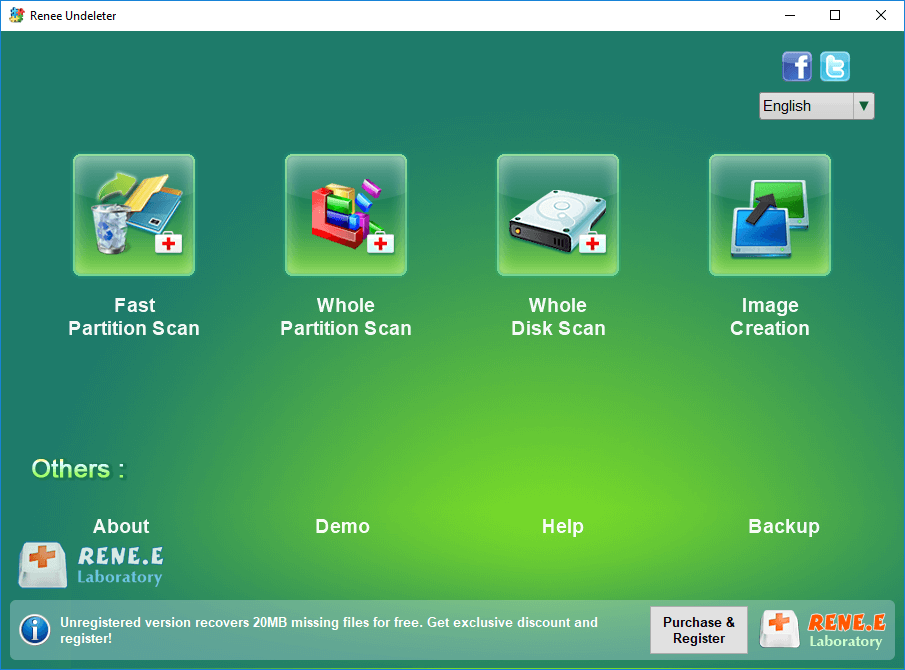
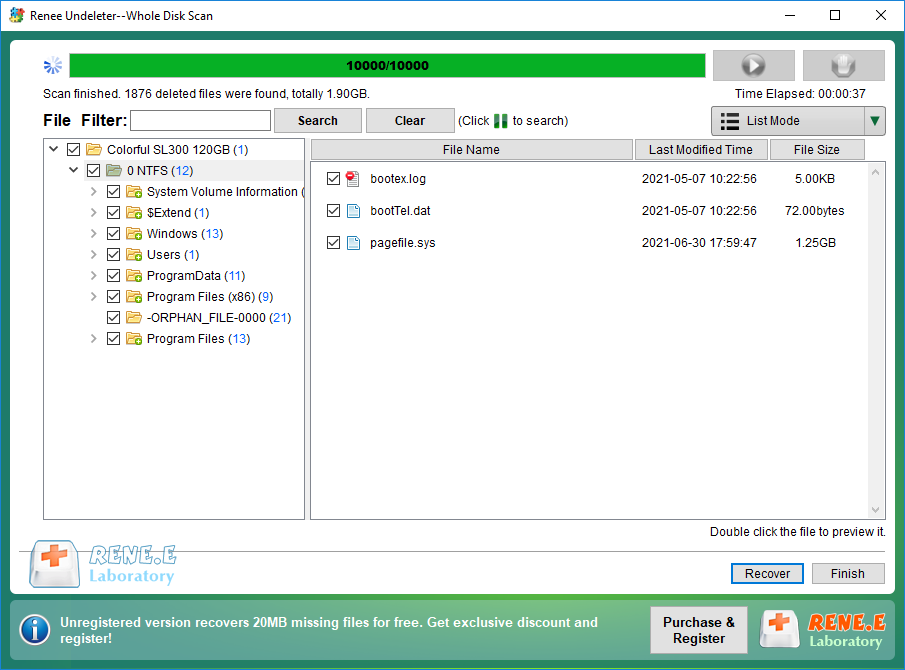
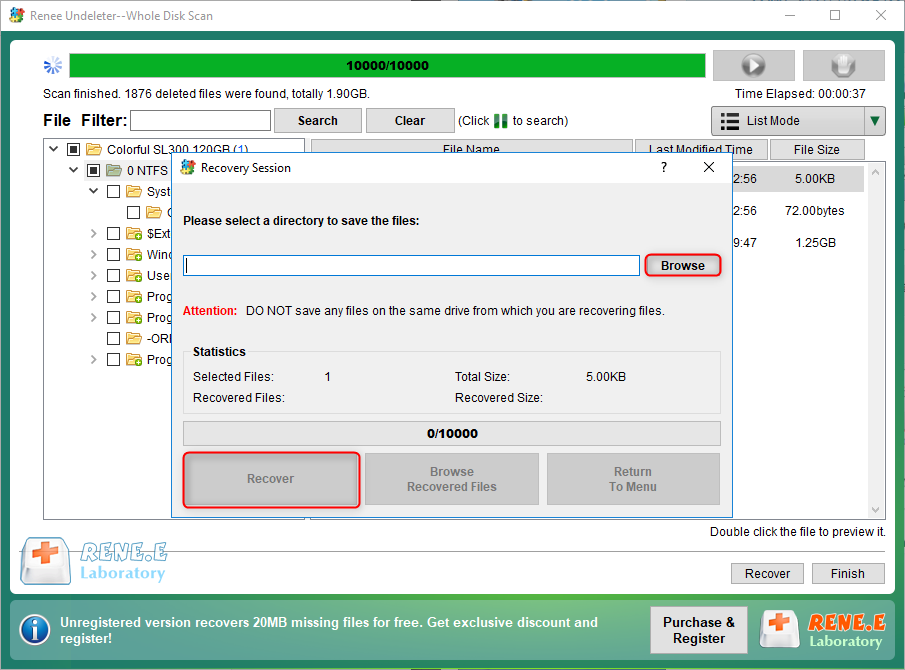
Renee Undeleter to operate, the following is the detailed operation method.

III. Recover lost data with Renee Undeleter

1. What is Renee Undeleter?

Renee Undeleter is a software specially designed to restore various data files. When you accidentally delete important files, empty the recycle bin, or format the disk/storage, you can use this tool to find the lost data back. This software covers four functional modules, including file recovery, format recovery, partition recovery and image creation, so it can help you solve many data loss problems that may occur during system use in an all-round way, which is very convenient.
Renee Undeleter - User friendly & Helpful Formatted Data Recovery Software

Easy to use 3 steps to recover formatted data back.

Multi Recovery Modes File recovery, Whole partition recovery and Whole disk recover are available.

Support Different File Types Photos, videos, audios, files, emails, etc.

Image Creation Creat image for disk or parititon.

Compatible with Different Devices SD card, SDHC, SDXC, USB disk, computer, etc.

Easy to go 3 steps for whole recovery.

Multi Recovery Modes Files/partition/disk recovery modes.

Support Different Devices SD card/USB disk/hard disk, etc.

Free TrialFree TrialFree Trial 800 users have downloaded and found data back!

2. How to recover lost data with Renee Undeleter?

Restoring data with Renee Undeleter is very simple, the specific steps are as follows:
Step 1: Download, install and run Renee Undeleter, select the option Whole Disk Scan in the main interface. This option will scan the entire hard disk, so do not install the software to any partition of the hard disk that needs to be scanned. In the hard disk that does not need to be scanned, otherwise it will not be able to use Whole Disk Scan to scan. If the lost data is not much and the lost time is not long, you can also use Fast Partition Scan and Whole Partition Scan modes to save scanning time.
select whole disk scan in renee undeleter
Data recovery function introduction:

Fast Partition Scan: Quickly retrieve files lost due to accidental deletion or emptying the recycle bin.

Whole Partition Scan: Quickly recover files lost due to inaccessible or formatted partitions.

Whole Disk Scan: It can analyze and obtain partition information, and fully scan the entire partition.

Image Creation: You can create a mirror image for a partition to back up the current partition state.

Step 2: Next, select the disk device to be scanned and then click Next. Select default setting on the advanced setting interface.
select a disk to recover in renee undeleter
Step 3: After that, the software will analyze the disk device. After scanning, you can double-click the file in the preview window on the right to preview it, then select the file you want to restore, and click the Recover button in the lower right corner to restore the selected file.
select taget files to recover with renee undeleter
Step 4: Next, select the target folder, click Browse to select another disk to save the recovered files, and then click the Recover button to start the file recovery command, you just need to wait patiently.
recover files from whole disk scan with renee undeleter