Resetting Windows Tablet Passwords: A Simple Guide
- Home
- Support
- Tips System Rescue
- Resetting Windows Tablet Passwords: A Simple Guide
Summary
This article discusses methods to reset the password on Windows tablets, emphasizing the importance of password security and providing solutions for forgotten passwords.
Table of contents
In the case of Windows tablets like the Surface Pro, the presence of a TPM (Trusted Platform Module) chip is a crucial aspect when it comes to enabling advanced security features like TPM+PIN for BitLocker. While some third-party encryption technologies may require pre-boot authentications, the Surface Pro devices, including Surface Pro 1, 2, and 3, typically have TPM chips in most countries.
It’s important to note that not all tablets have the same hardware capabilities or features. Surface Pro 3, for example, offers an on-screen keyboard that can be accessed during the BitLocker pre-boot authentication process. This allows users to enter their PIN even if they don’t have a physical keyboard attached to the device. However, it’s essential to check with the original equipment manufacturer (OEM) to determine the availability of on-screen keyboards or other specific features on different tablet models.
While TPM+PIN may not add significant security value on tablets like the Surface Pro 3, organizations that prioritize strict security measures can still choose to enable it. This allows for consistency in security policies across different devices while providing an additional layer of protection for sensitive data.
| Tablet Name | Encryption Method |
|---|---|
| Microsoft Surface Pro 9 (Intel) | BitLocker |
| Lenovo IdeaPad Windows Duet 5i | None |
| Dell XPS 13 2-in-1 (2022) | None |
| Microsoft Surface Pro 9 (SQ3) | BitLocker |
| Microsoft Surface Go 3 | None |
| Lenovo ThinkPad X12 Detachable | None |
| Dell Latitude 7320 Detachable | None |
| Dell Latitude 7220 Rugged Extreme Tablet | None |
| Getac F110 (2022) | None |
Please note that performing a factory reset will erase all data on the tablet, so it is crucial to have a backup of your important files beforehand. Here is a step-by-step guide on how to perform a factory reset on a Surface Pro tablet:
1. Power off your Surface Pro tablet completely.
2. Press and hold the Volume Up button on the left side of the device.
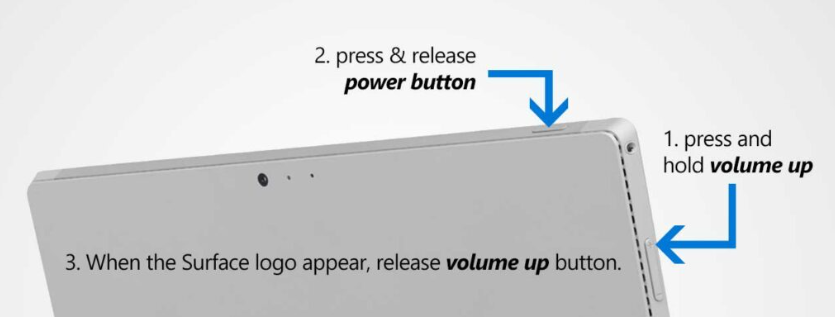
3. While still holding the Volume Up button, press and release the Power button on the top of the tablet.
4. Continue holding the Volume Up button until the Surface logo appears on the screen.
5. Once the Surface logo appears, you can release the Volume Up button.
6. The Surface Pro tablet will now boot into the UEFI (Unified Extensible Firmware Interface) settings.
7. In the UEFI settings, use the Volume Up and Volume Down buttons to navigate to the “Troubleshoot” option and press the Power button to select it.
8. From the Troubleshoot menu, choose “Reset this PC” and select “Remove everything.”
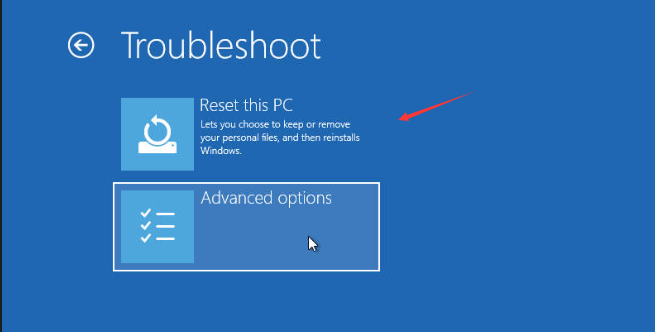
9. Follow the on-screen instructions to complete the factory reset process.
10. After the reset is complete, the tablet will restart and you can set it up as a new device.
It is important to note that the steps may vary slightly depending on the model and version of your Surface Pro tablet. It is always recommended to refer to the official documentation or support resources provided by Microsoft for your specific device.
Step 1: Download and Install Renee PassNow
Start by downloading Renee PassNow from the official website and install it on a different computer that you can access. You can choose the appropriate version based on your computer’s operating system.

Remove Windows Login Password 3 steps for whole password remove process.
Recover the files Recover the deleted files without Windows system.
Transfer the data Transfer the important files of the computer with system.
Fix Windows startup error Fix various Windows startup failures or crashes.
Erase disk Completely erase disk files which will not be restored.
Remove Windows Login Password 3 steps for whole password remove process.
Recover the files Recover the deleted files without Windows system.
Transfer the data Transfer the important files of the computer with system.
Launch Renee PassNow and insert a USB flash drive into the computer. Select the option to create a bootable media. Follow the on-screen instructions to complete the process.
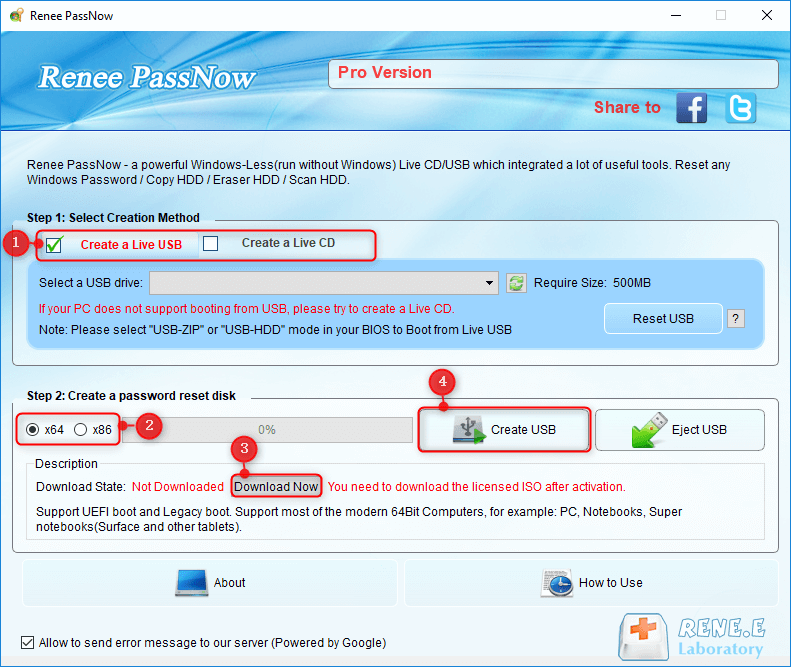
Step 3: Boot the Locked Windows Tablet from the Bootable Media
Insert the bootable USB into the locked Windows Tablet.
a. Power off the Surface tablet completely.
b. Press and hold the Volume Down button on the device. While holding the Volume Down button, press and release the Power button.

c. Keep holding the Volume Down button until the Surface logo appears on the screen. Then, release the Volume Down button.
The Surface tablet will now boot from the USB disk.
Step 4: Reset the Password
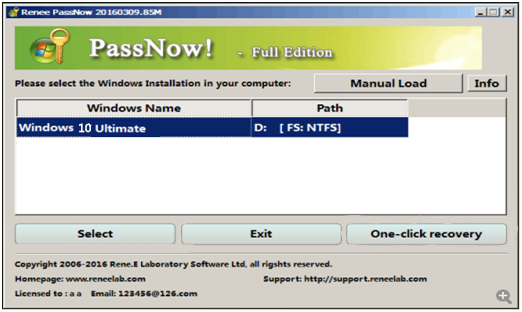
After successfully booting from the bootable media, Renee PassNow will load. Select “PassNow!” function after booting from the new created Windows password reset disk.
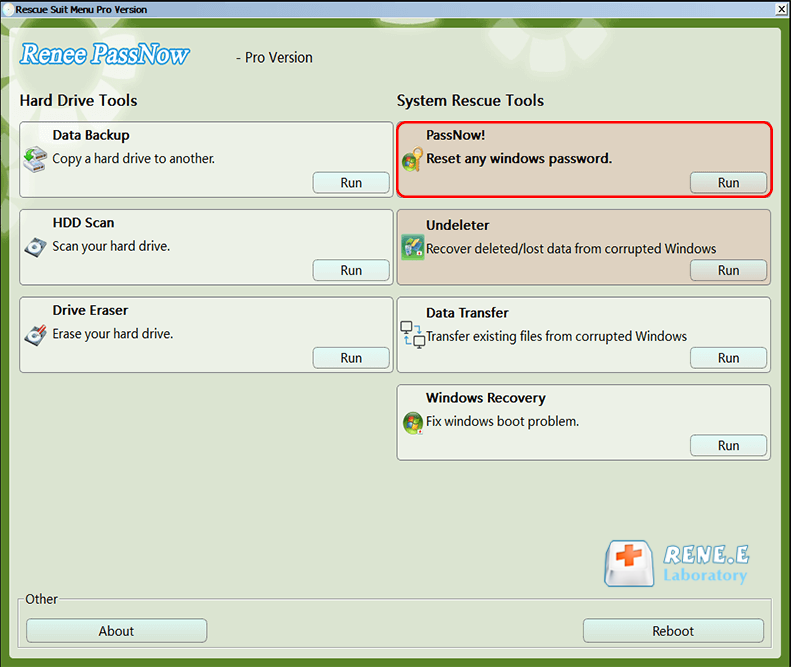
Step 5: Resetting the Password and active Account
Choose the user account for which you want to reset the password. Then, click on the “Clear Password” button. Renee PassNow will remove or reset the password for the selected user account.
Step 6: Reboot the Computer
Once the password is reset, remove the bootable media from the Tablet and restart it. You will now be able to log in to Windows Tablet without a password.
Congratulations! You have successfully reset your tablet’s Windows Account password using Renee PassNow. You can now log in to your tablet using the new password you just set. It’s important to note that this method has the potential to erase any data or files on your tablet, so it’s crucial to have a backup beforehand.

By temporarily suspending BitLocker during these updates, users can avoid encountering password prompts. This approach ensures that the tablet’s TPM or UEFI firmware can be updated without any interference from BitLocker. Once the update is completed, users can reactivate BitLocker to ensure the ongoing security of their data.
For instance, imagine a scenario where a user is attempting to update the firmware on their Windows tablet. During the update process, the tablet continuously prompts for a password, but the user does not have the password readily available. By following the recommended approach of suspending BitLocker, the user can proceed with the firmware update smoothly, without being hindered by password prompts.
Overall, suspending BitLocker during TPM or UEFI firmware updates provides a practical solution for resolving password prompts on Windows tablets. It allows users to update their devices seamlessly, ensuring the smooth functioning of both BitLocker and the tablet’s firmware.
Relate Links :
Easy Solutions to Fix The Error Winload.exe missing on Windows 10
13-07-2023
John Weaver : Learn how to fix the error of winload.exe missing or damaged in Windows 10. Besides, it is important...
How to Create Windows 10 Recovery Disk?
30-03-2021
Jennifer Thatcher : In the past, we were used to repairing the computer with the factory-attached recovery disk. How if you...
How to Factory Reset Lenovo Computer
04-01-2021
John Weaver : When your Lenovo computer is attacked by virus or it goes wrong, such as system corruption, system repair...
How to Reset Windows XP Password without Password Reset Disk
27-01-2022
Ashley S. Miller : Want to get some important data from the old Windows XP computer but can not login without the...
- Talk about different Windows Tablets and how they stores data inside
- Method 1 : Unlocking the Surface Pro tablet by performing a factory reset
- Method 2 : Reset tablet Windows Account password with Renee PassNow
- Suspending BitLocker during TPM or UEFI firmware updates to resolve password prompts
- The Importance of Password Security and Consequences of Forgetting on Windows Tablet


