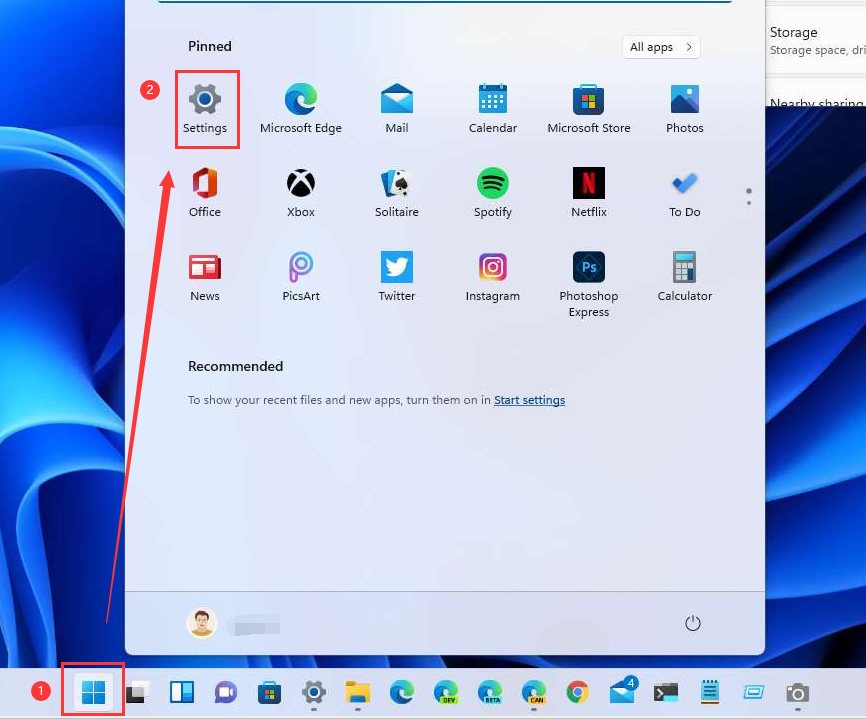
author avatar
    Senior Program Developer
 

Summary
The article explains how to whitelist files in Windows 11 Defender to prevent the built-in anti-malware program from mistakenly identifying trusted files as threats. It highlights the default real-time protection feature of Microsoft Defender and the need to add certain files to the exclusion list to avoid unnecessary blocking. The concept of whitelisting is introduced, emphasizing the importance of being cautious when excluding items to ensure only trusted files are allowed.


white-list 
Windows prioritizes security, and with Microsoft Defender—previously known as Windows Defender—users benefit from a free, built-in anti-malware program on their Windows devices. By default, Microsoft Defender automatically enables real-time protection, detecting, blocking, and neutralizing spyware, ransomware, viruses, and other malware. However, sometimes the antivirus program can be over-protective and detect trusted files as threats, blocking them in the process. To address this, you’ll need to add the files to Microsoft Defender’s exclusion list. This article will guide you through the steps to exclude a file you don’t want Microsoft Defender to scan.
Looking for solutions to password protect your data? Please refer to : Password Protect a Folder for Free and Safe for more.

What Is Whitelisting?

Whitelisting is the practice of allowing a list of administrator-approved entities, including programs and files, to be present and active on a computer system. Whatever is not on the list is blocked. Be cautious when excluding items; only exclude those you’re confident are safe. Allowing files and folders flagged as malicious by Microsoft Defender can harm your computer and files. If malware infects your computer, it could infect the excluded files. If the excluded files are compromised, it would be hard for the antivirus program to detect the malware, putting your entire PC at risk of infection.

How to Exclude Files from Windows 11 Defender Scans

To whitelist a file in Microsoft Defender, you must add it to the exclusion list. Carefully follow the instructions below to avoid any confusion.
1. Open the Start menu and click on Settings.
Windows 11 settings
2. Navigate to Privacy & security and select Windows Security.
3. Under Protection areas, select Virus & threat protection.
Privacy & security, Virus & threat protection
4. Navigate to Virus & threat protection settings and select Manage settings. Then, scroll down to Exclusions, and click on Add or remove exclusions.
5. Click on Add an exclusion and choose the file, folder, file type, or process to exclude. To exclude an individual file, click on File from the drop-down list and select the file you want to exclude from future scans. Then, close Windows Security to save your settings.
Windows Defender - Exclusions 
Here are the items you can exclude from Microsoft Defender and what each choice means:
- File: Excludes a single file from future scans.
- Folder: Excludes a folder and its contents, including subfolders.
- File type: Excludes all files with a particular extension. For example, “.txt” would exclude all files ending with the .txt extension from scans.
- Process: Excludes a process by name. For example, “test.exe” would exclude files opened by c:\sample\test.exe.
To avoid Renee programs being affect by Windows, please add the following executable files as process.
For Renee File Protector, please add the following file in red box in Installation Folder as Process in Windows Defender:
Renee File Protector whitelist files
For Renee USB Block,  please add the following file in red box in Installation Folder as Process in Windows Defender:
Renee USB Block whitelist files
For Renee Secure Silo,  please add the following file in red box  in Installation Folder  as Process in Windows Defender:
Renee Secure Silo whitelist files

Benefits of Whitelisting in Microsoft Defender

Whitelisting can be a handy approach to security; it improves defenses and reduces cyber threats. Here are the benefits of whitelisting:
1. It helps prevent false positives. Adding the file, folder, or process in question to the Microsoft Defender exclusion list stops the program from blocking or alerting you about the harmless files.
2. It protects computers and networks from potentially harmful threats. For example, companies with BYOD policies often whitelist certain applications and websites they consider safe for employees to provide some level of protection to personal devices when connected to the company network.
3. It can improve performance for some tasks. During its scans, Microsoft Defender checks all items on your computer, which could lead to occasional system lags. Whitelisting specific files and processes can fix this.
In summary, whitelisting files in Microsoft Defender is a straightforward process that can enhance your system’s performance and reduce false positives. By carefully selecting which files, folders, file types, or processes to exclude, you can maintain robust security while ensuring that trusted files are not unnecessarily blocked.
Renee File Protector - Overall Protection to Your Data

Easy to use Few clicks for whole folder encryption process.

Overall protection Users can hide, lock or get other protection to files in local disk or USB disk.

High Security Classified encryption method prevents data from leakage.

Compression transfer Support to compress and encrypt any files to secure the file transfer security.

Advanced self protection Provide self

Easy to use Few clicks for whole folder encryption process.

Overall protection Users can hide, lock or get other protection to files in local disk or USB disk.

High Security Classified encryption method prevents data from leakage.

Free TrialFree Trial 800 users have downloaded and protect data!