author avatar
    Senior Product Manager
 

Summary
Discover how to recover files permanently deleted from the Recycle Bin using built-in Windows tools like Previous Versions and the Command Prompt. If these methods fail, learn about using Renee Undeleter to get your files back. Read our guide for detailed steps and solutions.


Losing important files can be a daunting experience, especially if they seem to be gone for good after being permanently deleted from the Recycle Bin. Fortunately, there are several methods and tools available to help you recover these seemingly lost files. Before diving into the recovery process, it is essential to understand where these permanently deleted files actually go within the Windows system.
file delete process

Where Do Permanently Deleted Files Go?

Understanding the Deletion Process
When you delete a file in Windows by pressing the Delete key or right-clicking and selecting Delete, the file is moved to the Recycle Bin. This action does not remove the file from your hard drive; instead, it simply moves the file to a designated folder where it can be easily restored if needed.
before deleting a file
Before emptying the Recycle Bin or pressing Shift + Del
However, when you empty the Recycle Bin or use the Shift + Delete command to permanently delete a file, the file is not immediately erased from the hard drive. Instead, the file’s entry in the file system is removed, and the space it occupied is marked as available for new data. This means that the file data still exists on the storage device until it is overwritten by new files.
Tips:If your files are stored on an SSD (solid-state drive) and the TRIM command is enabled on your system, recovering files deleted from the recycle bin will not be possible, as the TRIM command erases all data associated with the file.
shift + delete a file on Windows
Overwriting Deleted Files
As you continue to use your computer and save new files, the data from permanently deleted files will eventually be overwritten. This process is not immediate and depends on the amount of new data being written to the disk. For example, if you frequently download large files such as movies or games, the chances of overwriting the deleted file data increase. Conversely, if you rarely add new data to your computer, the deleted file data may remain intact for a longer period.
If your deleted files are stored in C drive, please try to Use Renee Undeleter directly. Since system files are created and deleted always,  you should recover this files as soon as possible. Or data will be overwritten by system files.

Method 1: Utilize the Built-in Windows Tool Previous Versions

One of the most effective ways to recover files that have been permanently deleted from the Recycle Bin is by using the built-in Windows tool called Previous Versions. This feature is available in all recent versions of the Windows operating system, including Windows 7, 8, 10, and 11. It allows users to restore files to a previous state without the need for third-party software, provided that the feature was enabled before the files were deleted.
Recovering Deleted Files Using Previous Versions
Once Previous Versions is enabled, you can use it to recover files that have been permanently deleted. Here’s how to do it:
1. Open the Start menu, type “This PC”, and hit Enter.
2. Navigate to the location where the deleted files were stored. Right-click on the folder or drive and select “Properties”.
folder properties
3. Go to the Previous Versions tab. Here, you will see a list of available recovery options, which are essentially snapshots of your files at different points in time.
file previous versions for file history
4. Select a previous version that likely contains the deleted files and click “Restore”. This will revert the folder or drive to the selected state, effectively recovering the deleted files.
Limitations and Considerations
While the Previous Versions feature is a powerful tool for recovering deleted files, it does have some limitations. Firstly, it only works if the feature was enabled before the files were deleted. If no previous versions are available, you will not be able to use this method. Additionally, the effectiveness of this tool depends on how frequently restore points are created and the amount of disk space allocated for system protection.
In cases where Previous Versions is not available or does not contain the needed files, you may need to explore other recovery methods, such as using third-party software or the Windows File Recovery tool.
Pros:
  • It is a built-in feature in the Windows operating system, eliminating the need for third-party software.
  • It supports multiple versions of Windows including Windows 7, 8, 10, and 11.
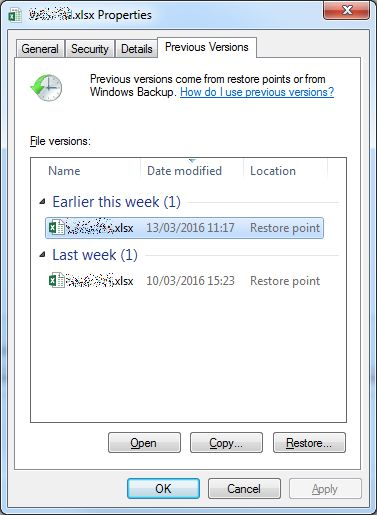
  • Allows users to restore files to a previous state before deletion.
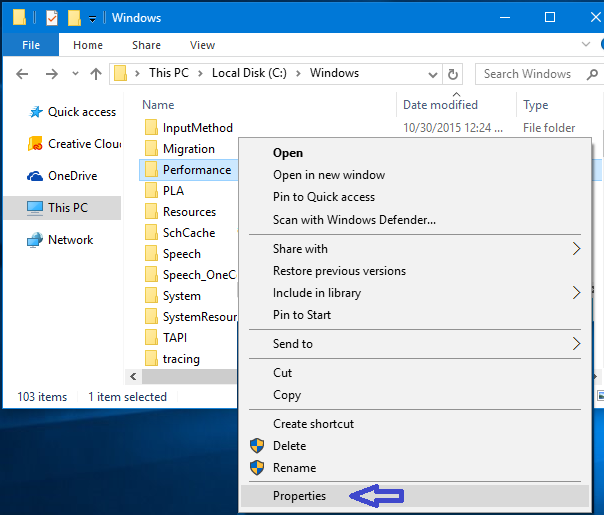
  • Simple and straightforward to use, integrated into the system's properties.

Cons:

  • The Previous Versions feature must be enabled before the files are deleted.
  • Recovery depends on the frequency of restore points created.
  • Limited by the amount of disk space allocated for system protection.
  • If no previous versions are available, the method cannot be used.

Method 2: Use Reliable Software Renee Undeleter to Get Back Files

When traditional methods like System Restore or Previous Versions fail to recover permanently deleted files, turning to specialized recovery software is often the most effective solution. One of the most reliable tools for this purpose is Renee Undeleter. This software is designed to perform deep scans of your storage devices to locate and recover lost or deleted files, even those permanently removed from the Recycle Bin.
Why Choose Renee Undeleter?
Renee Undeleter is a robust data recovery solution that offers several advantages. It supports various file types and storage devices, including hard drives, SSDs, USB drives, and memory cards. Unlike some built-in Windows tools, it can recover files that have been deleted, formatted, or lost due to system crashes. The software’s advanced algorithms make it possible to retrieve data even from severely corrupted or raw partitions.
Step-by-Step Guide to Using Renee Undeleter
Tips:Avoid using the affected drive for new file storage until the recovery process is complete to prevent data overwriting.
Step 1: Download and Install Renee Undeleter
Start by downloading the Renee Undeleter software from the official website. Follow the on-screen instructions to install the application on your computer. It’s advisable to install the software on a different drive than the one from which you’re trying to recover files to avoid overwriting data.
Renee Undeleter - Powerful Data Recovery SoftwareRenee Undeleter data Recovery software

Easy to use Only simple steps to recover data from storage devices.

Multiple scan modes Fast partition scan, whole partition scan and whole disk scan for different recovery needs.

File types Support to recover pictures, videos, audios, documents, mails, etc.

Supported storage devices Recover data from recycle bin, SD card, external disk, etc.

Supported systems Windows 10, 8.1, 8, 7, Vista, XP, 2000 and Mac OS X10.6, 10.7, 10.8.

Easy to use Only simple steps to recover data from storage devices.

Multiple scan modes - 3 scan modes for different recovery needs.

Supported storage devices Recover data from recycle bin, SD card, external disk, etc.

Free TrialFree TrialFree Trial

3000 users have downloaded Renee Undeleter and found data back!

Step 2: Launch the Software and Select Recovery Mode
Upon launching the software, you will be presented with several recovery modes. These typically include Fast Partition Scan, Whole Partition Scan, Whole Disk Scan, and Image Creation. For a thorough recovery, select Fast Partition Scan. These modes scan the entire disk or partition for recoverable files.
data recovery in renee undeleter
Step 3: Choose the Target Drive
Select the drive or partition where your deleted files were originally stored. Click Next to proceed to the scanning phase. The software will begin analyzing the selected drive, which may take some time depending on the storage size and data complexity.
scan disk with Renee Undeleter
Step 4: Preview and Recover Files
After the scan completes, a list of recoverable files will be displayed. Renee Undeleter allows you to preview files before recovery, making it easier to identify the exact data you want to restore. Select the files you wish to recover and choose a different drive or storage location for saving them.
preview before recovery
Step 5: Finalize the Recovery
Once you’ve selected the desired files, click on the Recover button. The software will restore the files to the chosen location. Make sure to check the recovered files to ensure they are in good condition and have not been corrupted.
Additional Tips for Successful Recovery
To maximize your chances of successful recovery, avoid using the affected drive for any new file storage until the recovery process is complete. Overwriting data on the drive can make it more challenging to recover the lost files. Additionally, consider creating a disk image of the affected drive before starting the recovery process. This creates a clone of the disk, allowing you to attempt recovery multiple times if needed.

Method 3: Deploy the Command Prompt to Recover Files

Windows File Recovery (winfr) is a command-line tool provided by Microsoft that allows users to recover files that have been permanently deleted from the Recycle Bin. This tool is particularly useful when other built-in Windows methods fail to retrieve the lost data. It is available for Windows 10 and later versions and can be downloaded from the Microsoft Store.
Tips:This method is only available for Windows 10(ver:2004)/11 users.
Note: Download and install Windows File Recovery from the Microsoft Store. Carefully follow the installation directions provided.
Microsoft's Windows File Recovery Work
Step 1: To begin using the Windows File Recovery tool, open the File Explorer and navigate to the folder where your deleted file was located. You can also search for the file by name using the search bar at the top of the File Explorer window.
Step 2: Once you have located the folder or file, open the Command Prompt by pressing the Windows and R keys on your keyboard, typing “cmd” into the Run dialog, and pressing Enter. Alternatively, you can right-click on the Start menu and select “Command Prompt” from the list.
type cmd in run dialog
Step 3: In the Command Prompt, type

winfr source: destination

and press Enter. The source refers to the drive where the deleted file was located, while the destination is where you want to recover the file to. For example, if you want to recover a file from drive C and save it to the desktop, you would type

winfr C: C:\Users\YourUsername\Desktop

Step 4: The tool will start running in either regular or extensive mode, depending on the size of the file and the current status of the drive. It may take some time for the tool to finish scanning and recovering the file, so be patient.

If users can use Windows System Restore to retrieve lost data

Windows System Restore is a built-in utility designed to help users revert their system to a previous state. This feature is particularly useful when dealing with system malfunctions or software conflicts. However, it is important to understand that Windows System Restore primarily focuses on system files and settings, rather than user data such as documents, photos, or other personal files.
System Restore and Data Recovery
One common misconception is that Windows System Restore can be used to recover files that have been permanently deleted from the Recycle Bin. While System Restore can indeed roll back system changes, it does not specifically target user files. Therefore, if you have permanently deleted files from the Recycle Bin, relying solely on System Restore may not yield the desired results.
Limitations of System Restore
There are several limitations to using Windows System Restore for data recovery. Firstly, System Restore points are created based on system events, such as software installations or updates, and do not necessarily coincide with the deletion of user files. Secondly, even if a restore point exists from before the files were deleted, System Restore does not guarantee the recovery of those files, as its primary function is to restore system settings and configurations.
When System Restore Might Help
In some rare cases, using System Restore might indirectly help recover lost data. For example, if a system malfunction or software conflict caused the deletion of files, restoring the system to a previous state might resolve the issue and potentially bring back the lost files. However, this is not a reliable method for data recovery and should not be solely relied upon.

Conclusion

In summary, recovering permanently deleted files from the Recycle Bin can be achieved using built-in Windows tools like Previous Versions, Command Prompt, and System Restore. However, if these methods fail, reliable third-party software such as Renee Undeleter can be utilized. These steps provide a comprehensive approach to reclaiming lost files without relying solely on external software solutions.