author avatar
    Specialist of Customer Service Dept.
 

Summary
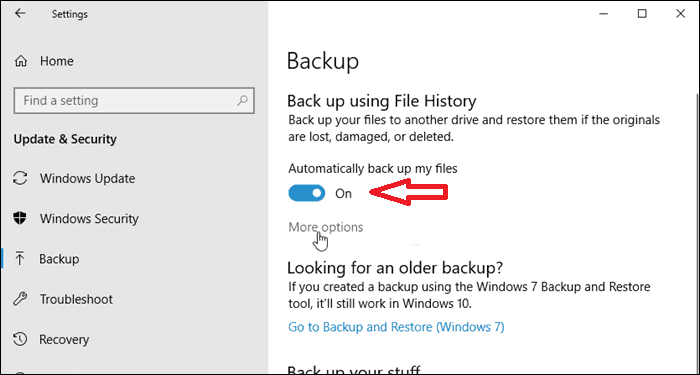
The article discusses how to recover deleted files that do not appear in the Recycle Bin. It explains that files might be missing due to being accidentally moved to another location or because they were permanently deleted, possibly by using Shift + Delete or if the Recycle Bin is disabled. The article suggests using both built-in Windows tools and third-party software to recover such files.


When you delete a file on your computer, you might expect it to go straight to the Recycle Bin, giving you a chance to recover it if needed. However, this isn’t always the case. Sometimes, files disappear without a trace, leaving you wondering where they went and how you can get them back. Fortunately, even if a file isn’t in the Recycle Bin, it’s often still recoverable. This article will explore various methods to recover deleted files that are not in the Recycle Bin, using both built-in Windows tools and third-party software.

Where Did the File Go if it's not in the Recycle Bin?

There are two main scenarios to consider when a file is missing:
1. File Moved by Mistake: It’s possible the file was accidentally moved to another location. In this case, you can use the Windows search bar to locate your missing files quickly.
2. Recycle Bin Disabled or File Permanently Deleted: If the Recycle Bin is disabled, or if you used Shift + Del to permanently delete the file, the file won’t appear in the Recycle Bin. In these situations, you can use data recovery software or services to retrieve your files before they are overwritten by new data.

Methods to Recover Deleted/Missing Files Not in Recycle Bin

Method 1: Use the Windows Search Bar

The first step in recovering a missing file is to search for it. Input the file name in the Windows search bar, and the system will attempt to locate it for you.
find word files in windows 10

Method 2: Use Data Recovery Software

If the file isn’t found via search, consider using third-party data recovery software. Renee Undeleter is a professional data recovery tool that can help you retrieve lost or deleted files from your computer. It is user-friendly and offers a high success rate for file recovery. With Renee Undeleter, you can find and recover around 500 file formats after overwriting. The process is simple thanks to its modern user interface and numerous quality-of-life features. In addition to signature scanning, it supports file system-based recovery for all major Windows file systems.
Step 1: Download, install, and run Renee Undeleter on your Windows computer.
Renee Undeleter - Powerful Data Recovery SoftwareRenee Undeleter data Recovery software

Easy to use Only simple steps to recover data from storage devices.

Multiple scan modes Fast partition scan, whole partition scan and whole disk scan for different recovery needs.

File types Support to recover pictures, videos, audios, documents, mails, etc.

Supported storage devices Recover data from recycle bin, SD card, external disk, etc.

Supported systems Windows 10, 8.1, 8, 7, Vista, XP, 2000 and Mac OS X10.6, 10.7, 10.8.

Easy to use Only simple steps to recover data from storage devices.

Multiple scan modes - 3 scan modes for different recovery needs.

Supported storage devices Recover data from recycle bin, SD card, external disk, etc.

Free TrialFree TrialFree Trial

3000 users have downloaded Renee Undeleter and found data back!

Step 2: Select the [ Fast Partition Scan ] option in the main interface.
Tips: Please avoid installing the software on the disk containing the data to be recovered in order to prevent data overwriting. Also, refrain from saving new data to the same disk partition after a file is lost to avoid further damage or complete loss of the lost file.
Renee Undeleter, select Fast Partition Scan
Data Recovery Features
Fast Partition Scan:Recovers files from accidental deletions or recycle bin clearance.
Whole Partition Scan:Restores files from inaccessible or formatted partitions.
Whole Disk Scan:Analyzes partition information for a comprehensive disk scan.
Image Creation:Generates a partition mirror image for backup purposes.
Step 3: Next, select the partition where the lost data is located, and click [ Next ] .
select partition to scan for fast partition scan
Step 4: Select the [ Fast Scan ] option and click the [ Next ] button to scan.
The [Fast Scan] mode scans the initial 30GB of available space on the chosen disk. If desired files are not found, the [Deep Scan] mode can be used for a thorough scan of the hard disk partition, though it will require additional time.
Select Fast scan in Fast Partition Scan
Step 5: Wait for the scan to complete
You can double-click the file to preview, then check the files that need to be recovered, and click the [ Recover ] button to recover the files to other disks.
preview before recovery
Please select a disk without any important data when installing the software to avoid overwriting it. If the quick scan mode doesn’t find the necessary files, we suggest trying the deep scan mode for a full search. Using a professional software like Renee Undeleter can greatly increase your chances of successful file recovery. It is important to note that the longer you wait to use this method, the lower your chances of successful recovery become.

Method 3: Use File History

If you have File History set up on your computer, you can restore files by following these steps:
1. Open the Settings app and navigate to Update & Security > Backup. Select Restore files from a current backup to begin.
2. Browse to the folder where the files were originally located and select the green Restore button.
Windows File History

Method 4: Use Folder’s Previous Versions

You can also roll back the folder containing your files to a previous version:
1. Navigate to the location of the deleted files, right-click on the folder, and select Properties.
2. Click on the Previous Versions tab.
file previous versions for file history
3. Select a backup that corresponds with the time when your files were still there and click on Restore.

How to Set Up File History

If you haven’t set up File History yet, here’s how to do it:
1. Open the Settings app in Windows and go to Update & Security.
settings Update And Security
2. Select Backup from the left sidebar.
3. From the Backup screen, select the drive you want to use for backing up your files by clicking on Add a drive.
4. Enable automatic backups by toggling on the Automatically back up my files option.
Turn on backup using file history

Conclusion

Files can be permanently deleted in Windows, but with the right tools and methods, you can often recover them. Whether using third-party data recovery software like Renee Undeleter or built-in Windows tools such as File History, you have multiple options to restore files that didn’t make it to the Recycle Bin. Setting up File History ensures that your files are backed up regularly, providing an additional layer of security against accidental deletion.
Renee Undeleter - Powerful Data Recovery SoftwareRenee Undeleter data Recovery software

Easy to use Only simple steps to recover data from storage devices.

Multiple scan modes Fast partition scan, whole partition scan and whole disk scan for different recovery needs.

File types Support to recover pictures, videos, audios, documents, mails, etc.

Supported storage devices Recover data from recycle bin, SD card, external disk, etc.

Supported systems Windows 10, 8.1, 8, 7, Vista, XP, 2000 and Mac OS X10.6, 10.7, 10.8.

Easy to use Only simple steps to recover data from storage devices.

Multiple scan modes - 3 scan modes for different recovery needs.

Supported storage devices Recover data from recycle bin, SD card, external disk, etc.

Free TrialFree TrialFree Trial

3000 users have downloaded Renee Undeleter and found data back!