author avatar
    Specialist of Customer Service Dept.
 

Summary
Learn how to clone your OS to an SSD with this comprehensive guide, including the importance of 4K alignment and various methods for a seamless transition. Make the most out of your SSD and optimize its performance for a faster and more efficient system.


Have you recently upgraded your computer with a new SSD? Congratulations on making a smart and efficient choice for faster system performance! Now, the next step is to clone your operating system to the new SSD. This can seem like a daunting task, but don’t worry, we’ve got you covered. In this guide, we’ll walk you through the basic concept of SSD cloning, including the important factors of 4K alignment and TRIM command. By the end of this chapter, you’ll understand why 4K alignment is crucial to consider when cloning your OS to an SSD. So, let’s dive in and get your SSD setup for optimal performance!

Talking about 4K Alignment and TRIM Command When Cloning Your OS to an SSD

When it comes to upgrading your computer’s storage, one of the most common methods is to clone your OS to an SSD. This process involves transferring all the data from your existing hard drive to a new solid-state drive (SSD), allowing for faster performance and more storage space. However, there are a few important concepts to understand before diving into this process, one of which is 4K alignment and the TRIM command. Let’s take a closer look at why these are essential to consider when cloning your OS to an SSD.
The Importance of 4K Alignment
Before we discuss 4K alignment, it’s important to understand what it means in the context of hard drives. Traditional hard drives have a physical sector size of 512 bytes, but newer hard drives, including SSDs, have a larger physical sector size of 4K (4,096 bytes). When data is written to a hard drive, it is typically done so in 4K blocks. If your hard drive’s physical and logical sector sizes are not aligned, it can lead to performance issues and even data corruption.
When you clone your OS to an SSD, it’s crucial to ensure that the partitions on the SSD are aligned with the drive’s physical sector size. This is known as 4K alignment. If your SSD is not properly aligned, it can lead to slower performance and even a shorter lifespan for your drive. Therefore, it’s essential to take the time to align your SSD before cloning your OS.
4K alignment
The Role of the TRIM Command
In addition to 4K alignment, another important concept to consider when cloning your OS to an SSD is the TRIM command. This command is specific to SSDs and is designed to help maintain their performance over time. When a file is deleted from an SSD, the data is not actually erased but marked as available for rewriting. Without the TRIM command, these spaces can become fragmented and slow down the performance of your drive.
The TRIM command helps to keep your SSD’s performance at its best by notifying the operating system which blocks of data are no longer in use and can be safely erased. This allows the drive to maintain optimal performance and prevent potential slowdowns in the future.
In summary, when cloning your OS to an SSD, it is important to consider 4K alignment and the TRIM command. Properly aligning your SSD and utilizing the TRIM command can help ensure that your drive is performing at its best and can even extend its lifespan. By understanding these concepts and taking the time to properly prepare your SSD for cloning, you can experience all the benefits of a faster and more efficient storage solution.

Clone Your OS to an SSD Using Renee Becca

In the previous chapter, we discussed the importance of 4K alignment and TRIM command when cloning your OS to an SSD. These two factors play a crucial role in ensuring the optimal performance and lifespan of your SSD. However, manually aligning and enabling TRIM command can be a daunting and time-consuming task for some users. Fortunately, there are third-party software programs like Renee Becca that can help simplify the process. In this chapter, we will discuss how to clone your OS to an SSD using Renee Becca and the benefits it offers.
Renee Becca is a tool specially used for system/hard disk data backup and restoration. It can help you back up and restore important data in your computer, such as programs, system configuration, emails, photos, videos, documents, bookmarks, etc. In addition, you can also use it to clone disk and system data. The software provides three cloning methods, including hard disk cloning/cloning system hard disk; partition cloning and system migration. You can choose the most suitable cloning method according to your different needs.
Here is a guide on how to use Renee Becca for cloning your Windows system from to an SSD.
Hot Topic - ADsRenee Becca – Safe and Quick System Migration to SSD

Automatic 4K alignment Improves SSD performance during system migration.

Support GPT and MBR Automatically adapt to the suitable partition format.

Support NTFS and FAT32 Redeploy various files in different file systems.

Back up quickly Back up files at up to 3,000MB/min.

Overall backup schedule Support system redeployment/system backup/partition backup/disk backup/disk clone.

Automatic 4K alignment Improve SSD performance

Support GPT and MBR Intelligently adapt to a partition format

Support NTFS and FAT32 Redeploy files in different file systems
Free TrialFree TrialNow 2000 people have downloaded!
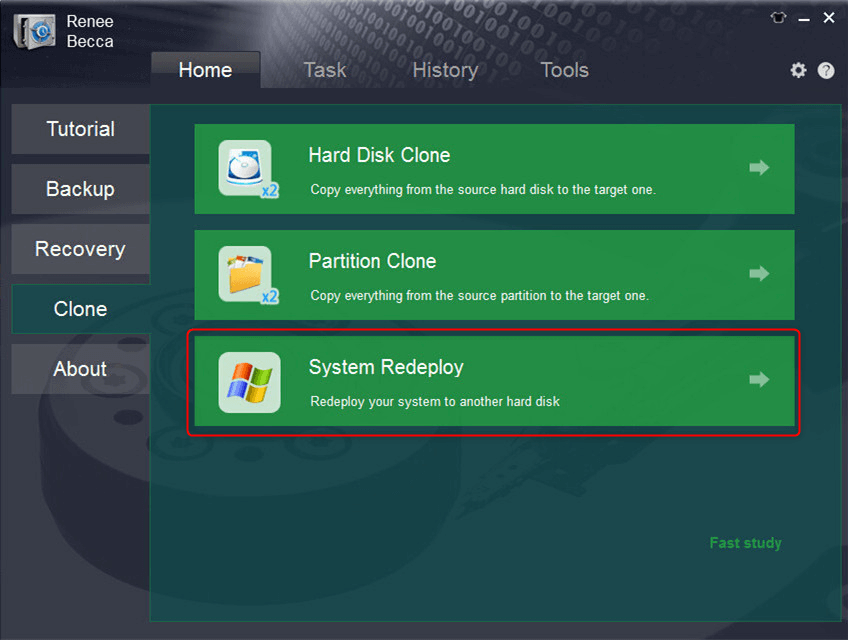
Step 1: Launch Renee Becca and click “System Redeploy” function in “Clone”.
select system redeploy function in renee becca
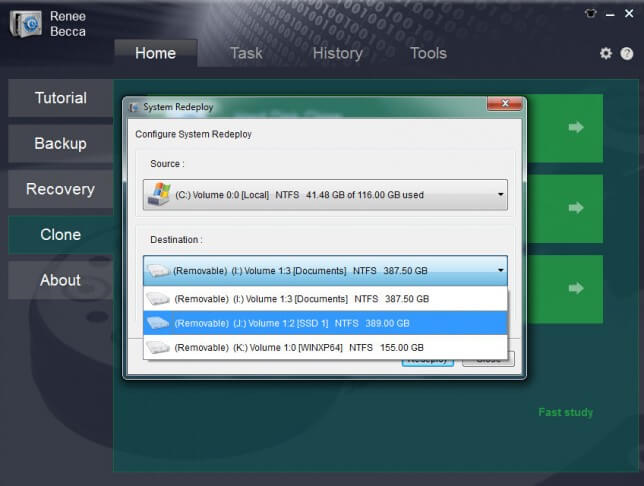
Step 2: Please select the original disk which saves Windows system and the target disk. Then click “Redeploy” to process the system migration.
select target disk and desination in system redeploy function in renee becca
By following these simple steps, you can seamlessly transfer your Windows OS to a new SSD using Renee Becca. This method eliminates the need for a fresh installation, saving you time and effort. Enjoy the improved performance and faster boot times that come with a new SSD!
In conclusion, using Renee Becca to clone your OS to an SSD is a convenient and efficient method that takes care of important factors like 4K alignment and TRIM command automatically. It is a valuable tool for anyone looking to upgrade their system with an SSD.
Pros:
  • Allows safe migration of operating system without fresh installation.
  • Simple steps for a smooth and hassle-free transfer.
  • Improves performance and faster boot times with new SSD.

Cons:

  • Doesn't have a Mac version.

Check the Status of Your SSD After Cloning

After successfully cloning your operating system to a new SSD, it is important to check the status of the SSD to ensure that it is functioning properly and all data has been transferred correctly. Ignoring this step may result in system instability or data loss in the future.
If you used Renee Becca to clone your OS to the SSD, you can easily check the status of the SSD using the built-in feature. In this chapter, we will guide you through the process of checking your SSD’s status and verifying its functionality.
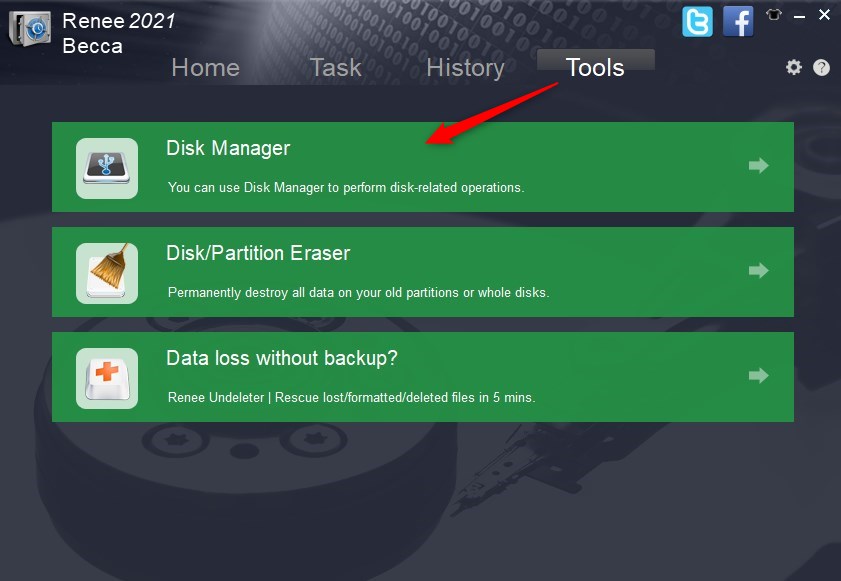
Step 1: Open Renee Becca and go to the “Disk Manager” function.
open disk manager in Renee Becca
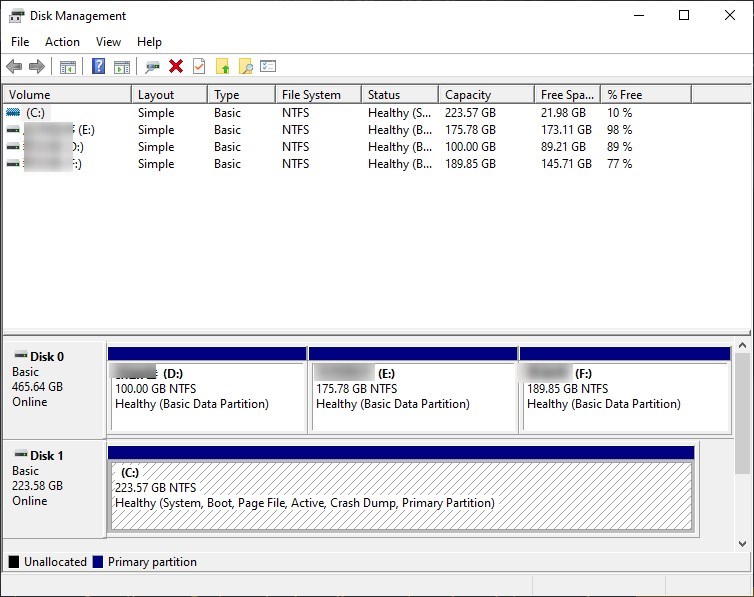
Step 2: A new window will pop up, showing the detailed information of your SSD, including its capacity, file system, partition style, and health status.
clone os to ssd
In conclusion, checking the status of your SSD after cloning is an important step to ensure that your system is running smoothly and all data has been transferred correctly. With the help of Renee Becca or any other reliable cloning tool, you can easily perform this task and have peace of mind knowing that your SSD is functioning properly.

Boot from a Cloned SSD

After successfully cloning your Windows OS to the new SSD, the next step is to set it as your primary boot drive. This will allow your computer to start up from the SSD for faster boot times.
Follow these step-by-step instructions to boot from a cloned SSD:
Step 1: Before proceeding with the booting process, make sure that you have successfully cloned your OS to the SSD. If you encounter any errors during the cloning process, refer back to the previous chapter for troubleshooting tips.
Step 2: Once you have confirmed that the cloning process was successful, shut down your computer and unplug the original disk from your system. This will ensure that your computer will only boot from the newly cloned SSD.
Tips:If you are using a laptop, you may need to open up the back panel and physically remove the original disk. 
Step 3: If you have multiple storage drives in your PC, you may need to go into your BIOS settings to change the boot order. This can usually be accessed by pressing a specific key (such as F2 or Delete) during the booting process. Consult your computer’s manual for the specific key and instructions on how to access BIOS settings.
Here is a list of BIOS shortcut keys for different brands. Alternatively, you can observe the BIOS shortcut keys displayed on the screen during booting.
BIOS NameMethodThe Key or Keys
AcerPress Del or F2 immediately after powering onDel/ F2
CompaqPress F10 while the cursor in the top right corner of the screen is blinkingF10
DellPress F2 when the Dell logo appears/ or press every few seconds until the message Entering Setup appearsF2
eMachinesPress Tab or Del while the eMachine logo displays on the screenTab/ Del
FujitsuPress F2 once the Fujitsu logo appearsF2
GatewayPress the F1 key repeatedly after restarting the computerF1
HPPress the F1/ F10/ or F11 key after restarting the computerF1/ F10/ F11
IBMPress F1 immediately after powering on the computerF1
LenovoPress F1 or F2 after powering on the computerF1/ F2
NecPress F2 to enter the BIOS SetupF2
Packard BellPress F1/ F2/ or Del to enter BIOSF1/ F2/ Del
SamsungPress F2 to start the BIOS setup utilityF2
SharpPress F2 after the computer startsF2
SonyPress F1/ F2/ or F3 after turning on the computerF1/ F2/ F3
ToshibaPress F1 or Esc after powering on to access BIOSF1/ Esc
ARLTPress Del or F11 when the respective message is shownDel/ F11
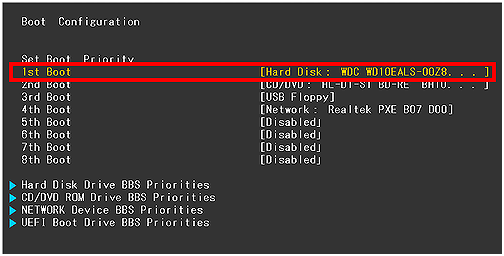
Step 5: Once in the BIOS settings, navigate to the “Boot” tab or menu and look for the option to change the boot order. Make sure to select the cloned SSD as the first boot option.
change the boot order in hard disk in boot configuration in BIOS
Step 6: Save your changes and exit the BIOS settings. Your computer should now reboot from the cloned SSD as the new boot drive.
Tips:If you encounter any issues during the booting process, you may need to go back and double-check your BIOS settings or reconnect the original disk.
After following these steps, your computer should now successfully boot from the cloned SSD. You can now enjoy the faster speeds and improved performance of your upgraded system.

Conclusion

In conclusion, cloning your operating system to an SSD is a crucial step in optimizing your computer’s performance. Proper 4K alignment and using the TRIM command are essential for a seamless transition and to ensure the SSD is functioning at its best. We have also provided tips for checking the status of your SSD and ensuring your PC or laptop boots from the cloned drive. Remember to remove or erase the original disk before booting from the new SSD to avoid any potential issues. With these tips and methods, you can easily and effectively clone your OS to an SSD and enjoy a faster and more efficient computer experience.