author avatar
    Specialist of Customer Service Dept.
 

Summary
Learn how to clone your operating system to an SSD in Windows, Mac, and Linux systems with our comprehensive step-by-step guide. Say goodbye to slow boot times and hello to improved performance with this ultimate tutorial on cloning OS to SSD.


Moving from a traditional hard drive to a solid-state drive can greatly improve the speed and performance of your computer. However, the process of transferring your operating system (OS) from one drive to another can seem daunting and complex. But fear not, with the right software and a step-by-step guide, this task can be easily accomplished. In this article, we will provide a comprehensive tutorial on how to clone your OS to an SSD, specifically focusing on using various software options in Windows, Mac, and Linux systems. So, let’s dive in and explore the different software options available for OS cloning.

Choosing the Right Software for OS Cloning

Windows: When it comes to cloning your OS on a Windows system, there are a variety of software options available. Some popular choices include Acronis True Image, Macrium Reflect, and Renee Becca. These tools offer user-friendly interfaces and a wide range of features to make the cloning process easier.
Mac: Mac users have access to several cloning software options as well. One of the most popular choices is SuperDuper, which offers a simple and straightforward interface. Other options include Carbon Copy Cloner and Tri-Backup, both of which offer advanced features for more experienced users.
Linux: Linux users have a plethora of software options for cloning their OS to an SSD. Clonezilla is a popular open-source option that offers a command-line interface and advanced features. dd is another commonly used command-line tool for cloning OS on Linux systems. For a user-friendly graphical interface, GNOME Disks and GParted are great options to consider.

Clone OS to SSD in Windows

If you’re a Windows user looking to clone your operating system to an SSD, Renee Becca is a user-friendly and efficient software option to consider.
Renee Becca is a tool specially used for system/hard disk data backup and restoration. It can help you back up and restore important data in your computer, such as programs, system configuration, emails, photos, videos, documents, bookmarks, etc. In addition, you can also use it to clone disk and system data. The software provides three cloning methods, including hard disk cloning/cloning system hard disk; partition cloning and system migration. You can choose the most suitable cloning method according to your different needs.
Here is a guide on how to use Renee Becca for cloning your Windows system from HDD to the SSD.
Hot Topic - ADsRenee Becca – Safe and Quick System Migration to SSD

Automatic 4K alignment Improves SSD performance during system migration.

Support GPT and MBR Automatically adapt to the suitable partition format.

Support NTFS and FAT32 Redeploy various files in different file systems.

Back up quickly Back up files at up to 3,000MB/min.

Overall backup schedule Support system redeployment/system backup/partition backup/disk backup/disk clone.

Automatic 4K alignment Improve SSD performance

Support GPT and MBR Intelligently adapt to a partition format

Support NTFS and FAT32 Redeploy files in different file systems

Free TrialFree TrialNow 2000 people have downloaded!
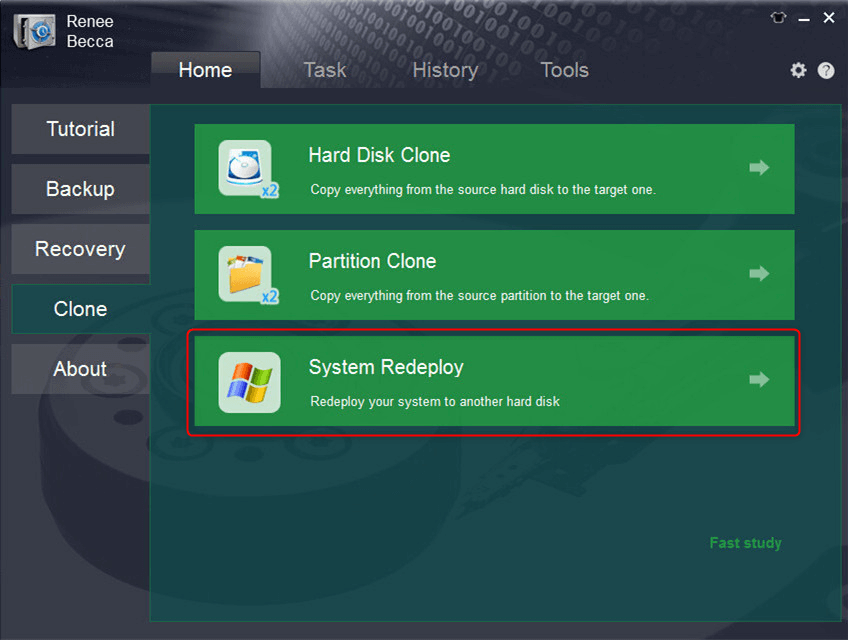
Step 1: Launch Renee Becca and click “System Redeploy” function in “Clone”.
select system redeploy function in renee becca
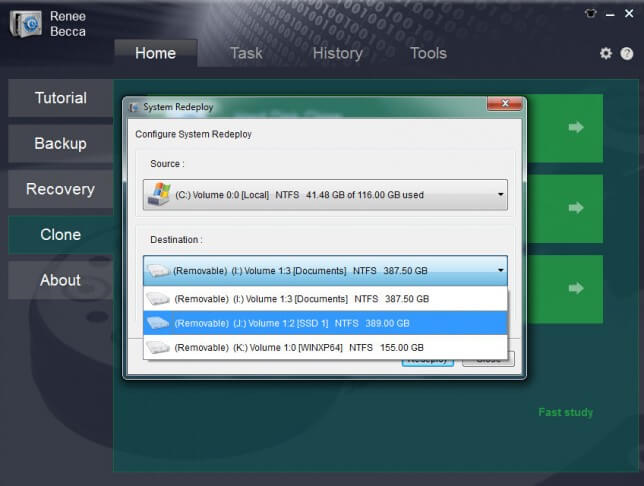
Step 2: Please select the original disk which saves Windows system and the target disk. Then click “Redeploy” to process the system migration.
select target disk and desination in system redeploy function in renee becca
Step 3: After clone finish, please selec the new disk in BIOS as the boot disk. Then you can start the computer from the newly installed hard disk with the original system.
Here is a list of BIOS shortcut keys for different brands. Alternatively, you can observe the BIOS shortcut keys displayed on the screen during booting.
BIOS NameMethodThe Key or Keys
AcerPress Del or F2 immediately after powering onDel/ F2
CompaqPress F10 while the cursor in the top right corner of the screen is blinkingF10
DellPress F2 when the Dell logo appears/ or press every few seconds until the message Entering Setup appearsF2
eMachinesPress Tab or Del while the eMachine logo displays on the screenTab/ Del
FujitsuPress F2 once the Fujitsu logo appearsF2
GatewayPress the F1 key repeatedly after restarting the computerF1
HPPress the F1/ F10/ or F11 key after restarting the computerF1/ F10/ F11
IBMPress F1 immediately after powering on the computerF1
LenovoPress F1 or F2 after powering on the computerF1/ F2
NecPress F2 to enter the BIOS SetupF2
Packard BellPress F1/ F2/ or Del to enter BIOSF1/ F2/ Del
SamsungPress F2 to start the BIOS setup utilityF2
SharpPress F2 after the computer startsF2
SonyPress F1/ F2/ or F3 after turning on the computerF1/ F2/ F3
ToshibaPress F1 or Esc after powering on to access BIOSF1/ Esc
ARLTPress Del or F11 when the respective message is shownDel/ F11
By following these simple steps, you can seamlessly transfer your Windows OS to a new SSD using Renee Becca. This method eliminates the need for a fresh installation, saving you time and effort. Enjoy the improved performance and faster boot times that come with a new SSD!
Pros:
  • Allows safe migration of operating system without fresh installation.
  • Simple steps for a smooth and hassle-free transfer.
  • Improves performance and faster boot times with new SSD.

Cons:

  • Doesn't have a Mac version.

Clone OS to SSD in Mac

With the increasing popularity of solid-state drives (SSD), many users are looking to clone their operating system (OS) from their old hard drive to a new SSD. This guarantees a faster and more efficient performance, without losing any data or settings. In this chapter, we will provide you with a detailed guide on how to clone your OS to an SSD using Carbon Copy Cloner compatible with Mac systems.
Step 1: Connect your SSD to your Mac using an external enclosure or adapter.
Step 2: Open the cloning software and select the option to clone your hard drive to your SSD.
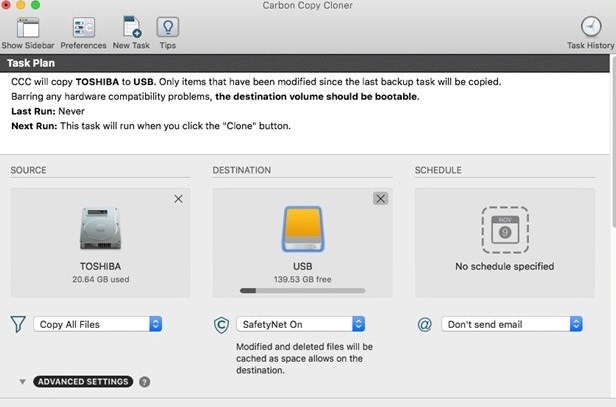
Step 3: The software will prompt you to select your source and destination drives. Make sure to select your old hard drive as the source and the new SSD as the destination.
clone os with carbon copy cloner
Step 4: Once all the settings are in place, start the cloning process. This process can take some time depending on the size of your hard drive, so be patient and let the software complete the cloning.
Tips:Once the cloning is finished, shut down your Mac and disconnect the old hard drive.
You may notice improved boot times, quicker file transfers, and overall smoother operation. It’s a great investment that can prolong the life of your Mac and enhance your user experience. Don’t forget to regularly update your operating system and apps to ensuremaximum performance and security.

Clone OS to SSD in Linux (Centos/Ubuntu)

Cloning your operating system to an SSD in Linux (Centos/Ubuntu) can be achieved through a combination of using the command line utility dd . This method allows for a precise and efficient transfer of the OS to the new SSD. Follow the steps below to successfully clone your OS:
Step 1: Prepare the new SSD
Make sure you have connected the new SSD to your computer. If necessary, change the SATA cable so that the new drive is recognized as /dev/sda. If the new SSD needs to be formatted, you can use GParted to create the desired partition layout (e.g., ext4 partition and a swap partition).
Step 2: Boot from a LiveUSB
Start your computer using a LiveUSB with a Linux distribution compatible with your system. This will allow you to run the cloning process without accessing the OS installed on your main SSD.
Step 3: Mount the old and new drives
Open a terminal and use the following commands to mount the old and new drives:

mkdir /mnt/old

mkdir /mnt/new

sudo mount /dev/sdX /mnt/old

(replace X with the appropriate partition letter of your old SSD)

sudo mount /dev/sdY /mnt/new

(replace Y with the appropriate partition letter of your new SSD)
Step 4: Copy files using dd command
Now, use the dd command to copy the files from the old SSD to the new SSD. Execute the following command:

sudo dd if=/dev/sdX of=/dev/sdY bs=4M conv=sync,noerror status=progress

(replace X with the appropriate partition letter for the old SSD and Y for the new SSD)
Step 5: Install Grub on the new drive
After the cloning process is complete, you need to install the bootloader (Grub) on the new SSD to enable booting. Change the root from the live CD root to the mounted partition’s root by using the following commands:

sudo mount –bind /dev /mnt/new/dev

sudo chroot /mnt/new

sudo grub-install /dev/sdY

exit
Step 6: Update /etc/fstab with new UUIDs
Open the /etc/fstab file using a text editor and update the UUIDs of the new SSD partitions accordingly. You can use the blkid command to find the UUIDs of the new partitions and replace the old ones in /etc/fstab.
Step 7: Change PARTUUIDs (Optional)
If you want both HDD disks to work in the same notebook, you need to change the PARTUUIDs of the new SSD partitions to ensure uniqueness. Refer to the provided sources on how to change PARTUUIDs in Linux filesystem.
Step 8: Reboot and test
Finally, reboot your computer and ensure that everything is functioning correctly. Verify that the new SSD is recognized as the main drive and that all files and settings have been successfully transferred.
By following these steps, you can clone your OS to an SSD using the command line utility dd. This method provides a reliable and efficient way to migrate your Linux OS to a new SSD.

Final Considerations

After successfully cloning your OS to an SSD, there are a few final steps and considerations to keep in mind to ensure a smooth transition and optimal performance. Here’s what you need to do:

Boot from the SSD

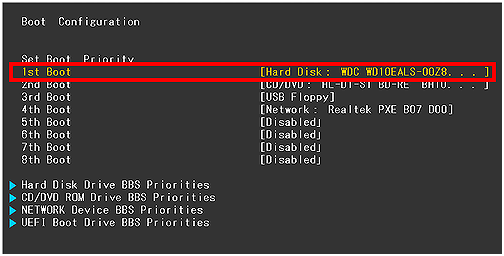
Make sure to change the boot order in your BIOS settings to prioritize the SSD as the boot drive. This will allow your computer to boot from the new OS on the SSD instead of the old one on the HDD.
change the boot order in hard disk in boot configuration in BIOS

Verify a successful migration

It’s always a good idea to double-check and verify that the cloning process was successful. You can do this by checking the available storage space on your SSD and ensuring that all of your files and settings are intact.

Other Considerations

If you have multiple drives on your computer, you may need to manually change the drive letter for your SSD in order to avoid conflicts with other drives. This can be done using the Disk Management tool in Windows or the Disk Utility in Mac.
Tips:If you encounter any issues or errors with your newly cloned OS, you can try redoing the process or seek help from the software’s support team.
Disclaimer: Please note that these instructions and considerations are general guidelines and may vary depending on your specific system and software choices. It’s always recommended to carefully research and follow the instructions provided by your chosen cloning software for the best results.

Conclusion

In conclusion, cloning your operating system to an SSD is a simple and effective way to improve your system’s performance. Whether you are a Windows, Mac, or Linux user, there are various software options available to help you with the cloning process. By following the step-by-step guides provided for each platform, you can easily transfer your OS to an SSD without any data loss or technical difficulties. Once the cloning process is complete, don’t forget to boot from the SSD and delete the old OS on the HDD to fully optimize your system’s speed and storage. Remember to double-check for a successful migration, and you’re all set to enjoy the benefits of a faster and more efficient SSD.