author avatar
    Senior Program Developer
 

Summary
Easily migrate OS to SSD on Windows 11 using automation tools, ensuring a smooth and error-free process while minimizing manual efforts.


Are you tired of sluggish performance and long load times on your Windows 11 operating system? Look no further! Moving your OS to an SSD can significantly improve your computer’s speed and overall responsiveness. With the latest advancements in technology, SSDs have become more affordable and readily available, making it the perfect time to make the switch. In this article, we will walk you through the process of migrating your operating system to an SSD in Windows 11, ensuring a smooth and hassle-free transition. Get ready to unleash the true potential of your computer!
 migrate to SSD speed up Windows 11

Benefits of Using Migration Tools to Migrate Windows 11 to SSD

Save Time

Migration tools are a valuable asset when it comes to migrating the operating system to an SSD in Windows 11. These tools streamline the process and eliminate the need for manual intervention, ultimately saving valuable time for users. Users no longer need to spend a lot of time reinstalling software and finding license keys for those software.

No Data Loss

One way migration tools simplify the migration process is by automatically transferring all the necessary files and settings from the old operating system to the new SSD. These tools can detect and migrate the operating system, applications, and personal files seamlessly, ensuring a smooth transition without the risk of data loss or missing files.

Maximize Performance

Migration tools also take care of tasks such as partitioning the SSD, optimizing system settings, and updating drivers. The tools can automatically identify the optimal partition size for the operating system, ensuring efficient utilization of the SSD’s storage capacity. Additionally, they can tweak various system settings to maximize performance on the new hardware.
In conclusion, automation tools are a time-saving solution for migrating the operating system to an SSD in Windows 11. They simplify the process by automatically transferring files, optimizing settings, and scheduling migrations. With tools like Renee Becca, users can enjoy a hassle-free migration experience while maximizing the performance and efficiency of their new SSD.

Prepare before using tools to transfer Windows 11 to SSD

Proper preparation is essential when utilizing migration tools to transfer Windows 11 to an SSD. By taking the necessary steps beforehand, you can ensure a smooth and successful migration process. Here are some important considerations before using migration tools:
Check system requirements
Before beginning the migration process, verify that your computer meets the system requirements for Windows 11 and the SSD. SSDs offer improved speed and performance, but they require specific hardware configurations. Ensure that your computer’s hardware, such as the motherboard and processor, is compatible with Windows 11 and the SSD. This will help prevent any compatibility issues during the migration process.
Clean up your system
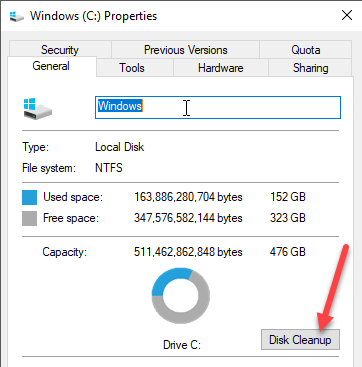
Over time, computers tend to accumulate unnecessary files and programs that can hinder the migration process. Prior to using migration tools, perform a thorough clean-up of your system. Uninstall any unused applications, delete temporary files, and run a disk cleanup utility to free up space on your hard drive. This will not only expedite the migration process but also optimize the performance of your new SSD. A tidy and organized system will result in a smoother and more efficient migration process.
Windows run a disk cleanup utility
Check hardware compatibility
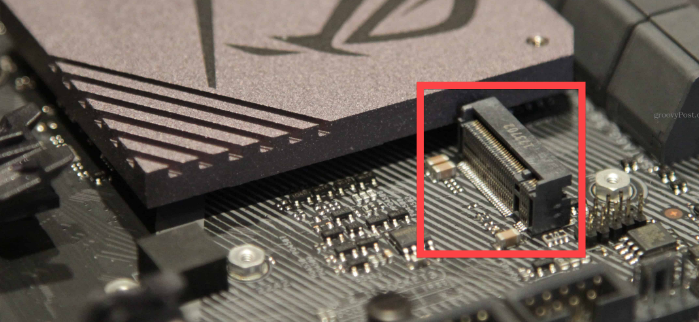
When adding a new SSD to your system, it’s essential to consider the physical aspects. Ensure that your computer has available drive bays to install the SSD. Additionally, check if you require any specific connectors or cables to connect the SSD to your motherboard and power supply. Some SSDs, such as M.2 SSDs, may not require additional cables, but please make sure your computer do have a M.2 slot.
M.2 slot on mother board

Overview of a Popular Migration Tool Specifically Designed for Windows 11 Migration

When it comes to migrating your operating system to an SSD in Windows 11, there are several automation tools that can greatly simplify the process and save you valuable time. These tools are specifically designed to handle the intricacies of the Windows 11 migration, ensuring a seamless transition from your old hard drive to the new SSD.
One popular migration tool for Windows 11 migration is Renee Becca. This tool offers a comprehensive set of features that make migrating your OS a breeze. With its intuitive interface, you can easily clone your entire system, including the operating system, applications, and data, to the SSD. It also supports incremental backups, allowing you to update your SSD without having to perform a full migration each time.
This software provides three cloning methods, including hard disk cloning/cloning system hard disk; partition cloning and system migration. You can choose the most suitable cloning method according to your different needs.
Here is a guide on how to use Renee Becca for cloning your Windows system to the SSD.
Hot Topic - ADsRenee Becca – Safe and Quick System Migration to SSD

Automatic 4K alignment Improves SSD performance during system migration.

Support GPT and MBR Automatically adapt to the suitable partition format.

Support NTFS and FAT32 Redeploy various files in different file systems.

Back up quickly Back up files at up to 3,000MB/min.

Overall backup schedule Support system redeployment/system backup/partition backup/disk backup/disk clone.

Automatic 4K alignment Improve SSD performance

Support GPT and MBR Intelligently adapt to a partition format

Support NTFS and FAT32 Redeploy files in different file systems

Free TrialFree TrialNow 2000 people have downloaded!
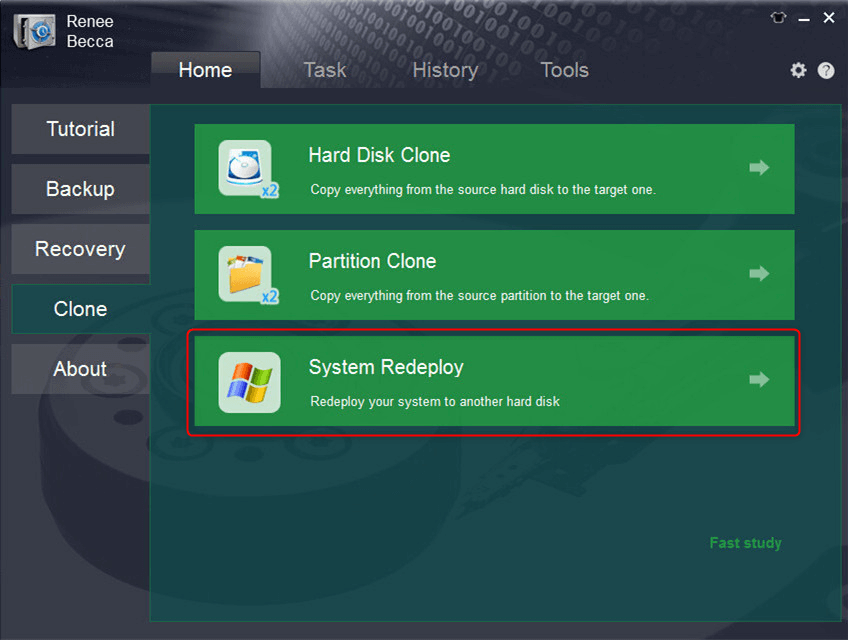
Step 1: Launch Renee Becca and click “System Redeploy” function in “Clone”.
select system redeploy function in renee becca
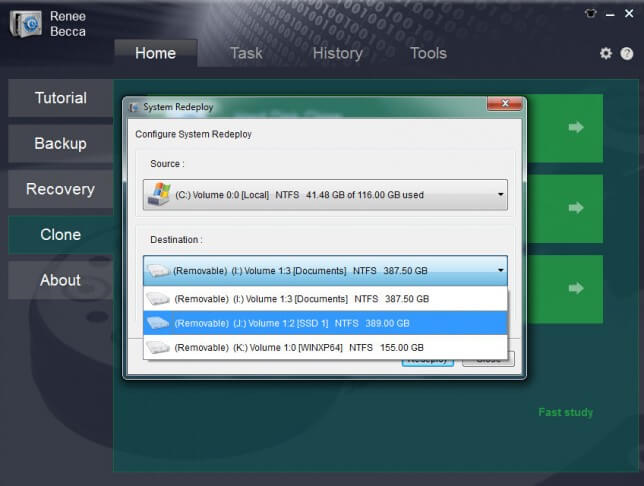
Step 2: Please select the original disk which saves Windows system and the target disk. Then click “Redeploy” to process the system migration.
select target disk and desination in system redeploy function in renee becca
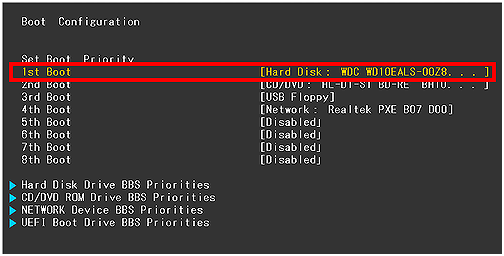
Step 3: After clone finish, please selec the new disk in BIOS as the boot disk. Then you can start the computer from the newly installed hard disk with the original system.
change the boot order in hard disk in boot configuration in BIOS
BIOS NameMethodThe Key or Keys
AcerPress Del or F2 immediately after powering onDel/ F2
CompaqPress F10 while the cursor in the top right corner of the screen is blinkingF10
DellPress F2 when the Dell logo appears/ or press every few seconds until the message Entering Setup appearsF2
eMachinesPress Tab or Del while the eMachine logo displays on the screenTab/ Del
FujitsuPress F2 once the Fujitsu logo appearsF2
GatewayPress the F1 key repeatedly after restarting the computerF1
HPPress the F1/ F10/ or F11 key after restarting the computerF1/ F10/ F11
IBMPress F1 immediately after powering on the computerF1
LenovoPress F1 or F2 after powering on the computerF1/ F2
NecPress F2 to enter the BIOS SetupF2
Packard BellPress F1/ F2/ or Del to enter BIOSF1/ F2/ Del
SamsungPress F2 to start the BIOS setup utilityF2
SharpPress F2 after the computer startsF2
SonyPress F1/ F2/ or F3 after turning on the computerF1/ F2/ F3
ToshibaPress F1 or Esc after powering on to access BIOSF1/ Esc
ARLTPress Del or F11 when the respective message is shownDel/ F11
By following these simple steps, you can seamlessly transfer your Windows OS to a new SSD using Renee Becca. This method eliminates the need for a fresh installation, saving you time and effort. Enjoy the improved performance and faster boot times that come with a new SSD!
Pros:
  • Allows safe migration of operating system without fresh installation
  • Simple steps for a smooth and hassle-free transfer
  • Improves performance and faster boot times with new SSD

Cons:

  • Doesn't have a Mac version

Tips and tricks for optimizing Windows 11 performance after migrating to an SSD using the migration tool

After successfully migrating your Windows 11 operating system to an SSD using a reliable migration tool, there are several additional tips and tricks you can follow to further optimize the performance of your system. These strategies, when combined with the previous tips mentioned, will ensure that your Windows 11 runs smoothly and efficiently on the new SSD. Here are some key tips to consider:
Disable Indexing
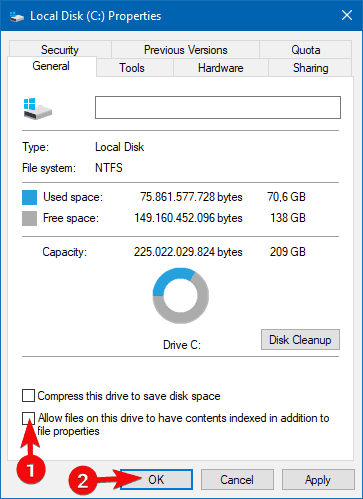
Indexing was designed to speed up file searches on hard disk drives (HDDs), but it is unnecessary for SSDs. Disabling indexing can prevent the system from making numerous writes to the SSD, reducing unnecessary wear and improving performance. To disable indexing, open File Explorer, right-click on the SSD drive, select Properties, and uncheck the box next to “Allow files on this drive to have contents indexed in addition to file properties.”
What's drive indexing on Windows 10/11 and how it works
Enable Write Caching
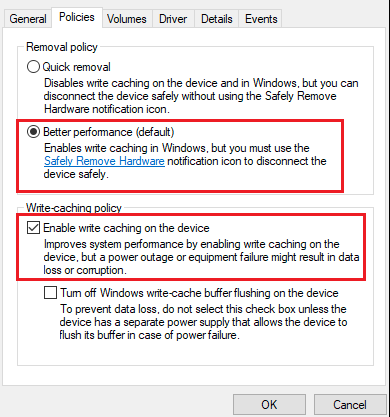
Write caching is a feature that uses system memory to queue write commands until the SSD is ready to write them to disk. Enabling write caching enhances performance by reducing application wait times. To enable write caching, open the Device Manager, double-click on Disk Drives, select the SSD drive, go to the Policies tab, and ensure that “Enable write caching on the device” is checked.
Enable write caching on the device
Adjust PCIe Low-Power States
While power-saving features like L1.2 can reduce consumption, they can also add latency, affecting overall performance. If you find that your SSD feels slower than expected, it may be due to PCIe bus settings. To adjust these settings, open the Control Panel, click on Hardware & Sound, then Power Options. From there, navigate to Change plan settings, Change advanced power settings, expand PCI Express, then Link State Power Management. Turn off Max Power Settings for the plugged-in mode and select Max Performance.
Use “God Mode” to Simplify Configuration
God Mode is a hidden feature in Windows 11 that allows you to consolidate over 200 settings menus into a single folder, making it easier to access and configure options. To enable it, right-click on the desktop, create a new folder, and name it with the following string:

GodMode.{ED7BA470-8E54-465E-825C-99712043E01C}

Open the folder to access all the available settings options for customization.
Regularly Perform Maintenance Actions
To keep your system running at peak performance, periodically perform maintenance tasks such as disabling unnecessary startup programs using the Task Manager, controlling which applications boot up when you log in, and regularly cleaning up temporary files to free up disk space.
By following these additional tips and tricks, in addition to the ones previously mentioned, you can optimize the performance of your Windows 11 operating system after migrating to an SSD using a migration tool. Each of these strategies focuses on different aspects of optimization, ranging from drive organization to power settings and configuration modifications. Implementing them will help ensure that your Windows 11 runs smoothly and efficiently, providing you with a seamless user experience on your new SSD.

Conclusion

In conclusion, migrating your operating system to an SSD in Windows 11 can significantly enhance your computer’s performance and speed. The seamless transition ensures that your files, programs, and settings remain intact, allowing for uninterrupted productivity. By harnessing the advanced capabilities of SSD technology, you can experience faster boot times, reduced loading screens, and improved overall system responsiveness. With Windows 11′s enhanced features and the added benefits of an SSD, you can unlock a whole new level of efficiency and enjoyment in your daily computing tasks. Embrace the change, and embark on a smoother and more productive digital journey with the power of SSD.