author avatar
    Specialist of Customer Service Dept.
 

Summary
Learn how to move Windows 11 to another drive with our detailed guide. This step-by-step tutorial covers everything from backing up data to setting your system to boot from the new drive, ensuring a seamless migration process.


Moving your Windows 11 installation to another drive can seem daunting, but it doesn’t have to be. Whether you’re upgrading to a larger SSD or simply reorganizing your storage, the process can be streamlined and efficient. One effective approach is cloning your system with professinal data backup software, which ensures all your files, programs, and license information are seamlessly transferred. The right cloning software even supports 4K alignment for SSDs and various resizing options.
moving Windows 11 to a new drive

Moving Your Windows System: What you should consider

Transferring your Windows 11 installation to a different drive may appear challenging, but it can be straightforward. Whether you’re upgrading to a larger SSD or reorganizing your storage, keep these factors in mind:
Transferring License Information and Windows Files : When cloning your Windows system, you’re not just copying files—you also need to transfer the license codes for all your daily programs. Retrieving these license codes can be time-consuming and troublesome.
Transferring Installed Programs : Programs like Microsoft Office, Adobe Suite, and even games require processing of their program data. Installing them one by one can waste a lot of time.
Handling boot codes for Windows : The Windows boot process is intricate, requiring proper configuration of the boot code on the new disk to ensure the computer can start Windows from it.
Handling Different Drive Sizes :  If you are transferring Windows to a larger drive, ensure you utilize the additional space effectively.
different size of hard disk

Moving Windows system with Clone Software

An effective solution involves using professional software to clone your system, ensuring seamless setting boot codes, transfer of all files, programs, and license information. The right cloning software supports 4K alignment for SSDs and offers various resizing options. Software like Renee Becca, Macrium Reflect, and Clonezilla are excellent choices. These programs also support cloning to both smaller and larger drives, allowing you to fully utilize additional space when upgrading to a larger drive.
Hot Topic - ADsRenee Becca – Safe and Quick System Migration to SSD

Automatic 4K alignment Improves SSD performance during system migration.

Support GPT and MBR Automatically adapt to the suitable partition format.

Support NTFS and FAT32 Redeploy various files in different file systems.

Back up quickly Back up files at up to 3,000MB/min.

Overall backup schedule Support system redeployment/system backup/partition backup/disk backup/disk clone.

Automatic 4K alignment Improve SSD performance

Support GPT and MBR Intelligently adapt to a partition format

Support NTFS and FAT32 Redeploy files in different file systems

Free TrialFree TrialNow 2000 people have downloaded!
Next, we will explain how to use cloning software to transfer your Windows system to a new target disk step by step.

Step 1: (Optional) Back Up Your Data to Ensure Nothing is Lost

Before you begin the process of moving Windows 11 to another drive, it is crucial to back up your data to ensure that nothing is lost during the migration. Important data can be backed up using tools like Renee Becca or OneDrive.
User Account Folders
When backing up your important personal files on Windows 11, the first and foremost directories to consider are the user account folders. These typically contain vital data such as documents, music, pictures, videos, and downloads – all of which are stored within the C:\Users\[Username] directory. Backing up these folders ensures that you don’t lose crucial files in the event your primary storage fails.
In addition, the Desktop folder under C:\Users\Username\Desktop is another crucial directory to back up, especially if you frequently save shortcuts, files, and documents directly to your desktop. Backing up this folder will preserve the arrangement and content of your desktop environment.
AppData Folder
The AppData folder is another critical directory that stores your user-specific application settings and data. This hidden folder is located within your user account folder at C:\Users\Username\AppData. It contains three subfolders – Local, LocalLow, and Roaming – each of which holds different types of settings and data for your installed applications.
Backing up the AppData folder is essential for preserving your customized application settings. To do this, you’ll need to adjust your File Explorer settings to show hidden files and folders.
file explorer hidden items
Email Clients
If you use desktop email clients like Outlook or Thunderbird, it is important to back up your emails and contacts. These programs store data in specific files within the AppData folder. For instance, Outlook stores its data in PST files within the 
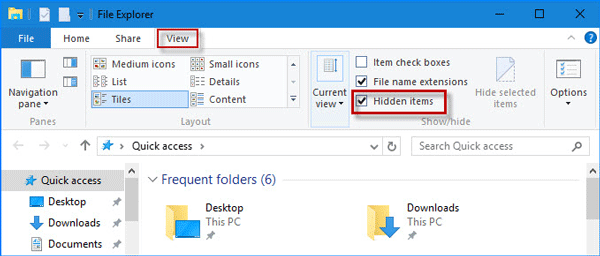
AppData\Local\Microsoft\Outlook directory, whereas Thunderbird stores email data in the Profiles folder found within AppData\Roaming\Thunderbird.
Custom Program Files
In addition to user-specific data, you might have custom program files stored outside the default directories. These could include installation files, third-party game save data, or other important directories tailored to specific applications or projects.

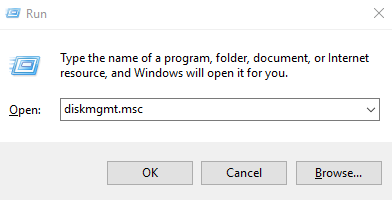
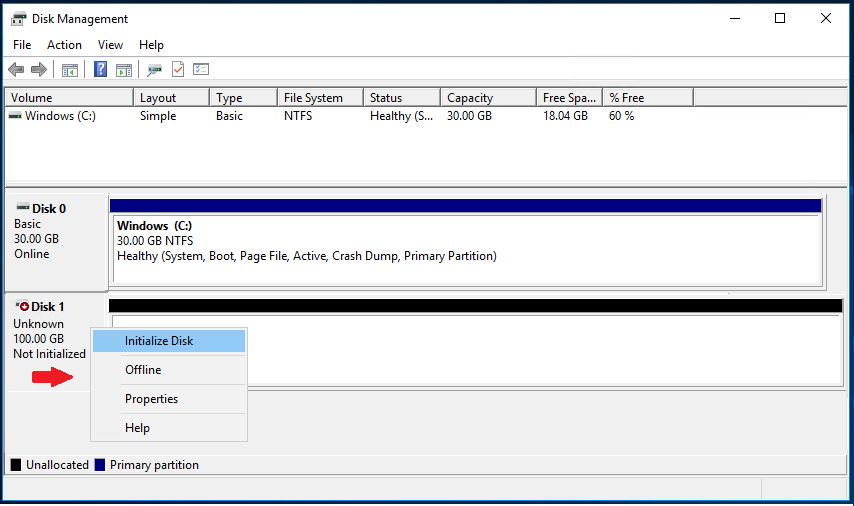
Step 2: Connect the New Drive to Your Computer Using Windows Disk Management

Before you can move your Windows 11 installation to a new drive, it is essential to ensure that the new drive is correctly connected and recognized by your system. This can be achieved by using Windows Disk Management. Follow the detailed instructions below to prepare your new drive for the migration process.
Step 1: Press Windows Key + R
press win and r button
Step 2: Input “diskmgmt.msc” and click “OK”
run disk management
Step 3: Make sure your can find your new hard drive in the dirve list. Then, right click the new disk and select “Initialize Disk”.
how to initialize a disk step 2
By following these steps, you can ensure that the new drive is ready for the Windows 11 migration. Once the drive is recognized and healthy, you can proceed to the next step of the migration process.

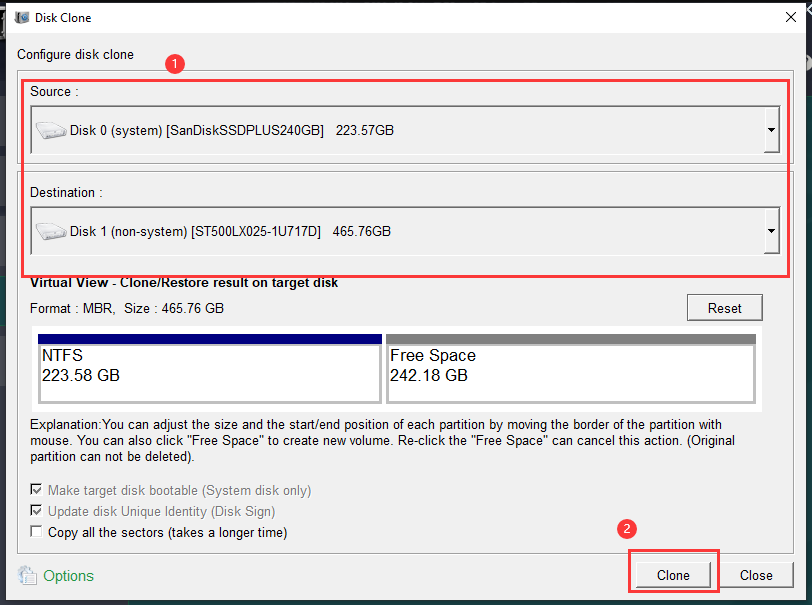
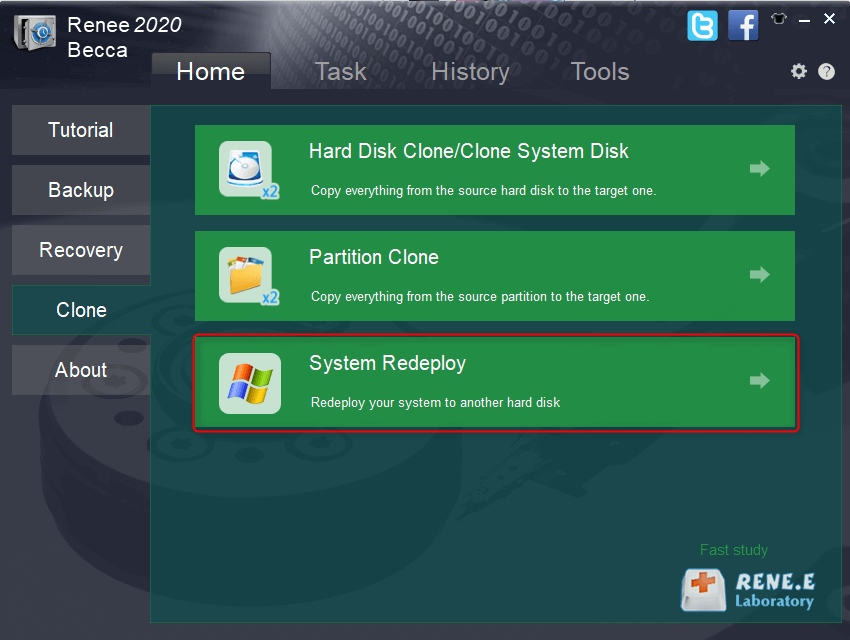
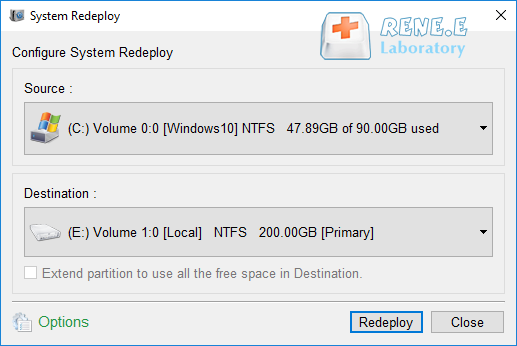
Step 3: Using Renee Becca to Clone the Existing Windows 11 System

To seamlessly move your existing Windows 11 system, including license information, files, and installed programs, to a new drive, you can use Renee Becca. This tool provides a straightforward and reliable way to clone your system. Follow these steps to ensure a smooth transition.

Preparation

Step 1: Download and Install Renee Becca
Begin by downloading and installing Renee Becca on your current system. Ensure that your computer meets the software’s requirements and that the installation completes without any issues. Launch Renee Becca to get started.
Hot Topic - ADsRenee Becca – Safe and Quick System Migration to SSD

Automatic 4K alignment Improves SSD performance during system migration.

Support GPT and MBR Automatically adapt to the suitable partition format.

Support NTFS and FAT32 Redeploy various files in different file systems.

Back up quickly Back up files at up to 3,000MB/min.

Overall backup schedule Support system redeployment/system backup/partition backup/disk backup/disk clone.

Automatic 4K alignment Improve SSD performance

Support GPT and MBR Intelligently adapt to a partition format

Support NTFS and FAT32 Redeploy files in different file systems

Free TrialFree TrialNow 2000 people have downloaded!
Step 2: Connect the New SSD to Your Computer
Connect the new SSD to your computer. Ensure it is recognized by your system. You can check this using Disk Management. Refer to the previous chapter on initializing the new drive if needed.

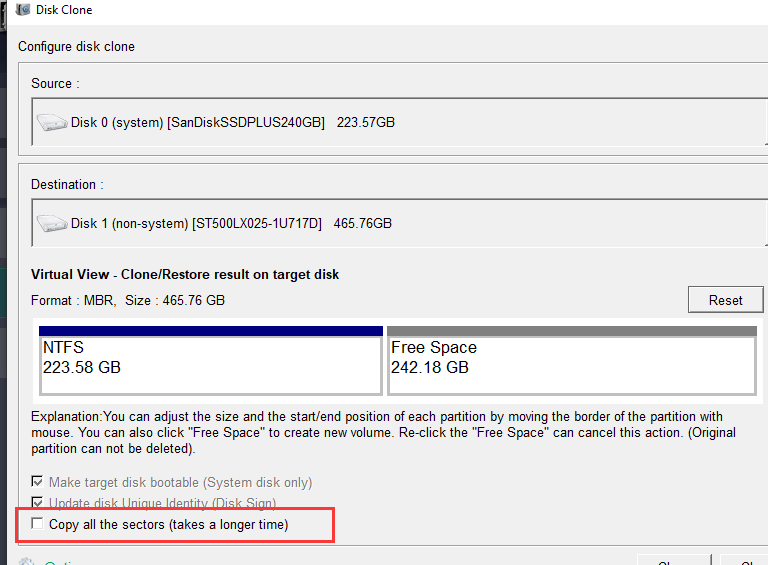
Method 1: Clone the whole hard disk

If you have a single drive bay or simply wish to replace your current hard drive with a larger one, this method is ideal for you.
Step 1: Select the “Hard Disk Clone/Clone System Disk” Option
In Renee Becca, navigate to the Clone option and select “Hard Disk Clone/Clone System Disk”. This feature will allow you to moving your entire Windows 11 system disk to the new SSD.
select to clone hard disk within renee becca
Step 2: Choose the Source and Destination Drives
In the Disk Clone window, select your current system drive as the source. Then, choose the new SSD as the destination drive. Make sure the storage capacity of the new SSD is sufficient to hold all the data from your current system drive.
clone system disk

Method 2: Clone System Drive(C Drive) Only

If you want to use the new drive as your system disk to boost performance while keeping your data on the old hard drive, this method could be ideal.
Step 1: Select the “System Redeploy” Option
In Renee Becca, navigate to the Clone option and select System Redeploy. This feature will allow you to migrate your entire Windows 11 system to the new SSD, including all the vital components.
migrate system with renee becca
Step 2: Choose the Source and Destination Drives
In the System Redeploy window, select your current system drive as the source. Then, choose the new SSD as the destination drive. Make sure the storage capacity of the new SSD is sufficient to hold all the data from your current system drive.
select a destination to redeploy system with renee becca
Step 3: Start the Cloning Process
By following these steps, you can successfully clone your existing Windows 11 system to a new drive using Renee Becca. This method ensures that all your data, licenses, and programs are preserved, providing a seamless transition to your new SSD.
For the next steps in the migration process, continue to the subsequent chapter.

Step 4: Set the System to Boot from the New Drive

After moving your Windows 11 operating system to a new drive, it is crucial to set the new drive as the primary boot device. Failing to do this will result in your computer continuing to boot from the old drive. Below are detailed instructions to help you set the OS to boot from the new disk by changing its boot priority in the BIOS or UEFI settings.
Step 1:Restart Your Computer
Begin by restarting your computer. As soon as your machine starts to boot up, you need to enter the BIOS or UEFI settings. This usually involves pressing a specific key or combination of keys right after the computer is powered on.
Step 2:Enter the BIOS or UEFI Setup Utility
Different manufacturers use different keys to access BIOS or UEFI. Below is a list of common keys used for various manufacturers:
  • DELL: Press F12 repeatedly before the Dell logo appears on the screen.
  • HP: Press F9 multiple times when the HP logo is displayed.
  • ASRock: Press DEL or F2.
  • ASUS: Press DEL or F2 for PCs, DEL or F2 for Motherboards.
  • Acer: Press DEL or F2.
  • Lenovo (Consumer Laptops): Press F2 or Fn + F2.
  • MSI: Press DEL.
  • Microsoft Surface Tablets: Press and hold Power and Volume Up buttons.

Refer to your computer or laptop manual for specific instructions on how to enter the BIOS or UEFI setup utility.

Step 3:Navigate to the Boot Menu
Once inside the BIOS or UEFI setup utility, use the arrow keys to navigate to the Boot Options or Boot Menu. This section allows you to change the boot priority.
Step 4:Select the New Drive as the Primary Boot Device
If your computer uses the Legacy BIOS, modify the boot order to set the new SSD as the first boot device. If your computer operates with UEFI, select the new SSD as the boot drive. The option is usually labeled as Boot Option #1 or something similar.
Step 5:Save Changes and Exit
After setting the new SSD as the primary boot device, save the changes and exit the BIOS or UEFI setup utility. The exact key to save and exit may vary by manufacturer, but it is often F10.
Following these steps ensures your system utilizes the new SSD effectively, offering improved speed and performance. If everything is done correctly, you can now enjoy Windows 11 on your new drive without any issues.

FAQ: Solving Cloning Issues

Situtaion 1: New cloned hard drive is not bootabled
Solution: After cloning, avoid using the disk manager to view the target hard disk to prevent Windows from altering its identifier. Additionally, ensure that the BIOS is configured to enable secure boot on the new machine, as Windows 11 typically uses UEFI for booting.
Situation 2: A program lost its license information after cloning to a new Windows system.
Solution:  Please select the “Copy all sectors” option when cloning the system disk, as this ensures that any license information stored in system reserved sectors is also copied. This may take longer, but it is necessary to transfer all possible sectors to the new hard disk.
copy all sectors

Conclusion

In conclusion, migrating Windows 11 to a new drive involves crucial steps like backing up data, selecting appropriate cloning software, and configuring BIOS settings. By following this guide and utilizing software such as Renee Becca, users can confidently move their system, including licenses and installed programs, to their new drive, ensuring a seamless transition and optimal use of storage space.