author avatar
    Senior Product Manager
 

Summary
Learn how to troubleshoot mouse freeze issues on your computer with this informative article. Find solutions to ensure smooth operation and uninterrupted performance.


mouse freezes

I. The reason why the computer mouse freezes

There are several reasons why a computer mouse may become stuck, including the following:
1. Stains on the bottom of the mouse or mouse pad can affect normal mouse function.
2. The wireless mouse needs a new battery to function properly.
3. There are problems with the components in the mouse.
4. The USB interface is not properly connected to the mouse.
5. The mouse driver is too old, or the new driver is not compatible with the mouse.
6. Some system settings have problems.
7. The system is attacked by viruses.
After understanding the reasons for the mouse freeze, please continue to read the solutions to the mouse freeze.

II. What should I do if the computer mouse freezes?

1. Preliminary solution to computer mouse freeze (general)

If the mouse stutters or freezes, you can try the following initial solutions.
① Clean the mouse and replace it with a clean mouse pad
Stains on the mouse or mouse pad can affect sensitivity and cause freezing or erratic cursor movement. Clean the mouse and replace the pad to troubleshoot freezing issues.
② Change the USB port or connect it to another computer
Connect the mouse to different USB ports to test functionality. If it works, the original USB port may be faulty. Try connecting the mouse to other devices to determine if the issue lies with the mouse itself. If other mice work fine but the problem persists with yours, consider replacing it or updating the driver.
③ Replace the battery for the wireless mouse
Replace the battery in the wireless mouse if it freezes, then check if the issue is resolved.
④ Use antivirus software
A virus attack on the computer may cause hardware issues, such as freezing mouse or cursor malfunction. Use virus killing software to scan comprehensively.
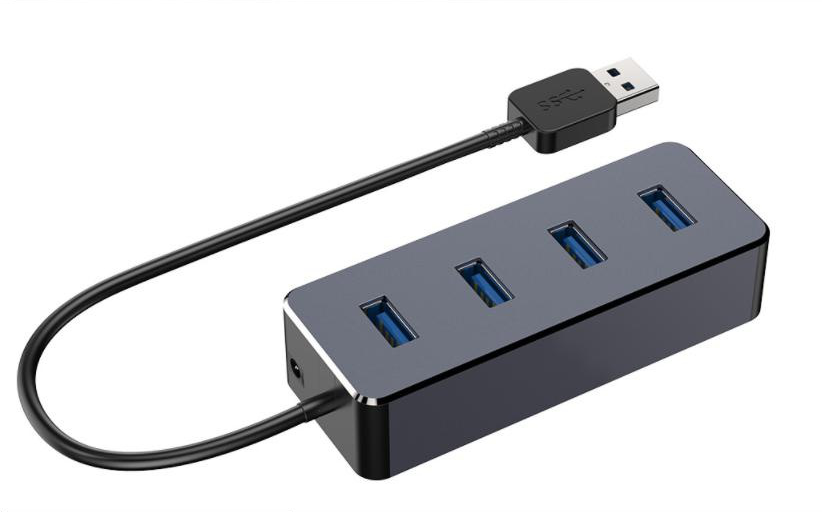
⑤ Connect mouse or keyboard without USB hub
To increase available USB ports on ultra-thin notebooks, connect mouse and keyboard directly to laptop ports to avoid freezing when using USB hub.
usb hub

2. Reinstall, update or roll back the mouse driver (Windows)

Problems with the mouse driver may cause freeze issues. Restart the computer if the mouse is not working at all. If it works after restarting, reinstall, update, or roll back the driver.
Step 1: Right-click on the Start menu and select (Device Manager).
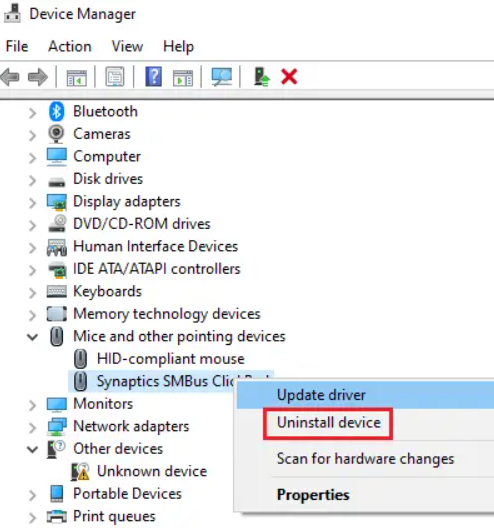
Step 2: Expand (Mice and other pointing devices), right-click the target mouse, select (Uninstall device), then remove and reconnect the mouse, and restart the computer. Generally, after restarting the computer, the mouse will be automatically recognized and the driver will be installed.
mouse driver uninstall device
Step 3: If the mouse is not recognized, press (Windows icon + X), then (M) to open device manager, select (Mouse and other pointing devices) with (Tab) and down arrow, press (Alt+A) for (Action) > (Scan for hardware changes), then press (Enter) to detect and install the driver automatically.
scan hardware in device manager
Step 4: If the mouse is still stuck, find the mouse device in the device manager, right-click, select (Update Driver), then choose (Automatically Search Driver). This process may take some time, so please be patient.
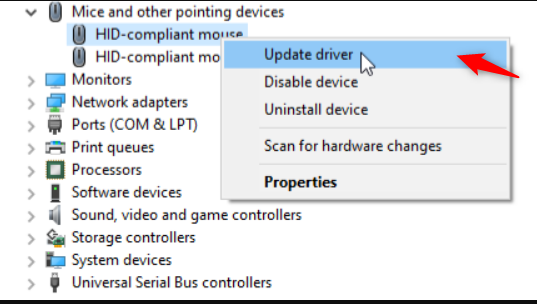
mice update driver
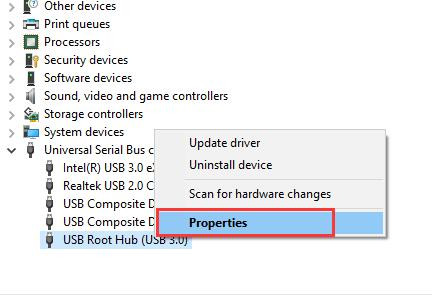
Step 5: If you experience mouse freezing after updating the driver, you can roll back to the previous mouse driver by right-clicking the mouse device, selecting (Properties) > (Driver) > (Rollback Driver).
3. Adjust the power management settings of the mouse (Windows)

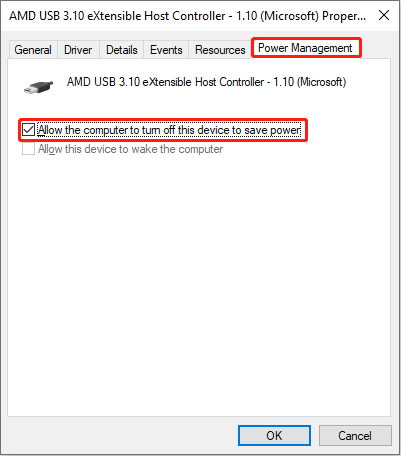
By default, Windows 10 closes unnecessary drivers and processes to save power, which can cause mouse issues if “Allow the computer to turn off this device to save power” is enabled. Adjusting the power management settings of your mouse can resolve this.
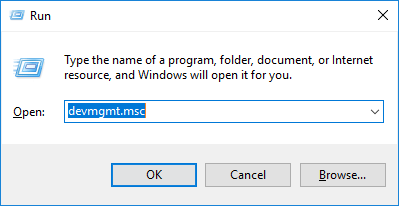
Step 1: Press the (Windows + R) keys simultaneously to launch the Run dialog. Type (devmgmt.msc) in the dialog and press (Enter) to open the Device Manager.
open device manager
Step 2: Scroll down the Device Manager menu and click (Universal Serial Bus Controllers) to expand it.
Step 3: Double click on the USB Root Hub (USB 3.0) option to display its properties. Uncheck the “Allow the computer to turn off this device to save power” option box under the (Power Management) section.
Step 4: Restart the Mac device or force quit the application (Mac).
usb properties in device managerUSB host device manager

4. Restart the Mac device or force quit the application (Mac)

When the Mac mouse freezes, restart the device first to check for resolution. If the issue persists after opening an application and the application becomes unresponsive, force quit by pressing and holding <kbd>Command (⌘)</kbd> + <kbd>Option</kbd> + <kbd>Escape</kbd>.
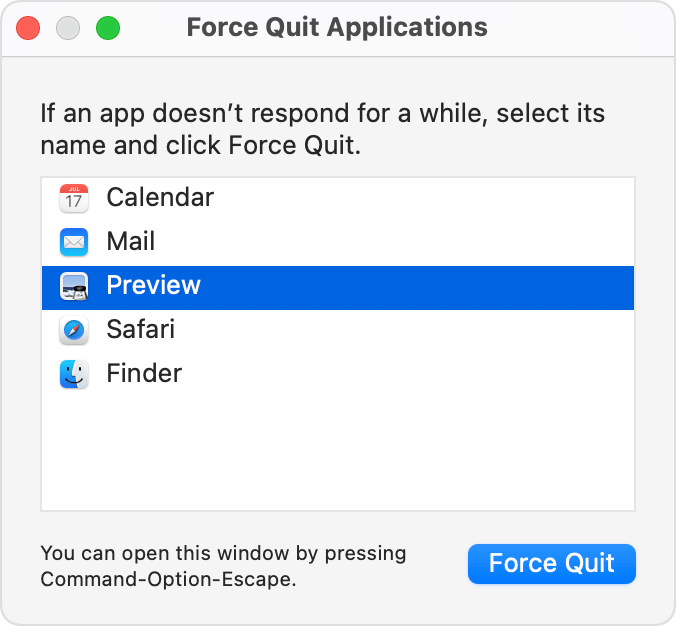
Navigate to the app using the arrow keys and press the (Enter) key to exit.
force quit application

5. Set Accessibility (Mac)

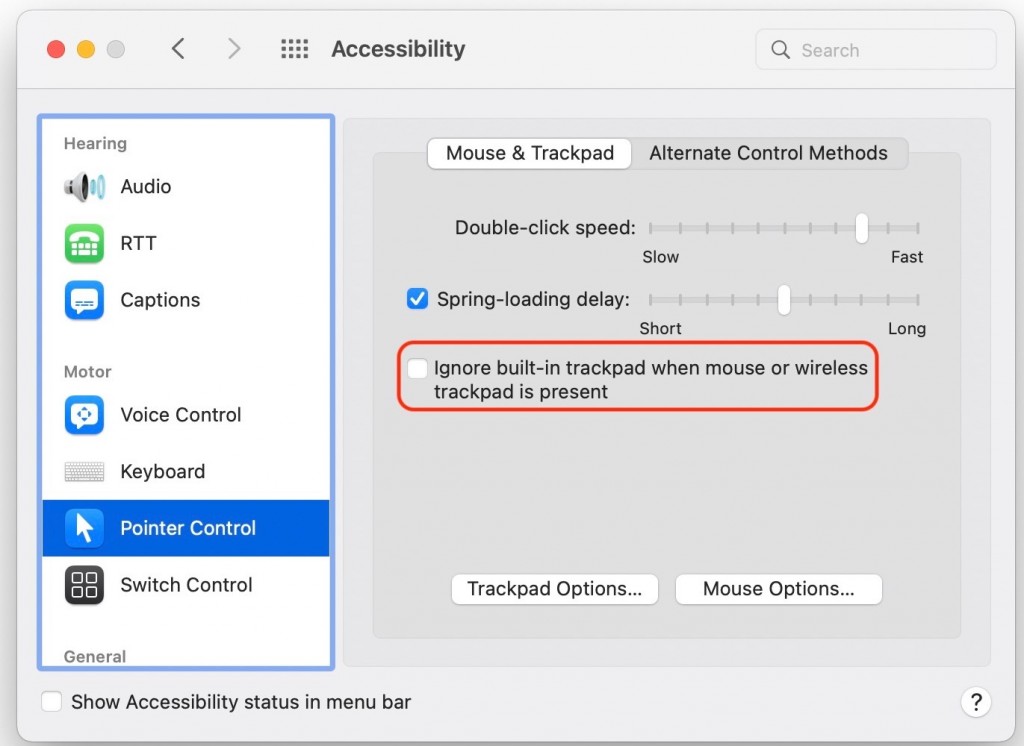
The Macbook has a built-in touchpad. To avoid conflicts and freezing issues when using an external mouse or wireless touchpad, go to Mac System Preferences > Accessibility > Pointer Control, and check the option to ignore the built-in touchpad when an external device is connected. Restart the computer to see if the problem is resolved.
pointer control macos

6. Reset SMC (Mac)

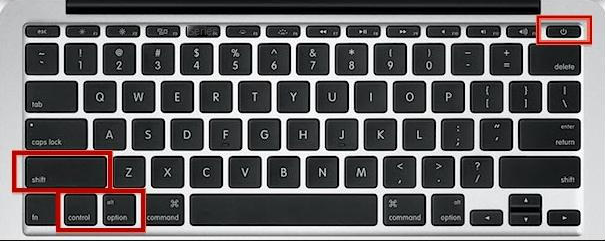
Resetting the System Management Controller (SMC) on your MacBook can help with general performance issues. To do this, shut down the MacBook, press and hold the (Shift + Control + Option) keys and the power button simultaneously for about 10 seconds, then release the buttons and start the computer normally. Check if the mouse stuck and frozen problem has been resolved.
mac Shift + Control + Option + Power button
To prevent data loss from system failures or hard disk damage, it is recommended to develop a habit of regularly backing up files. Use Renee Becca for automatic file backup on Windows systems. Learn more here.

III. Regularly back up files to prevent data loss caused by system failure

1. What is Renee Becca

Renee Becca is a tool specifically designed for system and hard disk data backup and restoration. It can efficiently back up and restore important data on your computer, including programs, system configuration, emails, photos, videos, documents, bookmarks, and more. Using leading incremental/differential backup technology, it saves time and disk space. Renee Becca supports system backup, partition backup, hard disk backup, file backup, disk cloning, and system migration to meet various needs.
Renee Becca - Reliable Data Backup & Restore Software

Quick Backup files at up to 3,000MB/min.

Fullfill different backup needs Supports system backup, disk / partition backup, file backup and disk clone.

Intelligent Automatically analyze the differences between source and backup data.

Convenient Support VSS, allowing to freely view webpages when backing up system.

Highly compatible Supports various files and storage devices.

Quick Backup files at up to 3,000MB/min.

Fullfill different backup needs Backup for disk, partition and system. Save disk space by backing up incremental /differential data.

Highly compatible Supports various files and storage devices.
Free TrialFree Trial 2000 users have downloaded and enjoy Renee Becca!

2. How to use Renee Becca to automatically backup files?

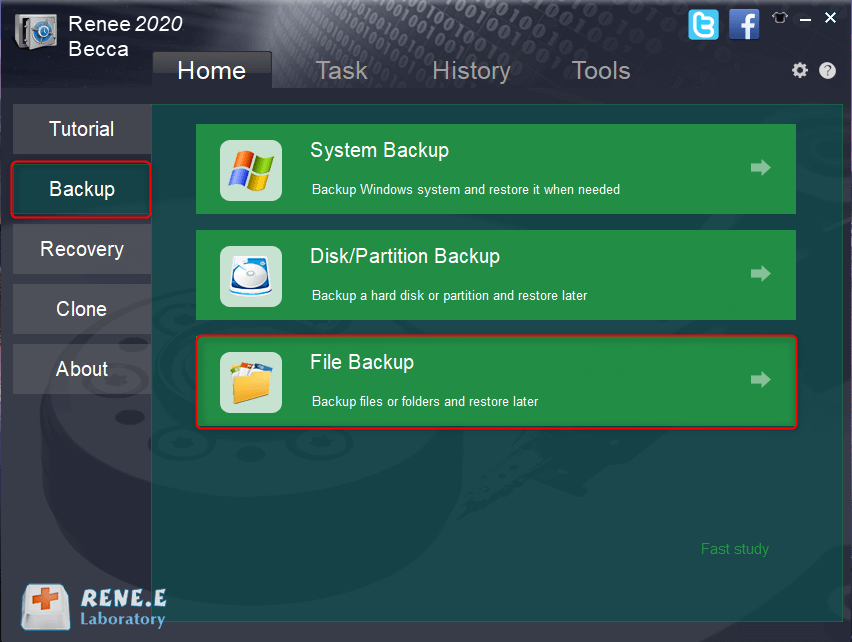
Step 1: Download, install, and run Renee Becca on the computer. Select the “File Backup” option in the main interface.
click to back up files in renee becca
Step 2: Select the files to be backed up in Source and choose the hard disk partition for storing the backup data Destination.
how to back up files in renee becca
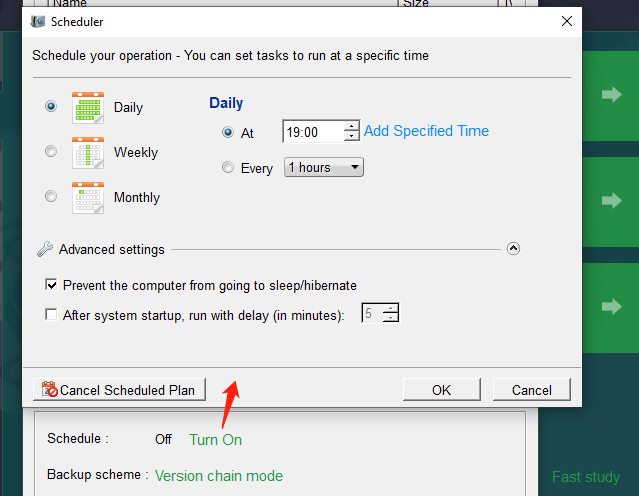
Create a daily/weekly/monthly automatic backup plan in the task plan and enable the function by clicking OK.
file backup schedule on Renee Becca
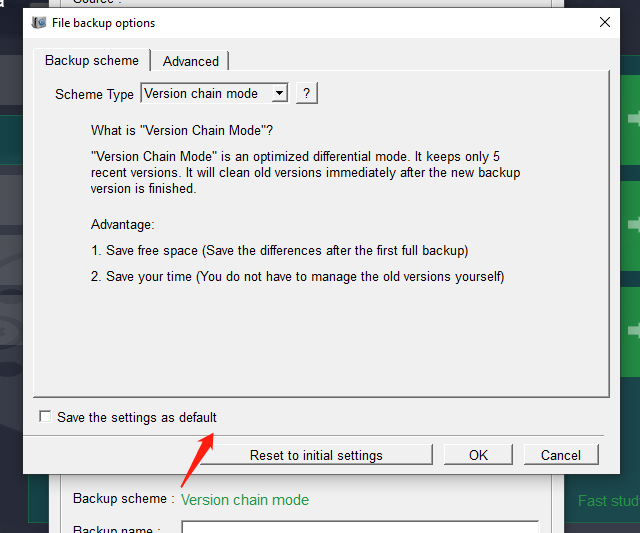
Select a suitable backup scheme mode in Renee Becca, choosing from version chain, single version, full, incremental, and differential modes based on individual needs.
backup mode of file backup on Renee Becca
Renee Becca offers 5 backup plans:
Version chain mode: Only the latest 5 versions are kept, and useless old versions are automatically deleted after the backup is complete.
Single version mode: Only the most recent version is kept, and the previous version is automatically deleted after the backup is complete.
Full mode: Create a full backup.
Incremental mode: After the initial full backup, only incremental backups are created.
Differential mode: After the initial full backup, only differential backups are created.
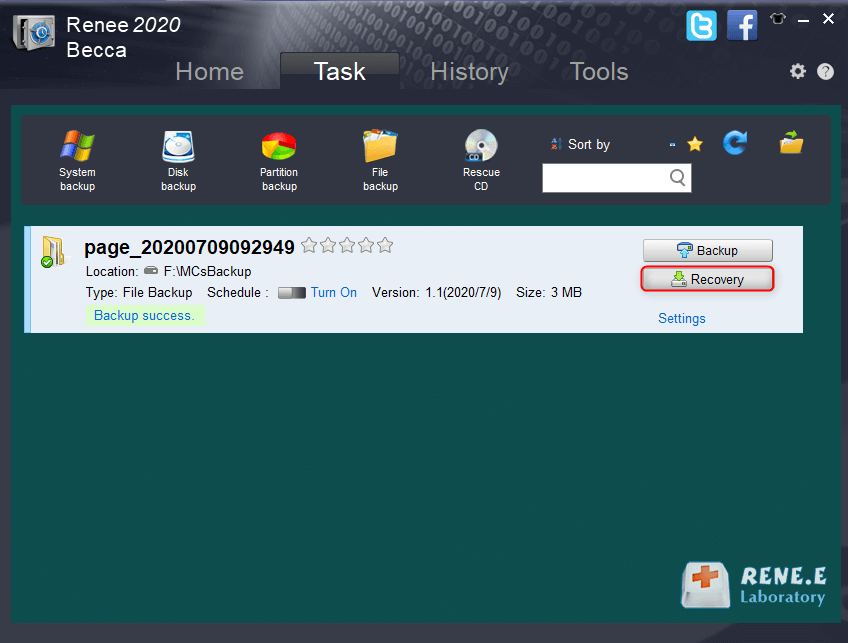
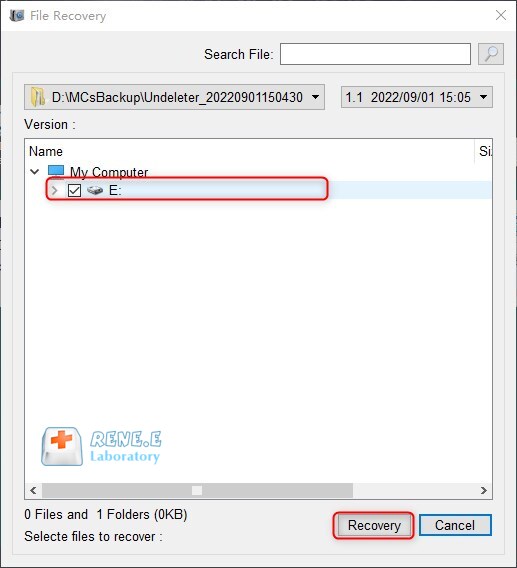
Step 3: Click the (Backup) button to execute the backup file command based on your settings and monitor the progress of all backup tasks on the taskbar. Use the (Recovery) button to restore files to the designated hard disk when needed after the backup is finished.
recover backup files from renee becca
Step 4: Then select the location where the files are to be restored, and click the (Recovery) button.
files recovery location
Kind tipsFor Mac users, check out the specific steps for backing up with Time Machine.