author avatar
    Specialist of Customer Service Dept.
 

Summary
Looking to upgrade to a faster and more reliable system? Learn how to easily migrate only your OS to a new SSD with our step-by-step guide, including tips on preserving data and choosing the right SSD.
Are you tired of your slow computer? Are you looking for a way to boost its performance without spending a fortune on a brand new device? One simple solution is to upgrade your hard drive to a solid-state drive (SSD). But if you’re only interested in migrating your operating system (OS) to the SSD and keeping your existing data intact, you’ll need to carefully consider which SSD to purchase. In this chapter, we’ll discuss the crucial criteria for selecting an SSD that has enough capacity to accommodate your Windows 10 OS and any additional data you may have. After all, the right SSD can significantly improve your computer’s speed and overall performance, making it a worthwhile investment.

SSD Selection Criteria

Step 1: When considering an SSD upgrade for your Windows 10 OS, capacity is of paramount importance. An SSD will dramatically enhance OS-related tasks, thanks to significantly lower seek times compared to HDDs. If you’re planning to relocate your OS, make sure the chosen SSD has enough space not only for the OS but also for the applications you use most frequently, as this will leverage the SSD’s quick access times. For instance, if your current HDD indicates 300GB of data, opt for an SSD with at least 500GB to ensure room for the OS, essential programs, and additional data.
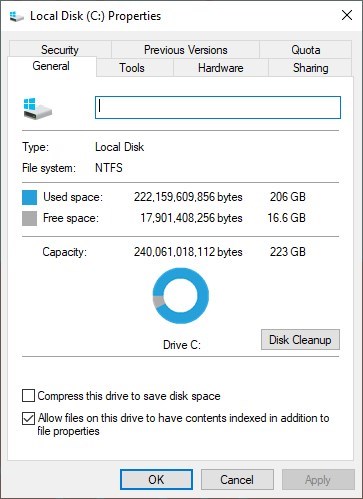
Step 2: To accurately estimate the size of the SSD required, take stock of your used space on your current drive. Right-click the HDD in File Explorer and select Properties to view the used space. To future-proof your investment, add a 25-30% buffer to this figure to accommodate for system updates, new software, and file storage. For instance, for a used space of 300GB, a 500GB SSD should suffice, offering that necessary extra space.
select Properties to view the used space
Step 3: For heavy users dealing with large files or numerous applications, consider an SSD with 1TB or more. An overlooked advantage of larger SSDs is their ability to maintain performance and longevity, due to additional room that facilitates efficient wear leveling and garbage collection processes.
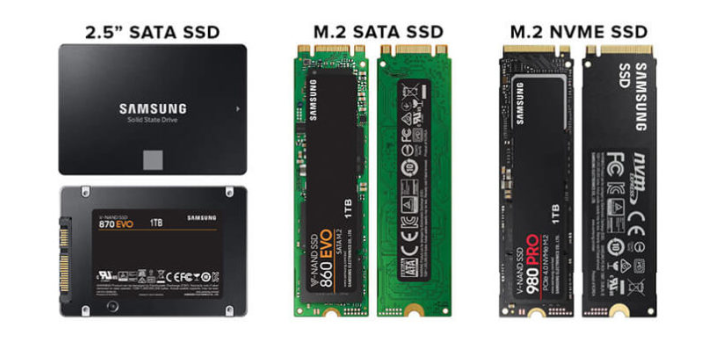
Step 4: Always confirm the SSD’s compatibility with your machine, checking for the correct interface type (SATA or NVMe/PCIe), and the appropriate physical form factor (2.5-inch or M.2), ensuring the migration process will be hassle-free.
sposta solo il sistema operativo su ssd
Using an SSD for your OS and the most used applications while keeping an HDD for less frequently accessed data can be a cost-effective way to boost your system’s performance. This setup ensures that your system boots up rapidly and your primary applications load swiftly, maximizing the efficiency of your workflow. However, it is crucial to remember that while the SSD can significantly decrease boot and application load times, accessing data on the HDD will still be subject to the mechanical drive’s slower speeds. Therefore, choosing an SSD with enough space to host both your OS and frequently used data provides the ideal balance of speed and storage. This well-thought-out approach ensures a responsive system while also offering ample storage for large files and lesser-used applications on the secondary HDD.

Pre-Migration Checklist: Essential Steps and Backups for Secure Data

Embarking on the journey to transfer your Windows 10 operating system to a new SSD requires a thorough Pre-Migration Checklist to ensure a seamless transition and mitigate risks such as data loss, security breaches, and operational disruptions. This essential step safeguards your data and prepares the system for migration.
Step 1: Confirm SSD Capacity and Compatibility. Ensure the new SSD has adequate capacity for the OS and additional files. A larger SSD is preferable to avoid storage issues post-migration. Connect the SSD to your system using an appropriate adapter and secure any necessary drive updates or firmware enhancements.
Step 2: Secure Your Data. Prior to any migration, it’s imperative to create backups. Use Windows” built-in Backup feature or third-party software to create an image or file history of your data. Make sure your antivirus and anti-malware tools are up to date to prevent security breaches.
Back up data
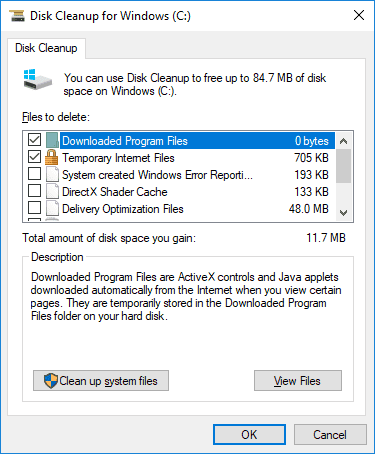
Step 3: Clean and Organize Your Current System. Review your files and programs, deleting anything unnecessary. A Disk Cleanup and Defragmentation may also be beneficial. This process reduces the data to be migrated and optimizes the cloning process.
run a disk cleanup
In summary, following this Pre-Migration Checklist carefully prepares you for a successful transfer of your Windows 10 OS to a new SSD. The measures taken here will help to preserve your data integrity, maintain security, and reduce system downtime during the migration. It is crucial to double-check that the capacity of the new SSD is sufficient for your existing system, and to ensure that the cloning software employed is compatible with your SSD type and offers features that will streamline the process. By doing so, you can enjoy the enhanced performance benefits of an SSD with minimal hassle..

Using Renee Becca to Clone and Migrate Windows 10 OS to SSD

In this chapter, we will discuss how to use Renee Becca to clone and migrate the Windows 10 OS to a new SSD. This will allow you to transfer all your system files and settings to the new drive, so you can enjoy faster speeds and better performance.
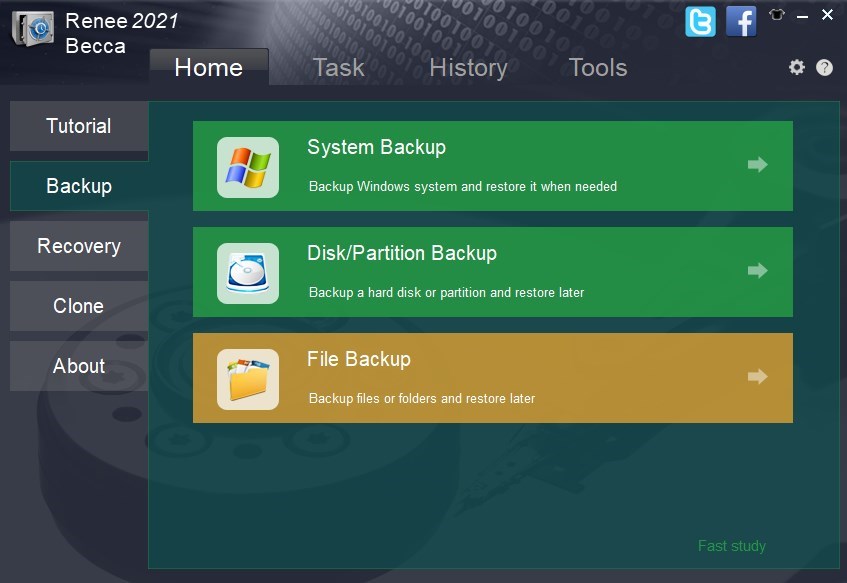
Renee Becca is a tool specially used for system/hard disk data backup and restoration. It can help you back up and restore important data in your computer, such as programs, system configuration, emails, photos, videos, documents, bookmarks, etc. In addition, you can also use it to clone disk and system data. The software provides three cloning methods, including hard disk cloning/cloning system hard disk; partition cloning and system migration. You can choose the most suitable cloning method according to your different needs.
In addition, Renee Becca supports 4K align and Cloning from larger partition to smaller partition. These functions can better assist you in completing system and data migration.
Here is a guide on how to use Renee Becca for cloning your Windows system to an SSD.
Step 1: Download and install Renee Becca software on your computer. This software is compatible with Windows operating systems.
Hot Topic - ADsRenee Becca – Safe and Quick System Migration to SSD

Automatic 4K alignment Improves SSD performance during system migration.

Support GPT and MBR Automatically adapt to the suitable partition format.

Support NTFS and FAT32 Redeploy various files in different file systems.

Back up quickly Back up files at up to 3,000MB/min.

Overall backup schedule Support system redeployment/system backup/partition backup/disk backup/disk clone.

Automatic 4K alignment Improve SSD performance

Support GPT and MBR Intelligently adapt to a partition format

Support NTFS and FAT32 Redeploy files in different file systems

Free TrialFree TrialNow 2000 people have downloaded!
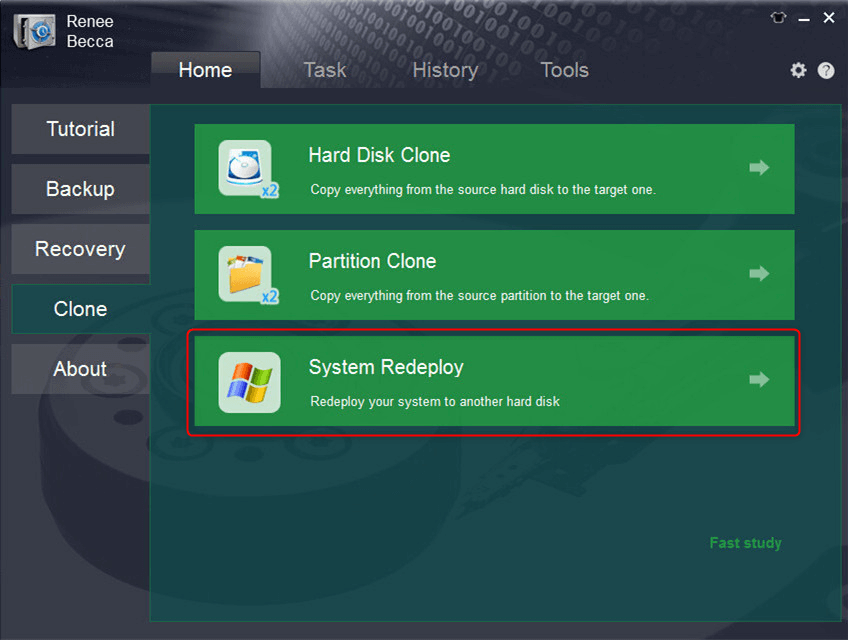
Step 2: Click “System Redeploy” in the “Clone” option from the main interface.
select system redeploy function in renee becca
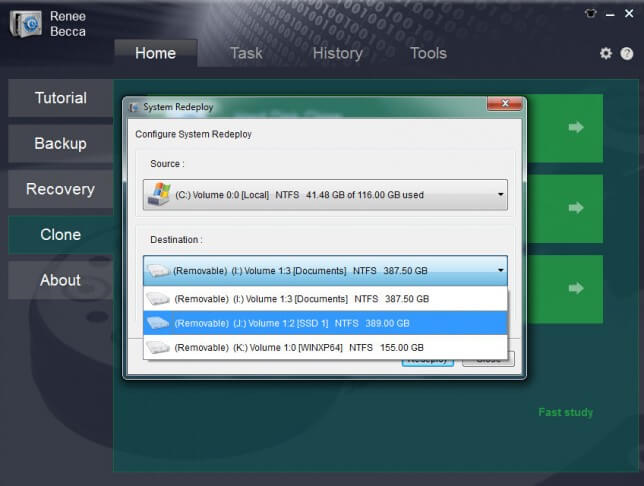
Step 3: Select the source disk, which is your current SSD, and the target disk. Click on “Redeploy” to start the cloning process.
select target disk and desination in system redeploy function in renee becca
Step 4: Once the clone is completed, set the new SSD as the primary boot device in your computer’s BIOS. You can refer to the next chapter for detailed instructions on this step.
Summary: In this chapter, we learned how to use Renee Becca to clone and migrate the Windows 10 OS to a new SSD. This will improve the performance and speed of your computer. Make sure to follow the pre-migration checklist and set the new SSD as the primary boot device in your computer’s BIOS to complete the process.
Pros:
  • User-friendly interface
  • Efficient cloning process
  • Allows you to preview the source and destination drives

Cons:

  • Paid subscription required for full access to all features

Next, you can refer to the next chapter for detailed instructions on setting up the new SSD as the primary boot device in your computer’s BIOS. This will ensure that your system boots up from the new SSD and that all your data is safely transferred.

Setting Up the New SSD as the Primary Boot Device in the BIOS

In the previous chapter, we have successfully cloned and migrated the Windows 10 OS to the new SSD. Now, we need to configure the BIOS settings to set the SSD as the primary boot device. This will ensure that the computer boots from the new drive and takes advantage of its faster speed. Follow the steps below to set up the new SSD as the primary boot device.
Entering the BIOS
The first step is to enter the BIOS settings on your computer. The method to enter BIOS varies depending on the brand and model of your computer. Here are some common ways to enter the BIOS settings:
BIOS NameMethodThe Key or Keys
DELLPress the F12 key repeatedly before the Dell logo appears on the screen.F12
HPPress the F9 key multiple times when the HP logo is displayed.F9
ASRockPress DEL or F2 for PCs/ or DEL or F2 for motherboards.DEL/ F2
AcerPress DEL or F2.DEL/ F2
DellPress F12 or F2.F12/ F2
ECSPress DEL.DEL
Gigabyte / AorusPress DEL or F2.DEL/ F2
Lenovo (Consumer Laptops)Press F2 or Fn + F2.F2/ Fn + F2
Lenovo (Desktops)Press F1.F1
Lenovo (ThinkPads)Press Enter first/ then F1.Enter/ F1
MSIPress DEL.DEL
Microsoft Surface TabletsPress and hold Power and Volume Up buttons.Power/ Volume Up
Origin PCPress F2.F2
SamsungPress F2.F2
ToshibaPress F2.F2
ZotacPress DEL.DEL
HPPress Esc/ F9 for `Boot Menu`/ Esc/ F10/ Storage tab/ Boot Order/ Legacy Boot Sources.Esc/ F9/ Esc/ F10
INTELPress F10.F10
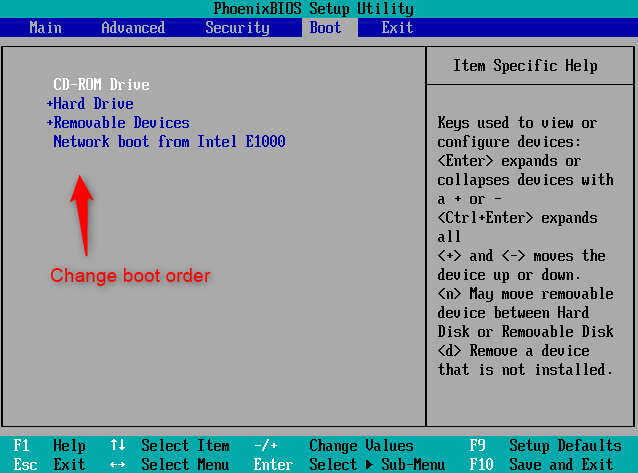
Changing the Boot Order
Once you have successfully entered the BIOS settings, navigate to the boot order settings. The location of this option may vary, but it is usually found under the Boot or Advanced tab.
If your computer uses Legacy BIOS, change the boot order to set the SSD as the first boot device. If the BIOS mode is UEFI, select the SSD as the boot drive. Once you have made the necessary changes, save the changes and exit the BIOS screen.
change the boot order
Setting your new SSD as the primary boot device is a crucial step in the OS migration process. It ensures that your computer will boot from the new SSD and that you will experience faster speed and improved performance. This step can be done by entering the BIOS settings and changing the boot order to set the SSD as the primary boot device.
However, it is important to note that not all computers have the same BIOS settings or options. Some may have different key combinations or different locations for certain settings. It is always best to refer to your computer or laptop manual for specific instructions.

Conclusion

In conclusion, migrating your Windows 10 operating system to a new SSD can greatly improve the speed and performance of your computer. However, it is important to carefully consider the SSD selection criteria to ensure enough space for both the OS and additional data. Before starting the migration process, it is crucial to complete a pre-migration checklist and backup your data to ensure its security. Using popular tools like Renee Becca or Samsung Data Migration software can make the migration process effortless. With a step-by-step guide, you can easily clone and migrate your OS to the new SSD and set it as the primary boot device. But don’t worry, your old HDD data will still be accessible. By following these steps, you can successfully relocate your Windows 10 to a fresh SSD and enjoy faster performance and improved efficiency. So don’t hesitate, make the switch to an SSD now and experience the benefits for yourself!