author avatar
    Senior Product Manager
 

Summary
Understand and solve the NET HELPMSG 2182 error when updating Windows through this article. Get expert insights and solutions for a stable operating system.


NET HELPMSG 2182

I. What is NET HELPMSG 2182 error?

NET HELPMSG 2182 is a common type of error that Windows users may encounter. This type of error usually appears during the process of updating the Windows system or installing new applications from the Microsoft Store. The cause of this type of error may be due to system file corruption, Windows update service error, or related to Windows update interruption.
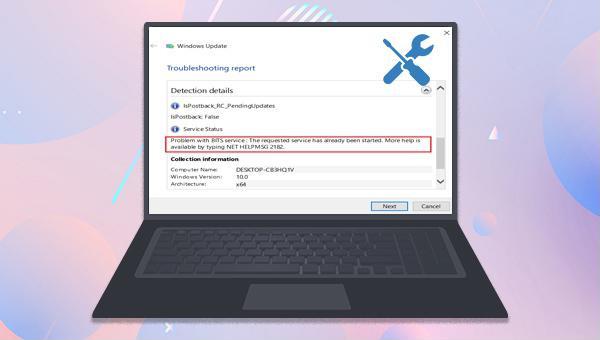
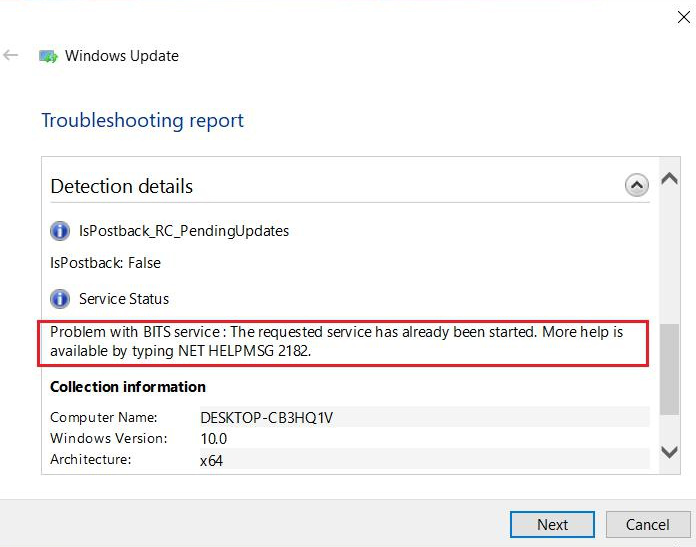
Windows update error NET HELPMSG 2182
After understanding the relevant knowledge points about the NET HELPMSG 2182 error, in order to avoid the problem of data loss in the process of repairing the error, it is recommended that you first use a professional data backup tool to back up your data in time. Then use the method in the third part to solve the problem. Let’s learn the method of backing up data first.

II. Use Renee Becca to back up data before repairing the fault

1. What is Renee Becca?

Renee Becca is a tool specially used for system/hard disk data backup and restoration. This software adopts leading incremental/differential backup technology, which can save you more time and disk space. It can not only help you easily backup and restore important data in your computer, such as programs, system configurations, emails, photos, videos, documents, bookmarks, etc.; it also provides system backup, partition backup, hard disk backup and disk cloning. It has many functions including system migration, and the operation is also very simple.
Renee Becca - Quickly and safely back up SD card data

Fast backup Backup speed up to 3 000MB/minute

Support multiple SD cards Backup data of SD card, SDHC card and SDXC card

Incremental/differential backup technology Automatically analyze data differences between source files and backup files to save disk space

Multiple backup schemes Support system backup/partition backup/hard disk backup/file backup/disk cloning

Easy to use Even newbie can handle it in seconds

Fast backup Backup speed up to 3 000MB/minute

Support multiple SD cards Backup data of SD card, SDHC card and SDXC card

Easy to use Even newbie can handle it in seconds
Free TrialFree TrialAlready 2000 users have downloaded and try Renee Becca

2. How to backup data with Renee Becca?

Backing up data with Renee Becca is very simple, the specific steps are as follows:
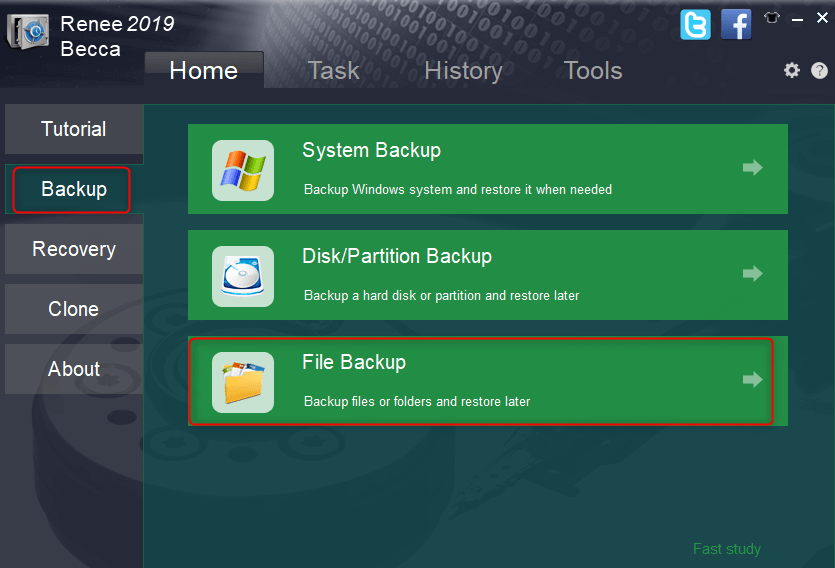
Step 1: Download, install and run Renee Becca on the computer, and select the File Backup option in the main interface Backup column.
File backup of Renee Becca
Step 2: Next, select all the files that need to be backed up in Source, and select the hard disk partition to store the backup data in Destination.
how to back up files in renee becca
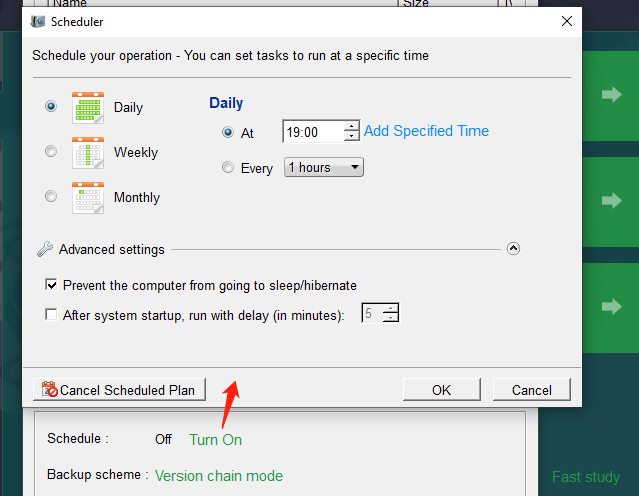
In addition, in Scheduler, you can make a daily/weekly/monthly automatic backup plan and click OK to enable the automatic backup function.
file backup schedule on Renee Becca
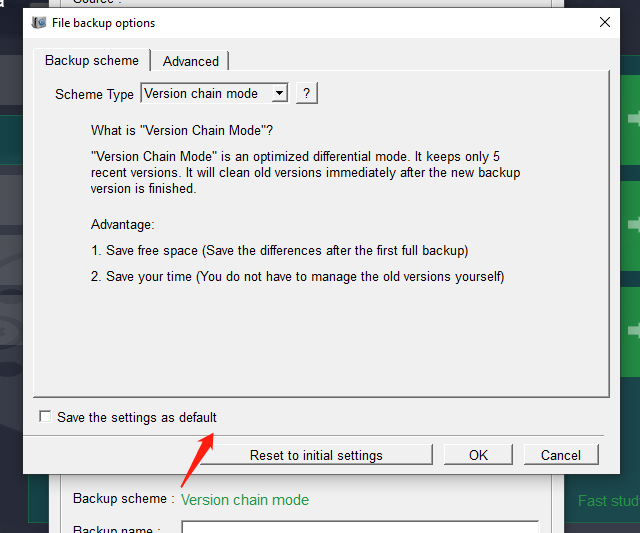
In Backup Scheme – Scheme Type, you can choose a suitable backup scheme mode according to your personal needs. Renee Becca has 5 backup schemes to choose from, namely version chain mode, single version mode, full mode, incremental mode and differential mode.
backup mode of file backup on Renee Becca
Renee Becca has 5 backup plans to choose from:
Version chain mode: Only the latest 5 versions are kept, and useless old versions are automatically deleted after the backup is completed.
Single version mode: Only the latest version is kept, and the previous version is automatically deleted after the backup is completed.
Full mode: Creates a full backup.
Incremental mode: After the initial full backup, only incremental backups are created.
Differential mode: After the initial full backup, only differential backups are created.
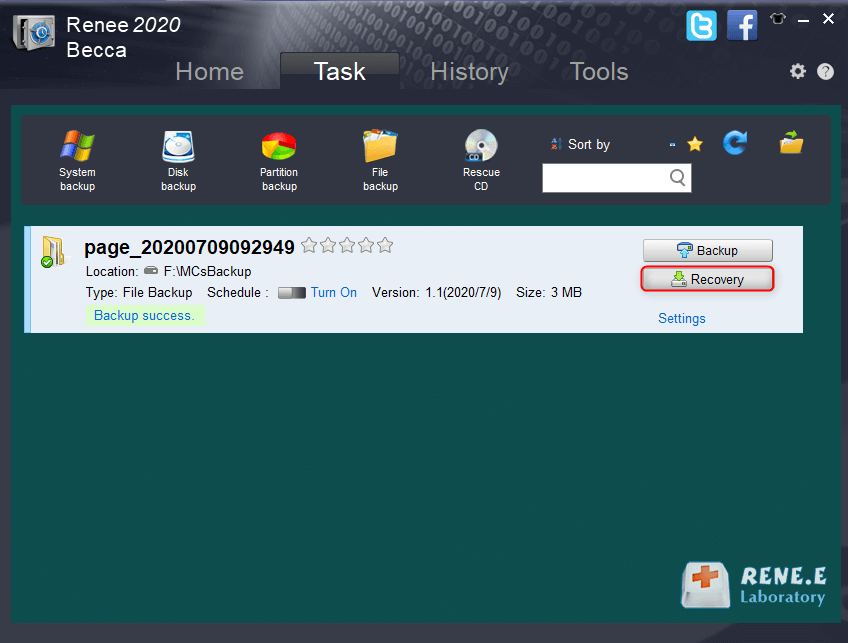
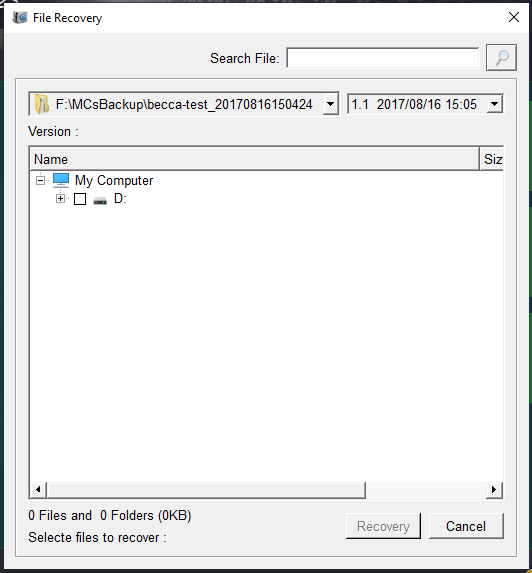
Step 3: Finally, click the Backup Now button to start executing the backup file command according to your settings, and you can see the progress of all backup tasks on the task bar. After the backup is complete, you can click the Recovery button to restore the files to the specified hard disk when necessary.
recover backup files from renee becca
Step 4: After that, select the location where the files are to be restored, and click the Recovery button.
recover the data from the backup file
After knowing the method of backing up data, let’s learn how to fix NET HELPMSG 2182 error.

III. How to fix NET HELPMSG 2182 error?

1. Run the Windows Update Troubleshooter

Windows Update Troubleshooter is a system update troubleshooting tool built into the Windows system, which can help users troubleshoot and fix most of the problems encountered during the system update process. Here are the detailed steps to run the Windows Update Troubleshooter:
Step 1: Run the computer, press the Windows and I key on the keyboard at the same time to open the setting interface. Then click into the Update and Security option.
windows updates and security
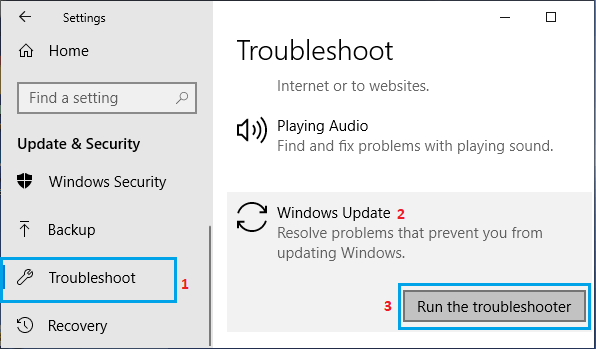
Step 2: Find Troubleshoot in the left function bar, then select the Windows Update option on the right, and click the Run the troubleshooter button. Wait a few moments after troubleshooting is complete to see if the problem is resolved.
run the trouble shooter in windows update

2. Troubleshooting background intelligent transfer service (BITS)

Background Intelligent Transfer Service (BITS) is responsible for installing new Windows updates. If this service is interrupted, you may experience issues such as the NET HELPMSG 2182 error that this article focuses on. The BITS troubleshooting program is a troubleshooting program specifically for BITS problems, which can help users solve various failures related to BITS. Therefore, you can try to run this program to solve the current problem, the specific steps are as follows:
Step 1: Run the computer and press the Windows and R keys at the same time to open the run window. Then type control panel and press OK to open the control panel interface.
type control panel
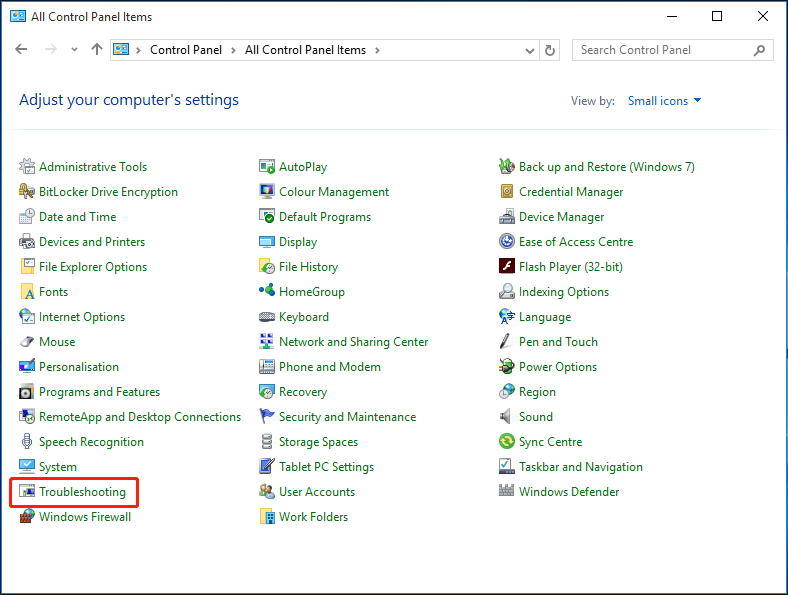
Step 2: Locate and open the Troubleshooting option.
troubleshooting
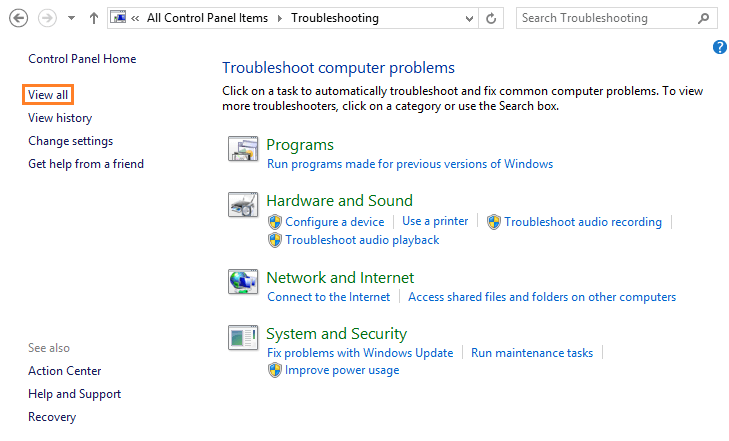
Step 3: In the Troubleshooting window, click the View all option.
view all of troubleshooting
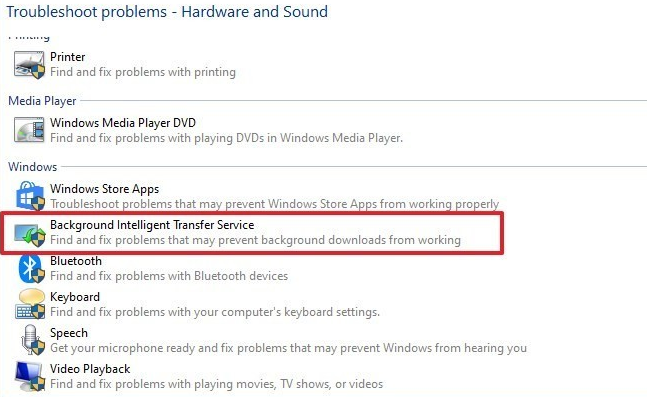
Step 4: Find and click the (Background Intelligent Transfer Service) option among all unresolved computer problems.
background intelligent transfert service
Step 5: Click the Next button, and then the service will start to automatically detect errors. After the process is completed, exit the current page and restart the computer to check whether the problem has been resolved.

3. Restart the Windows update process

If none of the above methods work, you can also reset the Windows update process to solve the current problem. The specific steps are as follows:
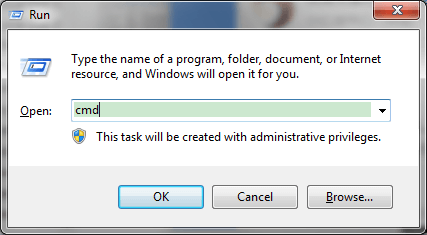
Step 1: Run the computer, press Windows and R keys at the same time to open the run window, then type cmd and click OK to open the command prompt window.
press win and r to run cmd
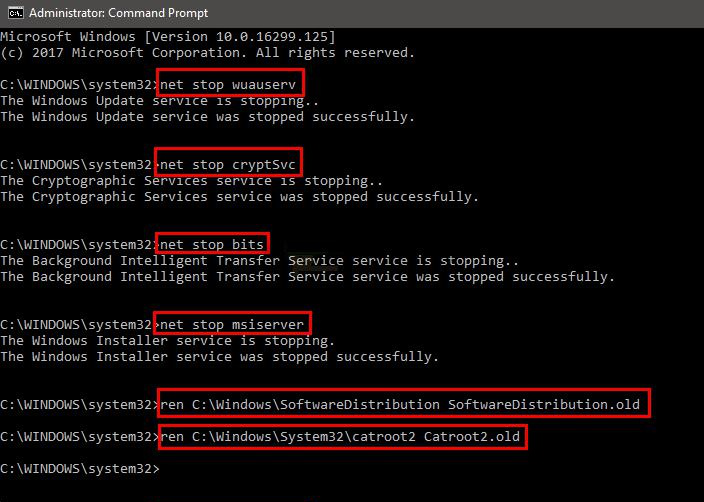
Step 2: Enter the following commands one by one, and press the Enter key after each command.
net stop wuauserv
net stop cryptSvc
net stop bits
net stop msiserver
Next enter the following commands again, pressing the Enter key after each command.
ren C:\Windows\SoftwareDistribution SoftwareDistribution.old
ren C:\Windows\System32\catroot2 Catroot2.old
Type net stop wuauserv
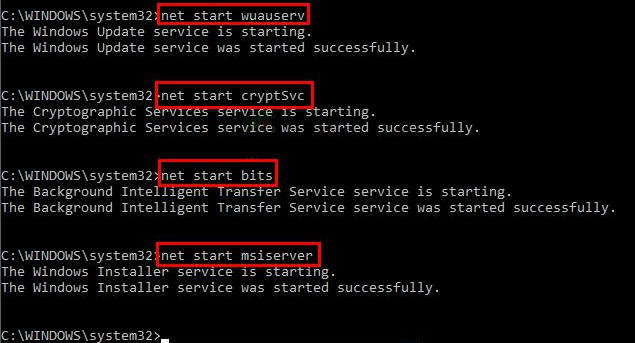
After completing the above operations, continue to enter the following commands and press the Enter key after each command. After all commands are executed, restart the computer to check whether the current problem is resolved.
net start wuauserv
net start cryptSvc
net start bits
net start msiserver
Type net start wuauserv

4. Try to repair system files

Scanning with the System File Checker tool will not only help you fix BITS errors but also repair corrupted system files. The specific operation steps are as follows:
Run the computer, press the Windows and R keys at the same time to open the run window, then type cmd and click OK to open the command prompt window.
press win and r to run cmd
Step 2: Enter the command DISM.exe /Online /Cleanup-image /Restorehealth in sequence and press the Enter key. This command can help you repair corrupted Windows images.
Enter the DISM command
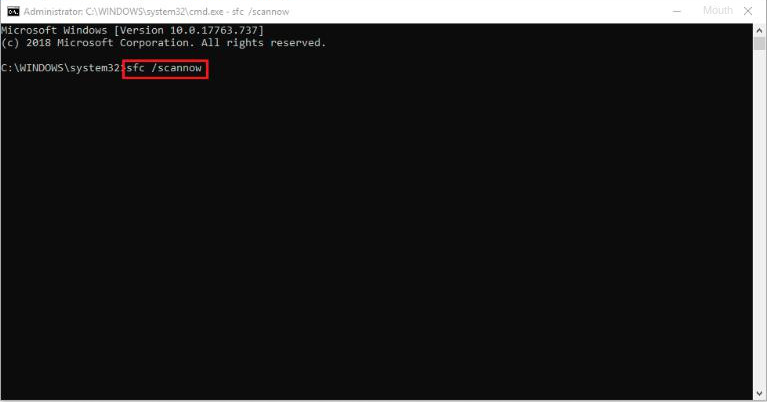
Step 3: Next, go ahead and type the command sfc /scannow and press the Enter key, this command will run the System File Checker and fix errors. This process takes about half an hour. After all commands are executed, restart the computer and check whether the problem is resolved.
Execute the sfc command