author avatar
    Specialist of Customer Service Dept.
 

Summary
Upgrade your system with ease by following our step-by-step guide on Samsung OS migration to SSD. Say goodbye to slow boot times and experience the speed and efficiency of a Samsung SSD. Check out our tips for troubleshooting common issues, and ensure a smooth transition for the ultimate upgrade.


In today’s fast-paced digital world, speed and efficiency are key to keeping up with our daily tasks and responsibilities. This is why many computer users are turning to solid-state drives (SSD) to boost their computer’s performance. And if you’re a Samsung user, you’re in luck – the tech giant offers a seamless solution to transfer your operating system (OS) to your new SSD. But before diving into the process of migrating your OS to an SSD, it’s important to take some pre-migration preparation steps, including backing up important data. In this chapter, we will discuss the essential steps you need to take before starting the migration process to ensure a smooth and hassle-free experience.

Pre-migration Preparation: Backing up Important Data

Before migrating your operating system from your old disk to a new Samsung SSD, it is crucial to prepare in advance by backing up important data. This step is necessary to ensure that you do not lose any important files during the migration process.
Gather Important Data
First, gather all important data from your old disk and save it in a secure location. This includes personal files, documents, photos, videos, and any other important data that you do not want to lose. It is important to double check and make sure that all important data is safely backed up before proceeding with the migration process.
Create a System Image
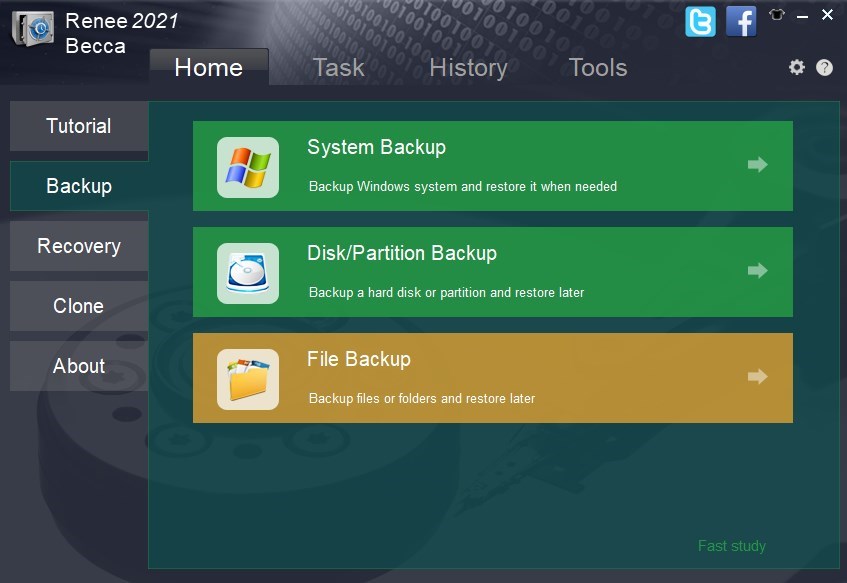
Once you have gathered all important data, it is recommended to create a system image of your old disk. A system image is an exact copy of everything on your old disk, including your operating system, programs, and files. It allows you to easily restore your system in case any issues arise during the migration process. You can create a system image using built-in Windows tools or third-party software such as “Renee Becca”.
Back up data
Backup Encryption Keys
If you have any encrypted data on your old disk, make sure to back up the encryption keys before proceeding with the migration. Without the encryption keys, you will not be able to access the encrypted data on your new Samsung SSD. You can back up your encryption keys by exporting them or copying them to an external drive.
Backing up important data is an essential step before migrating your operating system to a new Samsung SSD. It ensures that your data is safe in case any issues arise during the migration process. In addition, creating a system image and backing up encryption keys can further protect your data. In the next chapter, we will discuss how to use Renee Becca to create a complete and professional backup before the migration process.

Method 1: Using Renee Becca to Create a Complete and Professional Backup Before the Migration Process

Transitioning your operating system from an HDD to an SSD is a significant upgrade for any Samsung computer user. With an SSD, your system will perform faster, be more durable, and consume less power. Having discussed the basics of OS migration in the introduction, let’s dive into the details of using Renee Becca for this process.
Renee Becca is a tool specially used for system/hard disk data backup and restoration. It can help you back up and restore important data in your computer, such as programs, system configuration, emails, photos, videos, documents, bookmarks, etc. In addition, you can also use it to clone disk and system data. The software provides three cloning methods, including hard disk cloning/cloning system hard disk; partition cloning and system migration. You can choose the most suitable cloning method according to your different needs.
Here is a guide on how to use Renee Becca for cloning your Windows system from HDD to the SSD.
Hot Topic - ADsRenee Becca – Safe and Quick System Migration to SSD

Automatic 4K alignment Improves SSD performance during system migration.

Support GPT and MBR Automatically adapt to the suitable partition format.

Support NTFS and FAT32 Redeploy various files in different file systems.

Back up quickly Back up files at up to 3,000MB/min.

Overall backup schedule Support system redeployment/system backup/partition backup/disk backup/disk clone.

Automatic 4K alignment Improve SSD performance

Support GPT and MBR Intelligently adapt to a partition format

Support NTFS and FAT32 Redeploy files in different file systems

Free TrialFree TrialNow 2000 people have downloaded!
Step 1: Begin by downloading and installing Renee Becca on your Samsung computer. Ensure that the SSD, such as the Samsung 970 EVO, is correctly connected to your system.
Step 2: Open the Renee Becca software and select the “Clone” function from the main menu. This will prepare the environment for copying your OS.
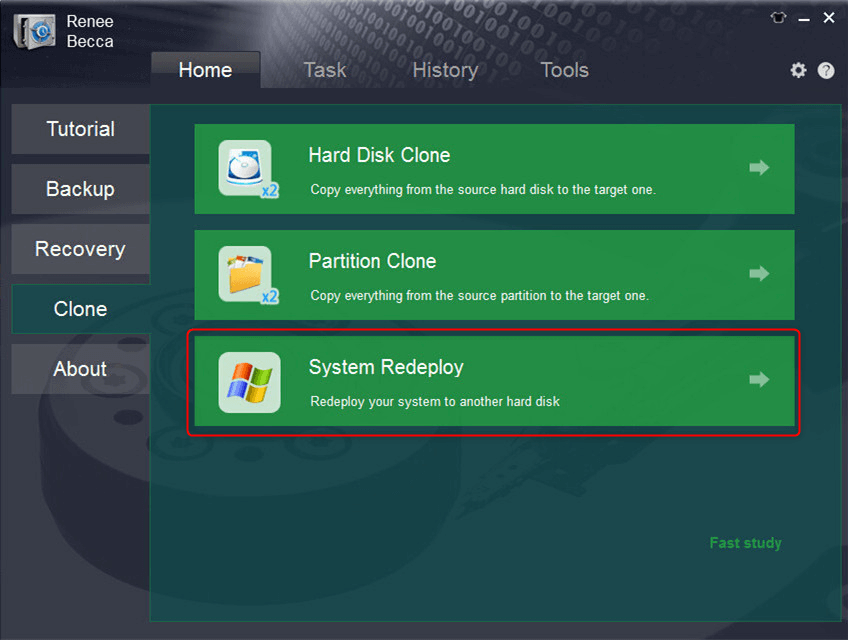
Step 3: Choose the “System Redeploy” option within the software. This feature is specifically designed for OS migration, ensuring that the copied system will be bootable on the new SSD.
select system redeploy function in renee becca
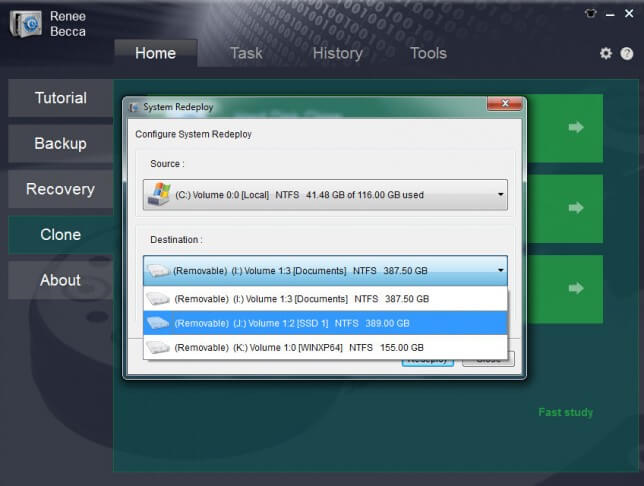
Step 4: Select your current HDD as the source disk and the SSD as the target disk. Before proceeding, make sure any critical data on the SSD has been backed up, as this process will overwrite existing data on the target disk.
Step 5: Proceed with the migration by clicking on “Redeploy”. Renee Becca will initiate the process. Should the target SSD be larger than the source disk, the software will provide the option to resize partitions accordingly. This feature becomes crucial when you’re migrating to larger drives like the Samsung 860 EVO and want to fully utilize the available space.
select target disk and desination in system redeploy function in renee becca
Step 6: Once the process is complete, you will be prompted to shut down the computer. Follow this prompt, then physically disconnect the HDD (if feasible) to prepare for booting from the SSD.
Step 7: Reboot your computer and press F2, Del, or the appropriate key to enter the BIOS settings. Here, change the boot priority to your new SSD to initiate booting from the migrated OS.
Pros:
  • Allows safe migration of operating system without fresh installation.
  • Simple steps for a smooth and hassle-free transfer.
  • Improves performance and faster boot times with new SSD.
  • Seamless transition without hassle of manual partition adjustments.

Cons:

  • Doesn't have a Mac version.Paid subscription required for full access to all features.
In summary, Renee Becca provides a straightforward method for migrating your operating system to a Samsung SSD. This tool is designed to manage the complexities of OS migration, including the resizing of partitions when moving to a larger SSD. It offers a seamless transition without the hassle of manual partition adjustments. While the process is user-friendly, it is crucial to ensure that data backups are performed to prevent any loss.
After migration, it’s important to configure the system BIOS settings correctly to boot from the new SSD and to check that the SSD’s parameters are optimized for best performance, as a clean OS installation would do. Remember, if the size of the data you want to migrate exceeds the capacity of the new SSD, you may need to either clean up your data or look for cloning software that allows for selective migration or partition resizing, such as Macrium Reflect or potentially the Samsung Data Migration tool for eligible drives.

Method 2: Cloning Your Operating System to the Samsung SSD Using Samsung Data Migration Software

In the previous chapter, we discussed the importance of creating a complete backup of your system before migrating to a new SSD. Now, let’s explore another method – cloning your operating system using Samsung Data Migration software.
If your Samsung SSD is larger than your original disk, this method is recommended as it allows you to transfer all your data and settings to the new disk without having to reinstall everything. However, if your Samsung SSD is the same size or smaller than your original disk, please refer to the next chapter for alternative methods.
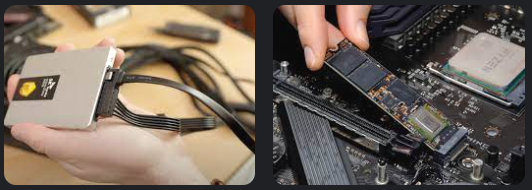
Step 1: Shut down your PC and connect your Samsung SSD using a USB-to-SATA or M.2 cable, depending on your disk slot.
Connect the SSD/M.2 to the PC
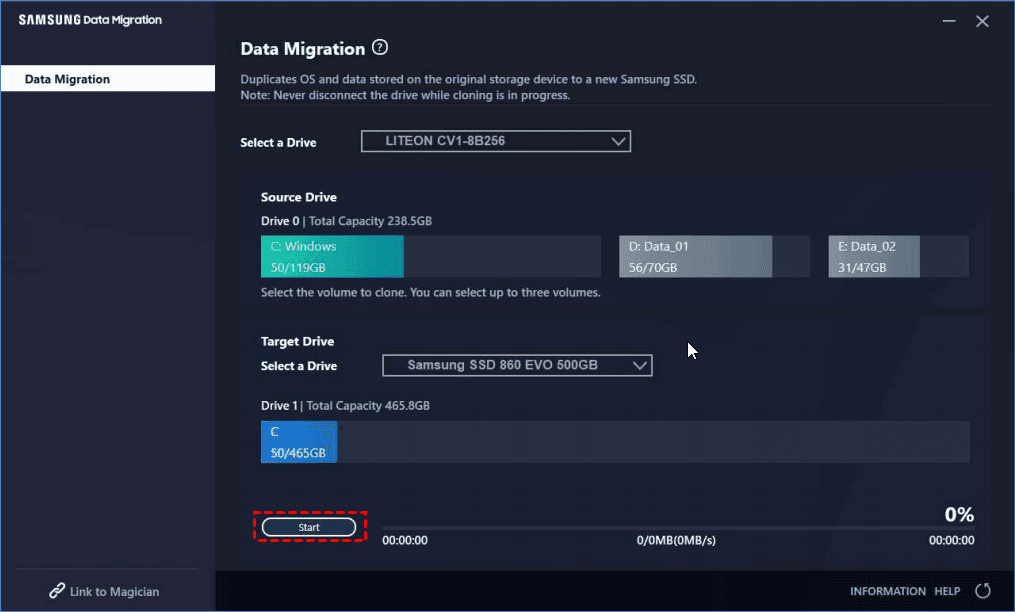
Step 2: Start your PC and install Samsung Data Migration software. Click the “Start” button in the lower right corner of the screen.
Step 3: Verify the source disk you want to move from and select the new Samsung SSD as the target disk. It is important to note that the target disk will be overwritten, so please make sure you have selected the correct one.
Samsung Data Migration software
Step 4: Click “Start” and then hit “Yes” at the warning message. This will begin the cloning process.
Step 5: Once the cloning is complete, click “Quit” to exit the software. Now, turn off your PC and replace the original drive with the new one. Make sure to boot up from the new SSD.
It is possible to encounter problems during the cloning process such as the Samsung Data Migration software getting stuck at certain percentages or error codes appearing.
Tips: If you encounter any of these issues, please switch to an alternative software like Renee Becca.
Summary: Cloning your operating system to a new SSD with Samsung Data Migration software can be a quick and efficient way to transfer all your data and settings. However, it is important to note that this method only works for larger Samsung SSDs and may encounter errors during the cloning process. If you encounter any issues, it is recommended to switch to alternative software.
Pros:
  • Quick and efficient way to transfer all data and settings
  • No need to reinstall everything if Samsung SSD is larger than original disk

Cons:

  • May encounter errors during the cloning process
  • Only works for larger Samsung SSDs

Next, we will explore another alternative method of migrating your OS to a Samsung SSD using free cloning software like Clonezilla. Stay tuned!

Method 3: Migrate Your OS to Samsung SSD With Free Cloning Software Like Clonezilla

In the previous chapter, we discussed how to clone your operating system to a Samsung SSD using Samsung Data Migration Software. However, if you are not comfortable using this software or want to explore alternatives, there is another option available. In this chapter, we will discuss how to migrate your OS to a Samsung SSD using free cloning software like Clonezilla. This method is equally effective and relatively easy to perform.
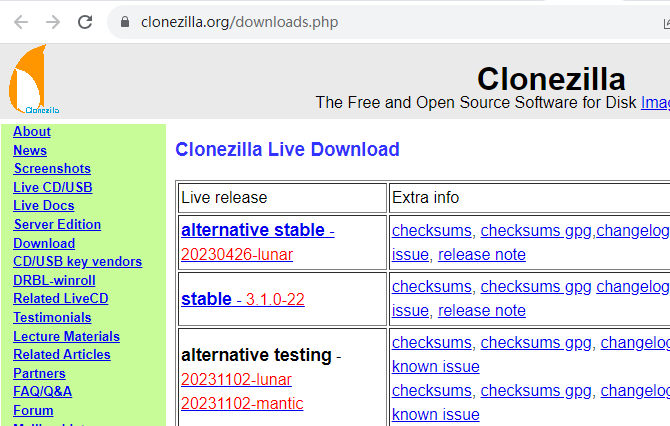
Step 1: Download Clonezilla – Clonezilla is a free and open-source cloning software that allows you to clone your operating system to a new drive. You can download it from their official website and install it on your computer.
download Clonezilla
Step 2: Create a bootable USB drive – To use Clonezilla, you will need a bootable USB drive. You can use a tool like Rufus to create a bootable USB drive with Clonezilla on it.
Step 3: Boot from the USB drive – Once you have created the bootable USB drive, insert it into your computer and restart it. While restarting, go to the BIOS settings and change the boot order to boot from the USB drive first.
Step 4: Start Clonezilla – After successfully booting from the USB drive, you will see the Clonezilla main menu. Select “Clonezilla” and press Enter to start the program.
Step 5: Select the source and destination drives – The next step is to select the source drive (your old hard drive) and the destination drive (Samsung SSD). Once you have selected the drives, click on “OK” to proceed.
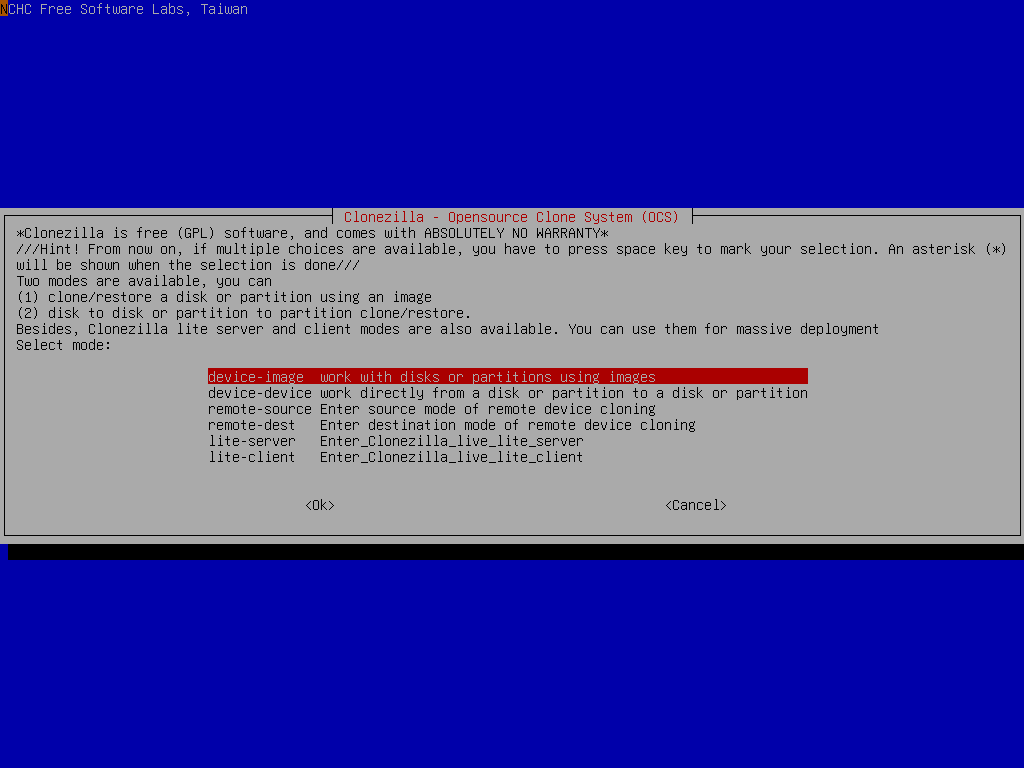
Step 6: Choose the clone mode – Clonezilla offers two cloning modes – Device-Device and Device-Image. For our purpose, we will choose Device-Device cloning.
select device-image Clonezilla
Step 7: Confirm the operation – Before proceeding with the cloning process, you will have to confirm the operation. Please note that this process will erase all data on your destination drive (Samsung SSD).
Step 8: Wait for the cloning process to complete – Once you have confirmed the operation, the cloning process will start. It may take some time depending on the size of your operating system and the speed of your drives.
Step 9: Replace the old hard drive with the new SSD – Once the cloning process is complete, shut down your computer and replace the old hard drive with the new Samsung SSD. Make sure to disconnect the old hard drive from your computer.
Step 10: Boot from the new Samsung SSD – Start your computer and enter the BIOS settings again. Change the boot order to boot from the Samsung SSD first. Save the changes and exit BIOS. Your computer should now boot from the new Samsung SSD.
Congratulations! You have successfully migrated your operating system to the new Samsung SSD using Clonezilla. You can now enjoy faster boot times and improved system performance.
Pros:
  • Free and open-source software
  • Relatively easy to use
  • Supports different cloning modes

Cons:

  • May take longer than using Samsung Data Migration Software

To ensure that everything is working properly, it is recommended to perform post-migration steps such as checking the SSD status using Crystaldiskinfo and testing its performance using Crystaldiskmark. We will discuss these steps in detail in the upcoming chapters.
Tips:If you encounter any issues during the cloning process or have any questions, please refer to the Clonezilla documentation or reach out to their support team.

Post-migration steps to ensure the system boots from the new Samsung SSD.

After successfully migrating your OS to a Samsung SSD using the Samsung Data Migration software, there are a few important steps you need to take to make sure your system boots from the new drive. This is crucial for the overall performance and stability of your computer.
Step 1: Shut down your computer and replace the old hard drive with the new Samsung SSD. Make sure the SSD is properly connected using the appropriate cable.
Step 2: Power on your computer and enter BIOS by pressing the designated key, which is usually F2 or Delete. If you’re not sure, consult your computer’s manual or search online for the specific key for your device.
Here is a list of BIOS shortcut keys for different brands. Alternatively, you can observe the BIOS shortcut keys displayed on the screen during booting.
BIOS NameMethodThe Key or Keys
AcerPress Del or F2 immediately after powering onDel/ F2
CompaqPress F10 while the cursor in the top right corner of the screen is blinkingF10
DellPress F2 when the Dell logo appears/ or press every few seconds until the message Entering Setup appearsF2
eMachinesPress Tab or Del while the eMachine logo displays on the screenTab/ Del
FujitsuPress F2 once the Fujitsu logo appearsF2
GatewayPress the F1 key repeatedly after restarting the computerF1
HPPress the F1/ F10/ or F11 key after restarting the computerF1/ F10/ F11
IBMPress F1 immediately after powering on the computerF1
LenovoPress F1 or F2 after powering on the computerF1/ F2
NecPress F2 to enter the BIOS SetupF2
Packard BellPress F1/ F2/ or Del to enter BIOSF1/ F2/ Del
SamsungPress F2 to start the BIOS setup utilityF2
SharpPress F2 after the computer startsF2
SonyPress F1/ F2/ or F3 after turning on the computerF1/ F2/ F3
ToshibaPress F1 or Esc after powering on to access BIOSF1/ Esc
ARLTPress Del or F11 when the respective message is shownDel/ F11
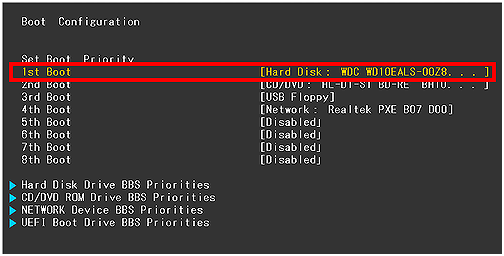
Step 3: In BIOS, go to the Boot tab and set the Samsung SSD as the first boot device. You may need to use the on-screen instructions to move the SSD to the top of the list.
change the boot order in hard disk in boot configuration in BIOS
Step 4: Save the changes and exit BIOS. Your computer will restart automatically and should now boot from the new Samsung SSD.
It’s important to note that in some cases, your computer may not be able to access BIOS. If this happens, there are a few things you can try:
  • Make sure the Samsung SSD is properly connected and recognized by your computer.
  • Try restarting your computer and pressing the designated key for BIOS again.
  • If you have a laptop, try removing the battery and unplugging the power cord, then press and hold the power button for a few seconds before reassembling and turning the computer back on.
  • Consult your computer’s manual or contact the manufacturer for further assistance.
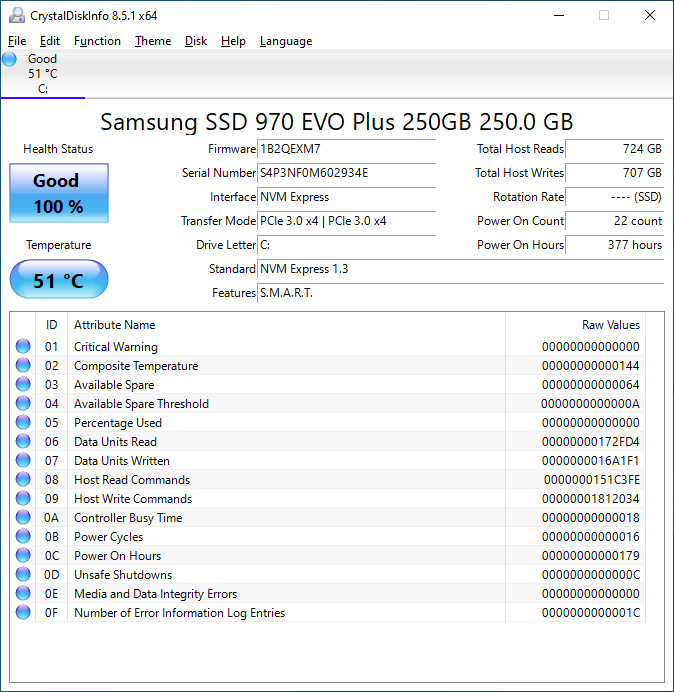
Now that your system is booting from the new Samsung SSD, it’s a good idea to check the status of the drive to ensure everything is working properly. You can use software like Crystaldiskinfo and Crystaldiskmark to do this.
Crystaldiskinfo is a free tool that displays detailed information about your SSD, including health status, firmware version, and more. It’s a good idea to run this tool periodically to keep an eye on the health of your SSD.
Check the health of your SSD
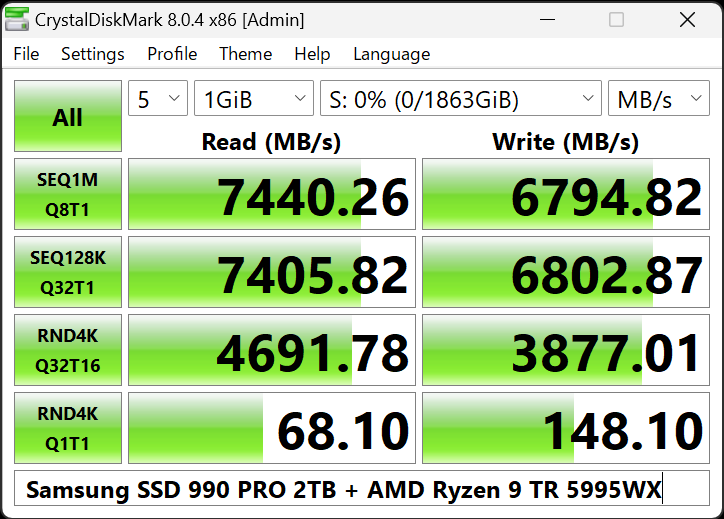
Crystaldiskmark is a benchmarking tool that measures the read and write speeds of your SSD. This can help you determine if your SSD is performing at its expected speed. Run this tool after the migration process and compare the results to the specifications of your SSD to make sure it’s functioning properly.
samsung migrate os to ssd
In conclusion, following these post-migration steps is essential for a successful OS migration to a Samsung SSD. While the Samsung Data Migration software is a convenient tool for cloning your OS, it’s important to monitor the status of your SSD and ensure it’s functioning as expected for optimal performance and stability.
If you encounter any issues during the OS migration process, don’t worry. Our next chapters will cover some common problems and provide troubleshooting solutions to help you successfully migrate your OS to a Samsung SSD.

Troubleshooting Common Issues Encountered During the OS Migration Process

When migrating your operating system (OS) to a new Samsung Solid State Drive (SSD), you may encounter some common issues that can cause frustration and delays. In this chapter, we will discuss these issues and provide step-by-step instructions on how to troubleshoot them.
Step 1: Identifying the Source of the Issue
The first step in troubleshooting any issue is to identify the source of the problem. This will help determine the appropriate solution and prevent wasting time on unnecessary fixes. In the case of OS migration, the most common issues are related to hardware, software, or user error.
If the issue is related to hardware, it could be due to compatibility issues between your computer and the new Samsung SSD. Software issues, on the other hand, could be caused by corrupt files or conflicting programs. User error can include improper installation or incorrect settings.
Step 2: Resolving Hardware Compatibility Issues
If you suspect that the issue is related to hardware compatibility, the first thing to do is check the system requirements of the Samsung SSD and compare them to your computer’s specifications. Make sure that your computer meets or exceeds the minimum requirements.
If your computer meets the requirements, but you are still encountering issues, try updating your computer’s BIOS (Basic Input/Output System). This can be done by visiting the manufacturer’s website and following their instructions. Updating the BIOS can often resolve compatibility issues.
Step 3: Fixing Software Issues
If the issue is related to software, there are a few steps you can take to troubleshoot. First, run a virus scan to ensure that there are no malicious programs causing the issue. Next, check for any conflicting programs and disable or uninstall them. Finally, try repairing any corrupt files using the “sfc /scannow” command in the Windows Command Prompt.
If none of these steps resolve the software issue, you may need to consider a clean install of the OS on the new Samsung SSD.
Step 4: Double-check Installation and Settings
Sometimes, the cause of the issue can be a simple installation or settings error. Double-check that you have followed all instructions for installing the new Samsung SSD and migrating your OS. Make sure all cables are connected properly and that the drive is recognized in the BIOS.
Check the settings in the BIOS and make sure they are configured correctly for the new SSD. If you are unsure, consult the manufacturer’s instructions or seek assistance from a professional.
Step 5: Additional Troubleshooting Tips
If you are still experiencing issues, here are a few additional troubleshooting tips:
• Try using a different data cable or port. Sometimes, faulty cables or ports can cause issues with the drive.
• Use a different cloning software. If you are using a third-party cloning software and encountering issues, try using Samsung’s own Data Migration software. It is specifically designed for Samsung SSDs and may be more compatible.
• Check for firmware updates. Make sure that you have the latest firmware updates for your Samsung SSD. These updates can address known issues and improve performance.
• Seek assistance from Samsung Support. If you have exhausted all troubleshooting options and are still having issues, contact Samsung Support for further assistance.
In summary, troubleshooting common issues during the OS migration process can be a frustrating but necessary step to ensure a successful migration. By identifying the source of the issue and following the appropriate troubleshooting steps, you can quickly resolve any issues and get your new Samsung SSD up and running smoothly.

Conclusion

In conclusion, migrating your operating system from a HDD to a Samsung SSD can greatly improve the performance and speed of your computer. This article has outlined three different methods for migrating your OS, including using Renee Becca, Samsung Data Migration, and Clonezilla. Each method offers its own advantages and can cater to various user preferences and needs. Additionally, we have discussed the importance of pre-migration preparation, post-migration steps, and troubleshooting tips to ensure a smooth and successful migration process. By following these steps and using the recommended tools, you can easily transfer your operating system to a Samsung SSD and experience the benefits of improved speed and efficiency. Don’t wait any longer, make the switch to an SSD and see the difference for yourself.