author avatar
    Technology Manager of Test Dept.
 

Summary
Upgrade windows 8 to 10 with ease by following the method shared below, just like millions of other users.
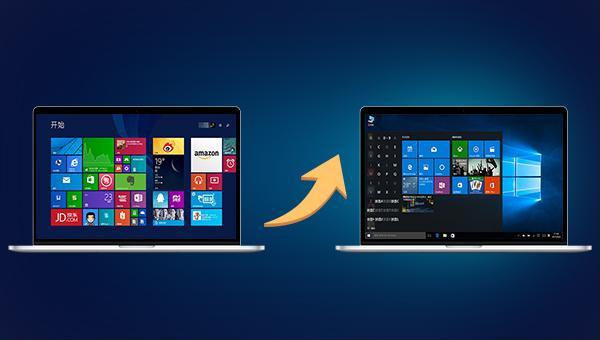


upgrade windows 8 to 10

I. What are the benefits of upgrading from Windows 8.1/8/7 to Windows 10?

1. Better security protection

Windows 10, maintained by Microsoft, offers superior security compared to other versions. As shown in the product lifecycle table, Windows 7 and Windows 8/8.1 no longer receive mainstream support, increasing the risk of hacking and viruses. Windows 10 users will receive updates, patches, drivers, and new features until October 14, 2025, enhancing system safety and performance.
Windows Product and Services Lifecycle Information Sheet
system versionstart datemainstream end dateExtended end date/deactivation date
Windows 72009/10/222015/01/132020/01/14
Windows 82012/10/302016/01/12
Windows 8.12013/11/132018/01/092023/01/10
Windows 10 Home and Professional2015/07/292025/10/14
Windows 10 Enterprise and Education editions2015/07/292025/10/14
Data source: https://learn.microsoft.com/en-us/lifecycle/products/windows-7, https://docs.microsoft.com/en-us/lifecycle/products/windows-8, https://docs.microsoft.com/en-us/lifecycle/products/windows-81, https://docs.microsoft.com/en-us/lifecycle/products/windows-10-enterprise-and-education

2. Added new functions

Windows 10 has added some useful functions, and to some extent the user experience is better.
Cortana voice assistant, capable of responding to voice commands for tasks like quick Internet searches, opening new emails, creating calendar entries, and more.
Virtual desktops allow users to quickly switch between running program windows, improving work efficiency. Press Alt+Tab to switch between the two most recently opened windows. To stay on the virtual desktop and select other windows, hold the Alt key, press and release the Tab key, then use the mouse to select any open window.
DirectX 12 and Xbox will significantly enhance the gaming experience. DirectX 12 (DX12) is a multimedia programming interface that boosts execution efficiency, enhances 3D graphics and sound, and provides a standard hardware driver for designers. This eliminates the need for game developers to write different drivers for each hardware brand and simplifies user installation and hardware configuration. DX11 is typically required for 3D standalone games, and DX12, the next generation, offers a 30-40% performance improvement. Additionally, Windows 10 supports streaming games from Xbox One, enabling users to play on their desktop or laptop within minutes. Xbox One streaming is fast and responsive.
Edge browser, which runs significantly faster than Internet Explorer and is only available on Windows 10.
Windows Hello offers a personal and secure way to access Windows 10 devices using a PIN, facial recognition, or fingerprint. Users must set up a PIN when configuring fingerprint or facial recognition but can also log in with just a PIN.
After understanding the benefits of upgrading Windows 10, if you decide to upgrade the system, you can check the method below.

II. How to upgrade from Windows 8.1/8/7 to Windows 10?

1. Upgrade Windows 10 using Windows 10 Installer

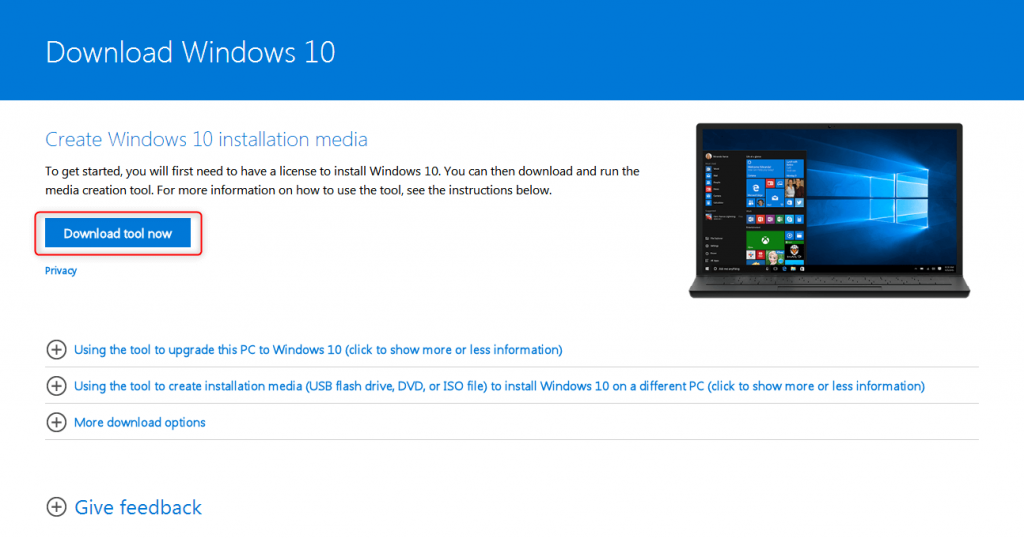
First, download the Windows 10 Media Creation Tool from Microsoft’s official website: https://www.microsoft.com/en-us/software-download/windows10. The tool will automatically download the latest Windows 10 installation files.
After opening the web page, click the “Download Tool Now” button to download the Media Creation Tool (MediaCreationTool.exe). Once downloaded, follow the steps below to upgrade. Tip: If Windows 8.1/8/7 is activated, you can likely upgrade to Windows 10 for free, but you may need to re-enter the serial number.
windows media creation tool
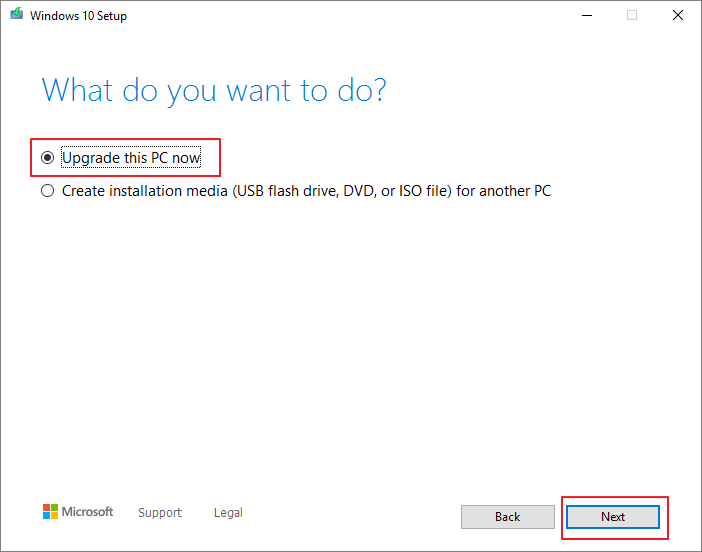
Step 1: Double-click the downloaded Windows 10 Media Creation Tool file (MediaCreationTool.exe). In the Windows 10 installer interface, select “Upgrade this PC now.”
upgrade this PC
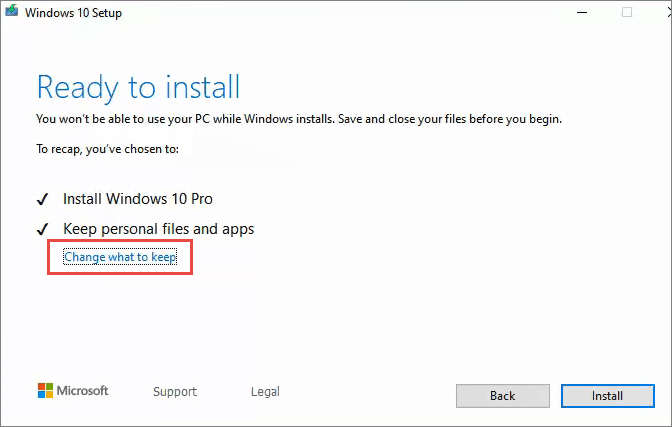
Step 2: The Windows 10 system will begin downloading, which may take some time. Ensure your computer remains connected to the Internet. If the License Terms screen appears, click Accept. When prompted with “Ready to install,” click Change what to keep to make adjustments or click Install in the lower right corner if no changes are needed.
Ready to install
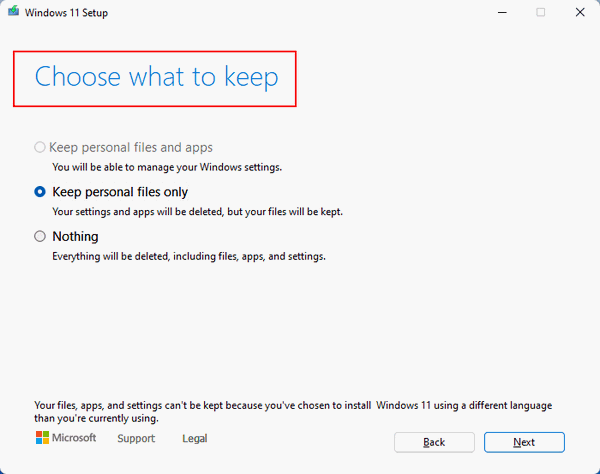
Step 3: Choose what to keep (personal files, applications, and Windows settings), then click Next.
keep personal files only
Step 4: After the upgrade is completed, you will enter the Windows 10 system setting interface, and you can configure it according to the prompts.

2. Change the system time to get another chance to upgrade Windows 10 for free

After Windows 10 launches, users receive a prompt to upgrade for free and can do so directly through the window.
① Adjust the system time to July 28, 2016 or earlier.
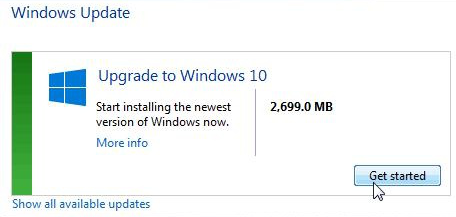
② When the prompt window of free upgrade to Windows 10 appears, please click it to upgrade.
③ Click “Get started” to upgrade. If the installation license terms appear, click “Accept” and follow the prompts to complete the steps. Wait patiently for the installation to finish.
Start the upgrade to windows 10
If the above methods fail, use Renee Becca to restore the Windows 10 system backup to the target computer for upgrading. Note: The motherboard and CPU must be of the same brand. A system backed up from an Intel CPU cannot be restored to an AMD CPU.

3. Windows 10 Backup and Restore with Renee Becca

Renee Becca is a specialized tool for system and hard disk data backup and restoration. It helps back up and restore important data such as programs, system configurations, emails, photos, videos, documents, and bookmarks. Utilizing leading incremental and differential backup technology, it saves time and disk space. It supports system backup, system migration, partition backup, hard disk backup, file backup, and disk cloning to meet various needs.
Hot Topic - ADsProfessional Data Backup & Restore Software - Renee Beccadata bacup software Renee Becca

Provides multiple functions like backup, restore, clone, system migration.

Clone all data (including system) in HDD to smaller SSD or larger HDD. Disk could boot PC after clone finished.

Supports to migrate Windows to SSD with a few clicks.

4K alignment will be processed when clone disk, migrate system, restore disk or system.

Backup & restore system/disk/folder. Auto backup plans are available.

Provides functions like backup, restore, clone, system migration.

Clone all data (including system) in HDD to smaller SSD or larger HDD.

Backup & restore system/disk/folder. Auto backup plans are available.

Compatible with: Windows 10 / 8.1 / 8 / 7 / Vista / XP / 2008 / 2012(32bit/64bit) / Server 2008
Free TrialFree Trial

5000 people have downloaded and made the disk clone successfully!

Steps to create a Windows 10 system backup:
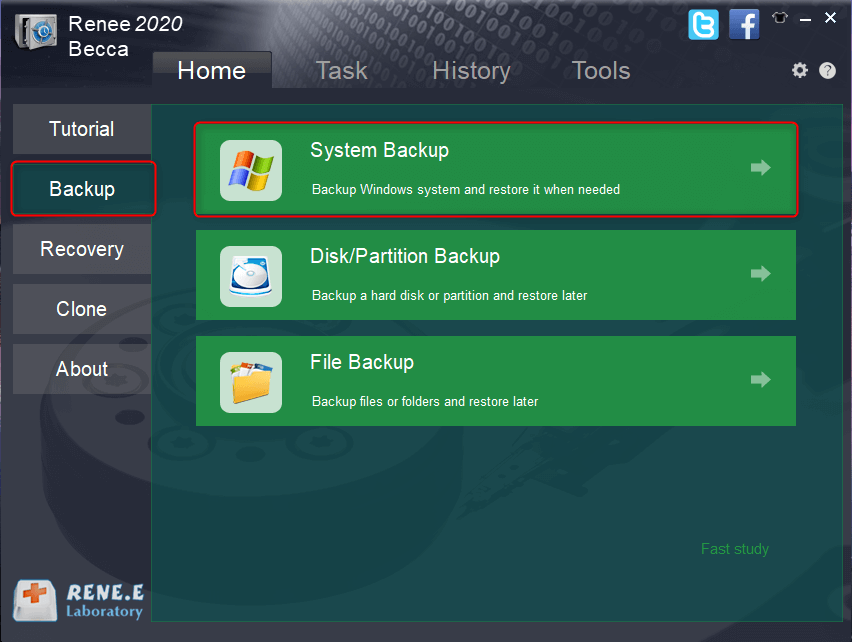
Step 1: Install and run Renee Becca on a Windows 10 computer, then select the System Backup option.
system backup renee becca
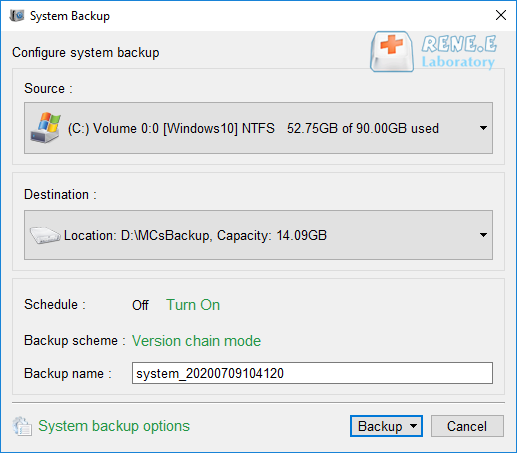
Step 2: Select the source file (device) and the destination. The source file generally defaults to the system partition, and the destination is where you want to save the system backup. To restore the Windows 10 system to other computers, save the system backup on an external hard disk.
back up system with renee becca
Step 3: After completing all settings, click Backup Now and wait for the system backup to finish. View the progress in Task.
system backup renee becca
Steps to restore Windows 10 to target computer:
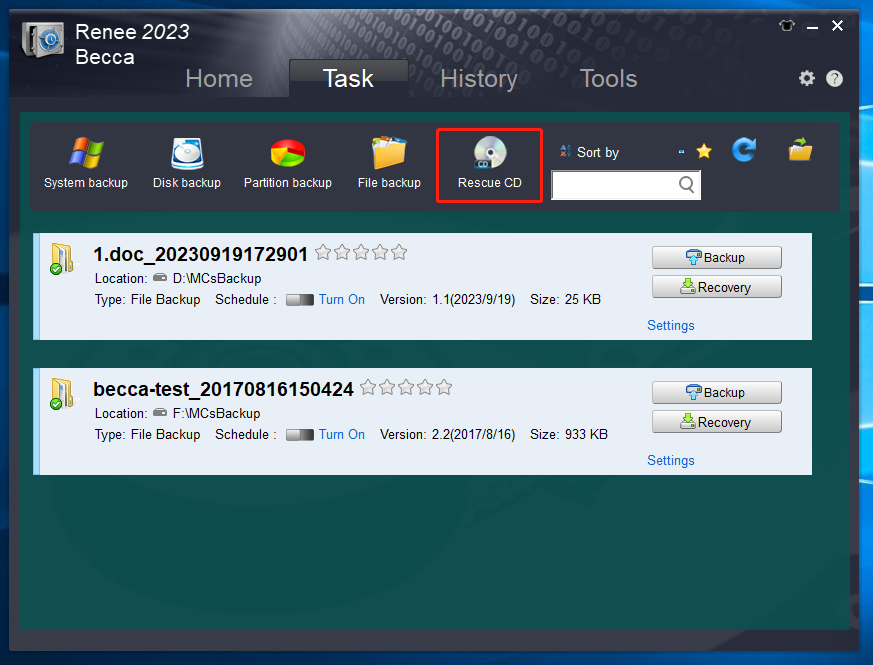
Step 1: Run Renee Becca, switch to (Task) at the top of the interface, and then select the (Rescue CD) option.
rescue CD
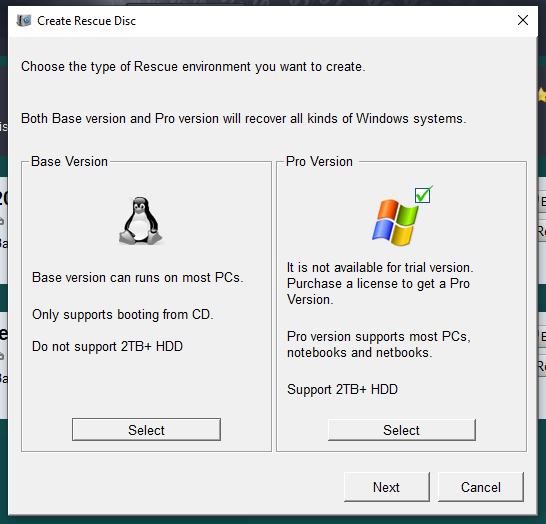
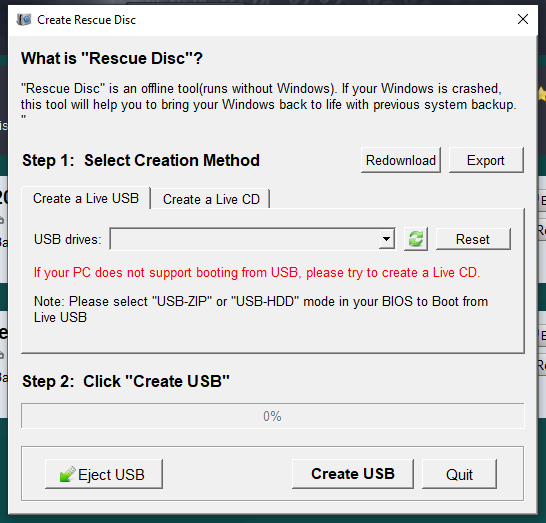
Step 2: Select the type of rescue disk based on your disk and computer conditions. Connect a blank CD or USB stick, then click Next to create a startup disk.
select the Pro version
create a rescue CD
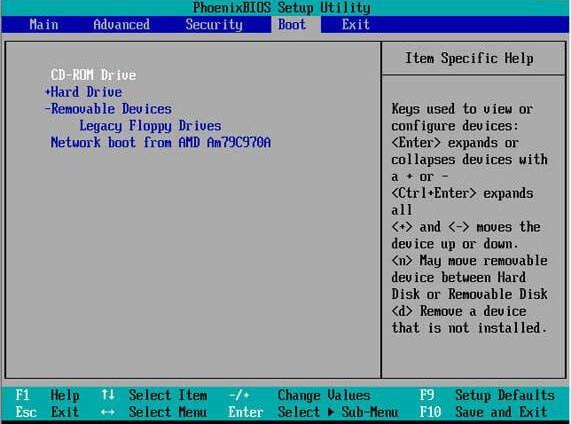
Step 3: Connect the boot disk (CD/USB stick) and the external hard disk with the system backup files to the computer. Enter the BIOS using the shortcut key at startup and change the boot sequence to USB/CD. For example, to boot from a CD, select (CD-ROM Drive); to boot from a USB flash drive, select (Removable Devices).
Change bios startup items
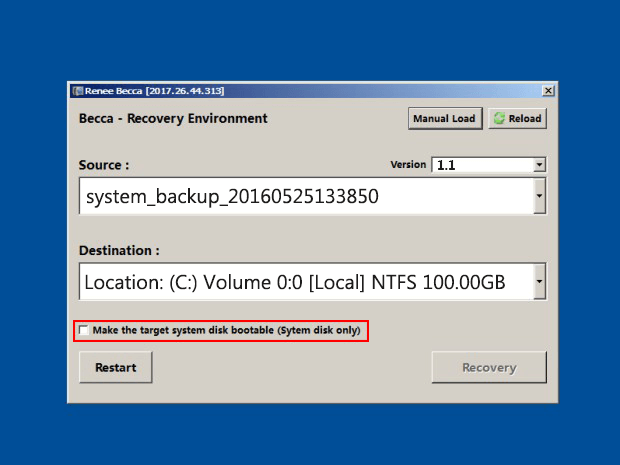
Step 4: After startup, select the backup version and target location to restore, check the “make the target system disk bootable (system disk only” option, and click “Recovery” to start the system restore.
recover system from rescue CD