author avatar
    Specialist of Customer Service Dept.
 

Summary
Experience better performance and faster boot times by migrating your Windows 10 to an SSD. Learn how to easily make the switch with our step-by-step guide and cloning utility, Renee Becca. Say goodbye to slow loading and hello to a more efficient PC.


As technology continues to advance, many users are looking to upgrade their computer’s performance by switching to a Solid-State Drive (SSD). One of the biggest benefits of an SSD is its faster speed, providing a significant improvement in overall system performance. With the release of Windows 10, more and more users are considering migrating to an SSD to take advantage of its features. However, before making the move, it is crucial to prepare and assess your current HDD space and data usage. In this chapter, we will discuss the steps you need to take to clean unnecessary files and save valuable disk space, ensuring a smooth and successful migration to an SSD.

Assessing Your Current HDD Space and Data Usage. Clean unnecessary files to save disk space.

If you are planning to migrate from Windows 10 to an SSD, it is important to assess your current HDD space and data usage before beginning the process. This will ensure that you choose the right SSD size and avoid any potential problems during the migration. Here’s how to prepare for the migration:
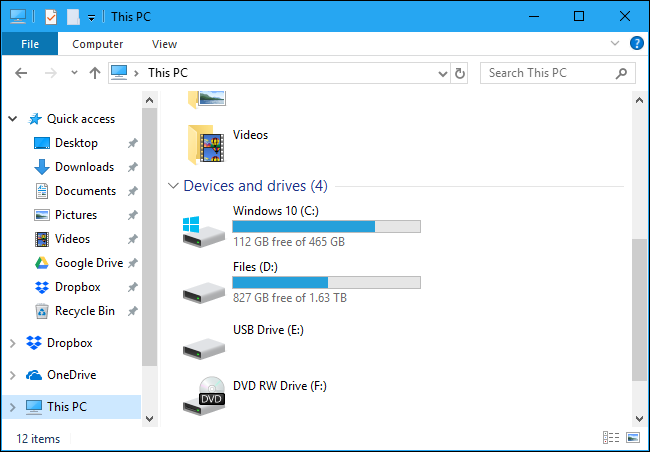
Step 1: Open File Explorer and right-click on the drive that contains your Windows installation. Usually, this will be the C: drive.
open file explorer
Step 2: Click on Properties and you will see a breakdown of the disk space usage on your HDD.
Tips:It is recommended to have at least 20% of your HDD space free for optimal performance.
Step 3: Look for any unnecessary files or applications that are taking up space on your HDD. These could include old documents, movies, or games that you no longer need.
Step 4: Delete or move these unnecessary files to an external drive to free up space on your HDD. This will also reduce the amount of data that needs to be migrated to your new SSD.
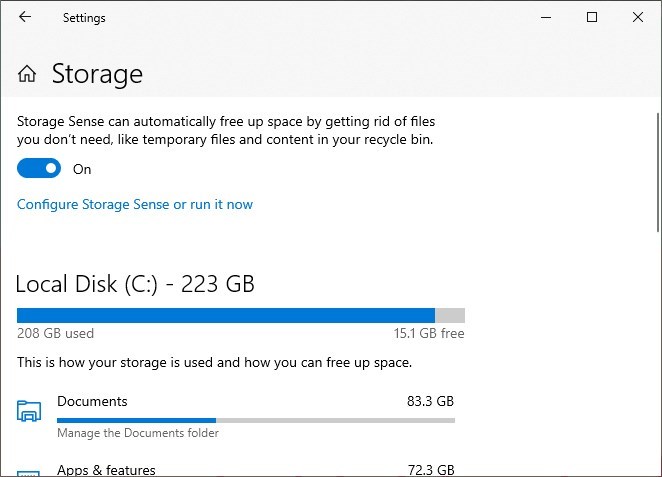
Step 5: Run a disk cleanup to remove temporary files and other system files that are taking up space on your HDD. To do this, go to Start > Settings > System > Storage and click on “Free up space now” under the Storage Sense section.
Free up space
Step 6: Uninstall any applications that you no longer use or need. This will not only free up space on your HDD, but also prevent unnecessary applications from being migrated to your new SSD.
After completing these steps, you should have a better understanding of your current HDD space and data usage. This will help you choose the right SSD size and ensure a smoother migration process.
What to Pay Attention to:
Make sure to carefully review and assess your data and applications before cleaning. Avoid deleting or moving important files or applications that you may need in the future. It is also recommended to back up any important data before beginning the cleaning process.
For more information on the migration process, continue reading the next chapter on “Selecting the Right SSD – Understanding Specifications and Capacity Needs. Check Computer interface, SATA or M.2“.

Understanding Specifications and Capacity Needs. Check Computer interface, SATA or M.2

Upgrading to an SSD requires selecting a drive that is compatible with your system’s interfaces and understanding the needed capacity and specifications to improve Windows 10 performance.
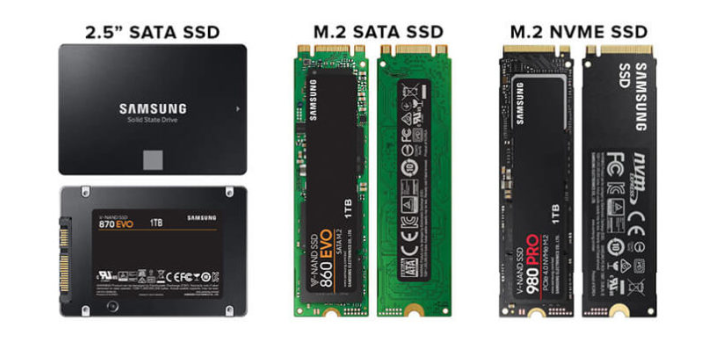
Step 1: Examine your computer’s interface to determine if it supports SATA or M.2, and ensure your chosen SSD type matches. For high-speed requirements, verify if the M.2 slot supports NVMe, as there can be significant differences in performance.
windows 10 migrate to ssd
Step 2: Assess your storage needs by reviewing your current HDD usage and calculating necessary SSD capacity. Consider acquiring an SSD with a larger capacity than currently needed to accommodate future needs and system updates while benefiting from prolonged drive endurance.
Step 3: Analyze SSD specifications like sequential read/write speeds, IOPS, and endurance (TBW). These specs will affect your system’s performance and the life span of the SSD.
Step 4: Prepare for migration by initializing the new SSD, choosing the correct partition style (GPT for UEFI firmware or MBR for older BIOS), and ensuring the SSD has unallocated space equal to or larger than the used space of your current OS partition.

Renee Becca - A Simple Solution for System Migration.

When it comes to upgrading your computer, one of the most important steps is migrating your operating system from your old hard drive to a new, faster SSD. This process can seem daunting, but with the right tools and instructions, it can be a simple and painless task. One tool that stands out as a top choice for cloning Windows 10 is Renee Becca – a powerful and user-friendly software that makes system migration a breeze.
Renee Becca is a tool specially used for system/hard disk data backup and restoration. It can help you back up and restore important data in your computer, such as programs, system configuration, emails, photos, videos, documents, bookmarks, etc. In addition, you can also use it to clone disk and system data. The software provides three cloning methods, including hard disk cloning/cloning system hard disk; partition cloning and system migration. You can choose the most suitable cloning method according to your different needs.
In addition, Renee Becca supports 4K align and Cloning from larger partition to smaller partition. These functions can better assist you in completing system and data migration.
Here is a guide on how to use Renee Becca for cloning your Windows system to an SSD.
Step 1:Installing Renee Becca on Your Computer
The first step in migrating your system is to download and install Renee Becca on your computer. The software is compatible with all versions of Windows 10 and is available for free download online. Once installed, launch the software to begin the cloning process.
Hot Topic - ADsRenee Becca – Safe and Quick System Migration to SSD

Automatic 4K alignment Improves SSD performance during system migration.

Support GPT and MBR Automatically adapt to the suitable partition format.

Support NTFS and FAT32 Redeploy various files in different file systems.

Back up quickly Back up files at up to 3,000MB/min.

Overall backup schedule Support system redeployment/system backup/partition backup/disk backup/disk clone.

Automatic 4K alignment Improve SSD performance

Support GPT and MBR Intelligently adapt to a partition format

Support NTFS and FAT32 Redeploy files in different file systems

Free TrialFree TrialNow 2000 people have downloaded!
Step 2:Connecting Your SSD to Your Computer
After launching Renee Becca, you will be prompted to connect your new SSD to your computer. Make sure to use a reliable and high-speed connection to avoid any interruptions during the cloning process. Once connected, the software will detect your SSD and show it as an option for the cloning destination.
Connect SSD to the computer
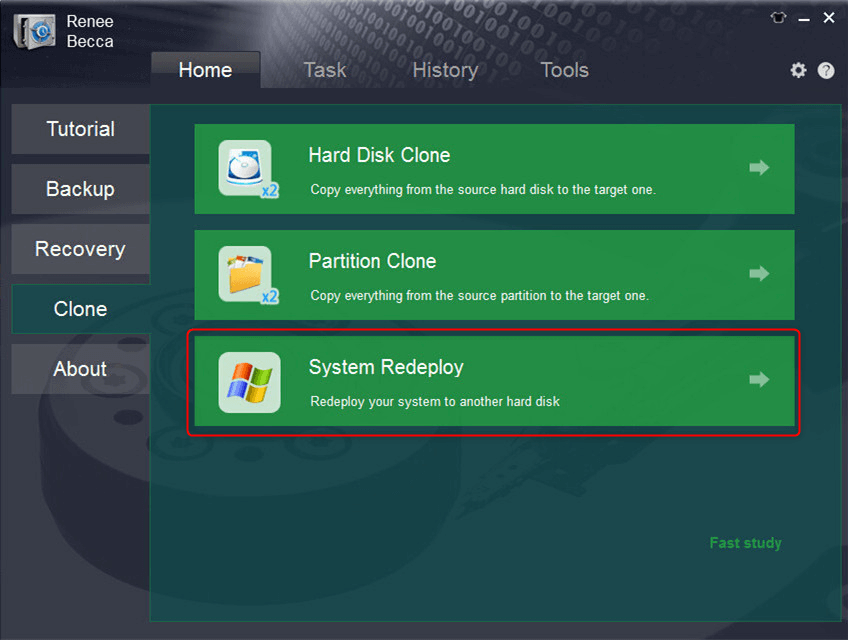
Step 3: Click “System Redeploy” in the “Clone” option from the main interface.
select system redeploy function in renee becca
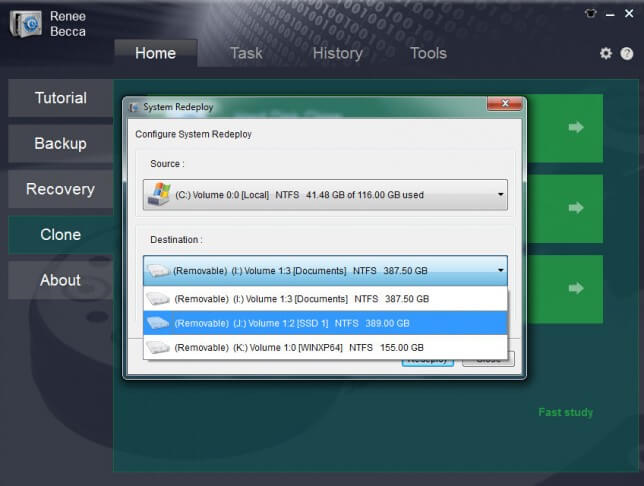
Step 4: Select the source disk, which is your current SSD, and the target disk.
Step 5: Click on “Redeploy” to start the cloning process. The software will begin copying all the data from your SSD to the SSD.
select target disk and desination in system redeploy function in renee becca
Step 6:Completing the Migration
Once the cloning process is complete, you will be prompted to restart your computer.
Tips:Make sure to keep your old hard drive connected to your computer until you are sure that the cloning process was successful. You can then safely disconnect and remove the old drive.
Summary:
In summary, using Renee Becca to clone your Windows 10 system to a new SSD is a simple and efficient solution for system migration. The software offers a user-friendly interface and provides step-by-step instructions to guide you through the process. However, it is important to make sure you have selected the right SSD and follow the instructions carefully to avoid any potential issues.
Pros:
  • Allows safe migration of operating system without fresh installation.
  • Simple steps for a smooth and hassle-free transfer.
  • Improves performance and faster boot times with new SSD.

Cons:

  • Doesn't have a Mac version.Paid subscription required for full access to all features.
  • Paid subscription required for full access to all features.

Once you have successfully cloned your system to the new SSD, you can move on to the next chapter to learn how to change BIOS Settings to Start Windows 10 from SSD.

Changing BIOS Settings to Start Windows 10 from SSD.

After successfully cloning your Windows 10 operating system to an SSD, you will need to change the boot order on your computer to set the SSD as the primary boot drive. This can be done in the BIOS settings.
To access the BIOS settings, you will need to restart your computer and press a specific key repeatedly before the logo appears on the screen. The key varies depending on the manufacturer and model of your computer, but common keys to enter the BIOS settings include DEL, F2, F12, and Esc.
Step 1: Restart your computer and press the designated key to enter the BIOS settings.
Here is a list of BIOS shortcut keys for different brands. Alternatively, you can observe the BIOS shortcut keys displayed on the screen during booting.
BIOS NameMethodThe Key or Keys
AcerPress Del or F2 immediately after powering onDel, F2
CompaqPress F10 while the cursor in the top right corner of the screen is blinkingF10
DellPress F2 when the Dell logo appears, or press every few seconds until the message Entering Setup appearsF2
eMachinesPress Tab or Del while the eMachine logo displays on the screenTab, Del
FujitsuPress F2 once the Fujitsu logo appearsF2
GatewayPress the F1 key repeatedly after restarting the computerF1
HPPress the F1, F10, or F11 key after restarting the computerF1, F10, F11
IBMPress F1 immediately after powering on the computerF1
LenovoPress F1 or F2 after powering on the computerF1, F2
NecPress F2 to enter the BIOS SetupF2
Packard BellPress F1, F2, or Del to enter BIOSF1, F2, Del
SamsungPress F2 to start the BIOS setup utilityF2
SharpPress F2 after the computer startsF2
SonyPress F1, F2, or F3 after turning on the computerF1, F2, F3
ToshibaPress F1 or Esc after powering on to access BIOSF1, Esc
ARLTPress Del or F11 when the respective message is shownDel, F11
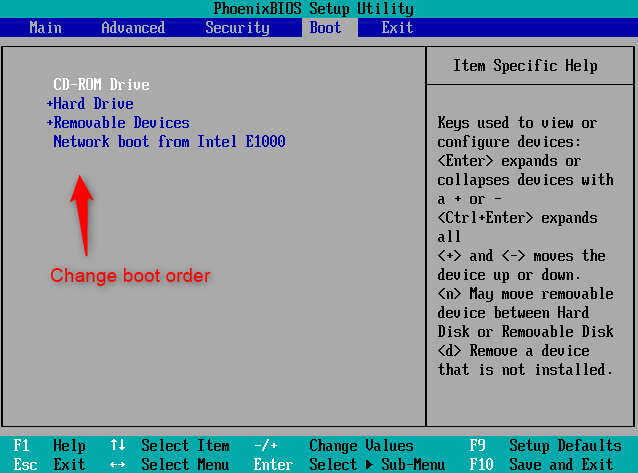
Step 2: Once you are in the BIOS settings, navigate to the “Boot” tab using the arrow keys on your keyboard.
change the boot order
Step 3: Use the arrow keys to select your SSD as the first boot option. If your SSD is not listed, make sure it is properly connected to your computer and then try again.
Step 4: Press the designated key to save and exit the BIOS settings. This is usually F10, but it may vary for different computers.
Step 5: Your computer will now restart and boot from your SSD.
Tips:If you have connected your SSD via USB, Windows 10 may not boot from it. In this case, try connecting the SSD via SATA if possible. Also, make sure to set the boot priority correctly in the BIOS settings.
Summary:
In this chapter, we discussed the steps to change the BIOS settings in order to boot from your newly cloned SSD. By following these instructions, you can ensure that your computer starts up and runs from your SSD, providing faster performance and improved efficiency.
Additionally, make sure to properly set the boot priority in the BIOS settings and connect the SSD via SATA for optimum performance. If you encounter any issues with booting from your SSD, check the connections and make any necessary adjustments in the BIOS settings.
Next, in the following chapters, we will discuss how to optimize your SSD’s performance and remove old data after migrating to the new drive. This will help you fully utilize the benefits of using an SSD as your boot drive.

Optimizing SSD Performance and Removing Old Data

Transitioning from HDD to SSD as a primary drive marks a significant upgrade in system performance. With Windows 10 now operating from an SSD, a post-migration cleanup and system optimization further amplify the improvements in speed and efficiency brought by the SSD technology. As a critical follow-through, this chapter delineates the measures required to optimize SSD performance and eliminate superfluous HDD data.
Step 1: Launch the Disk Cleanup tool to expunge unnecessary files from the SSD. You can find it by typing

Disk Cleanup

in the search bar. Ensure that it scrutinizes system files and previous Windows installations, which can consume valuable SSD space without offering any benefit.
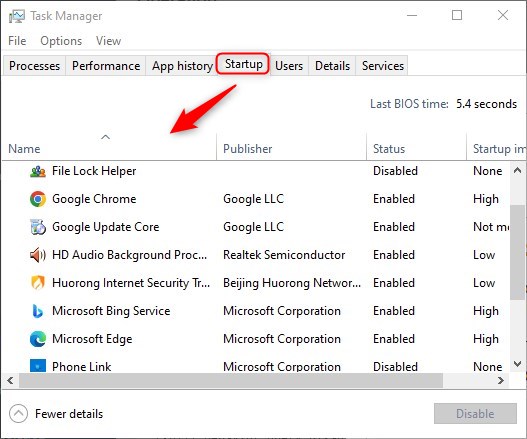
Step 2: Prune the list of startup programs. Take advantage of the SSD’s rapid boot times by paring down startup applications. Head to the Task Manager, navigate to the “Startup” tab, anddisable apps that are not essential to your startup routine, thus enhancing system responsiveness.
disable apps in the Task Manager
Step 3: Ensure the SSD’s TRIM feature is active. TRIM command is key for SSDs, to help manage the data deletion and garbage collection process. To verify TRIM status, open an elevated command prompt and enter

fsutil behavior query DisableDeleteNotify

. If the result is anything but “0“, activate TRIM by entering

fsutil behavior set DisableDeleteNotify 0
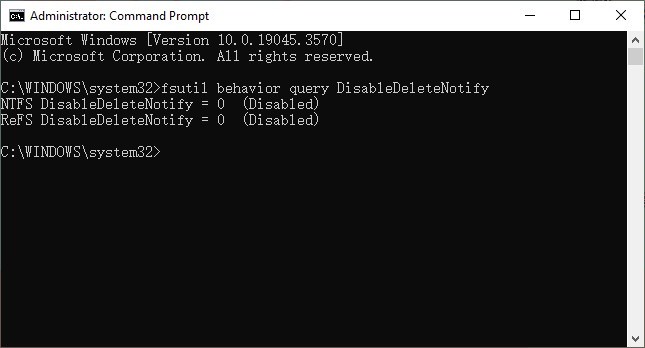
Check and Enable TRIM
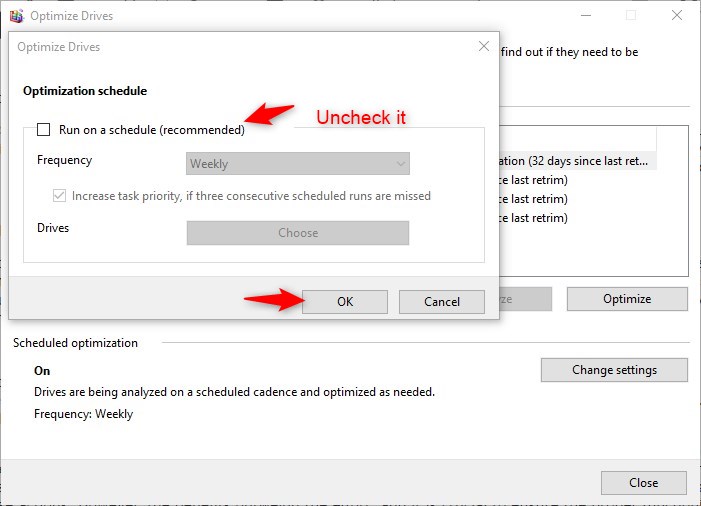
Step 4: Customize system behaviours suited to SSDs. Turn off file indexing and schedule defragmentation only for the HDD, as these operations are unnecessary and potentially detrimental to SSDs. Check the “Optimize Drives” tool to ensure that the SSD is not being defragmented.
Defragment and Optimize Drives
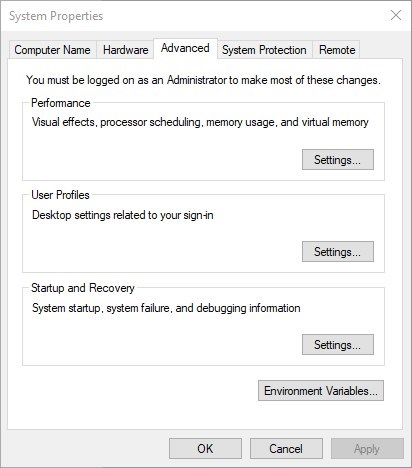
Step 5: Reconfigure the Pagefile and System Restore. Given the limited space on SSDs, manage these features under “System Properties“. (Enter “advanced system” inside the Cortana search box.) Consider scaling down the size of the Pagefile and use System Restore judiciously, especially if you have a reliable data backup regime.
 Open System Properties
Step 6: Securely wipe the original HDD. Once you’ve confirmed the SSD is functioning correctly, use a dedicated utility such as DBAN, or the manufacturer’s secure erasure tool, to completely erase the old HDD. This ensures data security if the drive is to be repurposed or disposed of.
wipe the original HDD using DBAN
Step 7: Arrange your data efficiently. To maximize SSD performance, relocate personal files to a secondary storage solution like an HDD, which is ideal for long-term data retention and cost-effective storage, while enabling the SSD to excel in providing rapid access to the operating system and applications.
To encapsulate, the post-migration process to an SSD requires meticulous optimization to unleash the full potential of SSD capabilities. The transition not only manifests in swifter boot and application load times but also heralds a more agile computing experience. However, users must be cognizant of the crucial need for backup solutions and SSD maintenance techniques. These steps, when implemented, not only leverage the superior speed of SSDs but also safeguard your data, ensuring a seamless and efficient computing environment.

Conclusion

Overall, migrating Windows 10 to an SSD can greatly improve the performance and lifespan of your PC. By understanding the benefits of using an SSD over an HDD and following a simple process with cloning utilities like Renee Becca, you can seamlessly transfer your OS without the need for a fresh installation. Through proper preparation and selecting the right SSD, you can ensure a smooth and successful migration. After safely replacing your HDD with the newly cloned SSD and changing BIOS settings, your PC will be ready to boot from the SSD, providing faster load times and improved overall performance. Don’t forget to optimize your SSD’s performance and remove old data for a more streamlined experience. With a little time and effort, you can easily breathe new life into your PC by migrating to an SSD.