author avatar
    Technology Manager of Test Dept.
 

Summary
The article provides a guide for resolving hard drive detection issues in BIOS. It outlines steps to check the hard drive status in BIOS settings, update the BIOS, load default BIOS settings, enable Compatibility Support Module (CSM), verify storage specifications, and confirm hardware connections. The instructions aim to help users troubleshoot and resolve situations where their computer's BIOS fails to detect hard drives, SSDs, or M.2 devices.


If your computer’s BIOS can’t detect the hard drive, SSD, or M.2 after powering on, follow these steps to resolve the issue. This guide will walk you through checking hard drive status in BIOS settings, updating BIOS, loading BIOS defaults, enabling CSM, checking storage specifications, and confirming hardware connections.
If you cloned SSD won’t boot, please refer to “Cloned SSD Won’t Boot? Discover the Fixes

Solution 1: Checking Hard Drive Status in BIOS Settings

First, check your hard drive settings in the BIOS. Power on the system and press either the Delete or F2 key to enter the BIOS settings page. The EZ Mode provides a basic system overview of your computer. You can find the hard drive, SSD, or M.2 device currently connected in the Storage Information section. If your computer enters Advanced Mode, you can easily switch to EZ Mode by pressing the F7 key. Alternatively, you can check the SATA Mode, M.2, and Hard Drive settings at PCH Storage Configuration and NVMe Configuration for PCIE M.2 device information.
BIOS Advanced Mode
Sections to check in ASUS BIOS:
75120:87309:-1:-1:-1:-1

Solution 2: Updating BIOS to the Latest Version

Updating the BIOS to the latest version can resolve detection issues. Search and download the latest BIOS file from the ASUS official website. Detailed BIOS update steps can be found on the information card.

Solution 3: Loading BIOS Defaults

If you have changed any BIOS settings, such as CPU overclocking or Memory overclocking, the computer may not detect the hard disk or SSD due to overclocking instability. It is recommended to load the BIOS settings to default. Enter BIOS EZ Mode, press the F5 key, and click OK. Then press the F10 key and click OK.
load Optimized defaults

Solution 4: Enabling CSM in BIOS Settings

The CSM (Compatibility Support Module) can help detect both UEFI and Non-UEFI devices. Enter BIOS EZ Mode and press the F7 key to switch to Advanced Mode. Click Boot.
enable CSM mode

Solution 5: Checking Storage Specifications for Your Motherboard

Go to the ASUS website and search for your motherboard model name. Check the Product specification page or User manual for storage information. Be aware that compatible installation scenarios vary by CPU and channel design. Some motherboards can’t detect the first M.2 slot if you install an Intel 10th generation CPU. Use an Intel 11th generation CPU to enable this slot. Some models share bandwidth with the 2nd M.2 slot and SATA port 1. In such cases, change to other ports to enable both devices.

Solution 6: Confirming the Hardware

Finally, check the hardware connections. Re-plug the SATA and power cable for the hard drive or SSD. Replacing these cables may fix the issue. You can also try connecting the hard disk or SSD to other SATA ports on the motherboard. For M.2 SSDs, re-install the SSD or try another slot. Ensure the M.2 SSD is firmly secured with the mounting screw. If the system still can’t detect the hard drive, install the device on different platforms to confirm whether the device is functional.
220800:265517:-1:-1:-1:-1

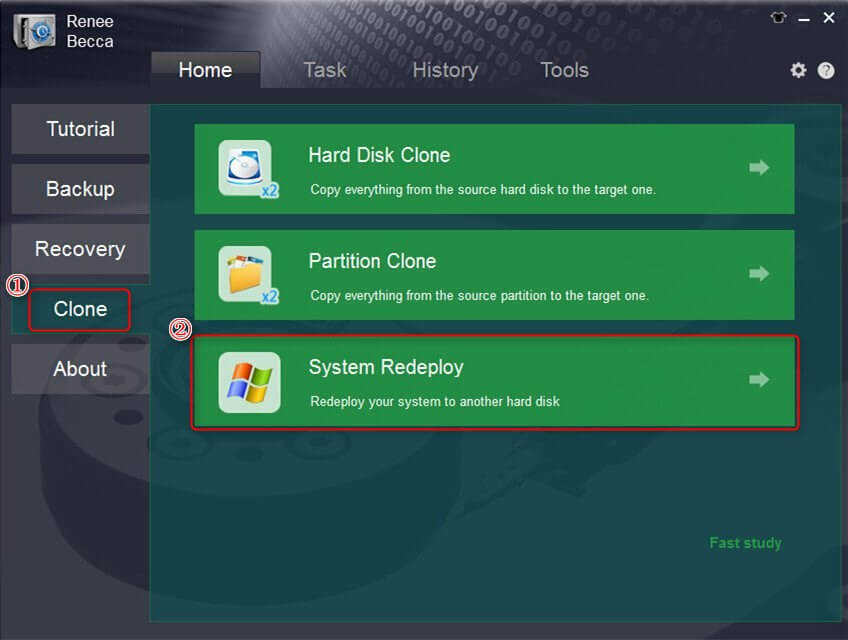
Using Renee Becca to Migrate Windows 10 System

1. Use Renee Becca to Migrate Windows 10 System

Renee Becca is a tool specifically designed for system and hard disk data backup and restoration. It can efficiently back up and restore essential data on your computer, including programs, system configurations, emails, photos, videos, documents, and bookmarks. Additionally, it allows for disk and system data cloning with 3 different cloning methods: hard disk cloning, partition cloning, and system migration.
Hot Topic - ADsRenee Becca – Safe and Quick System Migration to SSD

Automatic 4K alignment Improves SSD performance during system migration.

Support GPT and MBR Automatically adapt to the suitable partition format.

Support NTFS and FAT32 Redeploy various files in different file systems.

Back up quickly Back up files at up to 3,000MB/min.

Overall backup schedule Support system redeployment/system backup/partition backup/disk backup/disk clone.

Automatic 4K alignment Improve SSD performance

Support GPT and MBR Intelligently adapt to a partition format

Support NTFS and FAT32 Redeploy files in different file systems

Free TrialFree TrialNow 2000 people have downloaded!
Choose the most suitable method based on your individual needs. With the help of Renee Becca, it is very convenient to migrate the Windows 10 system to the hard disk of other computers, making it a system disk. The specific steps are as follows:
Step 1: Connect the hard disk of other computers to the original computer through an external hard disk box. Download and install Renee Becca on the original computer, and select the “System Redeploy” option in the main interface under the “Clone” column.
connect disk to another computer with enclosure
select system redeploy function in clone
Step 2: In the “System Migration” window, choose a new hard disk as the target location and the system partition as the source. Click the migration button to start the process. Wait for the progress bar to reach 100% to indicate successful migration. Install the new hard disk on other computers and set it as the first boot device in the BIOS. Check and adjust the settings in the BIOS if needed.
select a destination to redeploy system with renee becca
Kind tips: The total capacity of the new hard disk needs to be greater than the size of the system to be migrated; in addition, since all data in the target disk will be erased during the system migration, please check whether the target disk exists before the official system migration. Important data, and make file backups in advance. If you want to migrate all the data of the original system hard disk (not just the system partition) to the new hard disk, you can also choose the (hard disk clone/clone system hard disk) function.

Conclusion

We hope your system can successfully detect the hard drive after executing the above steps. By checking BIOS settings, updating BIOS, loading defaults, enabling CSM, verifying storage specifications, and confirming hardware connections, you can troubleshoot and resolve hard drive detection issues effectively. There are four main reasons why a system BIOS will not detect the presence of an internal Solid State Drive. These include the drive not being enabled in the BIOS, improperly installed Serial ATA drivers, a faulty or unplugged data cable, or a faulty SSD. Follow the steps outlined above to troubleshoot and isolate the problem.
Hot Topic - ADsRenee Becca – Safe and Quick System Migration to SSD

Automatic 4K alignment Improves SSD performance during system migration.

Support GPT and MBR Automatically adapt to the suitable partition format.

Support NTFS and FAT32 Redeploy various files in different file systems.

Back up quickly Back up files at up to 3,000MB/min.

Overall backup schedule Support system redeployment/system backup/partition backup/disk backup/disk clone.

Automatic 4K alignment Improve SSD performance

Support GPT and MBR Intelligently adapt to a partition format

Support NTFS and FAT32 Redeploy files in different file systems

Free TrialFree TrialNow 2000 people have downloaded!