author avatar
    Specialist of Customer Service Dept.
 

Summary
If your cloned SSD won't boot, don't worry. This guide covers common issues like improper installation and incorrect BIOS settings, offering practical solutions to get your system running smoothly again. Learn how to fix these problems and avoid them using tools like Renee Becca.


Facing a situation where your cloned SSD won’t boot can be frustrating, especially after meticulously cloning your drive. This issue can stem from various factors, each requiring a unique troubleshooting approach. Absolutely, a cloned SSD that won’t boot can be frustrating, but there are several common reasons this might happen. Here are some solutions and suggestions to troubleshoot and potentially resolve the issue.
cloned SSD can not boot

Solutions for fixing SSD boot issues

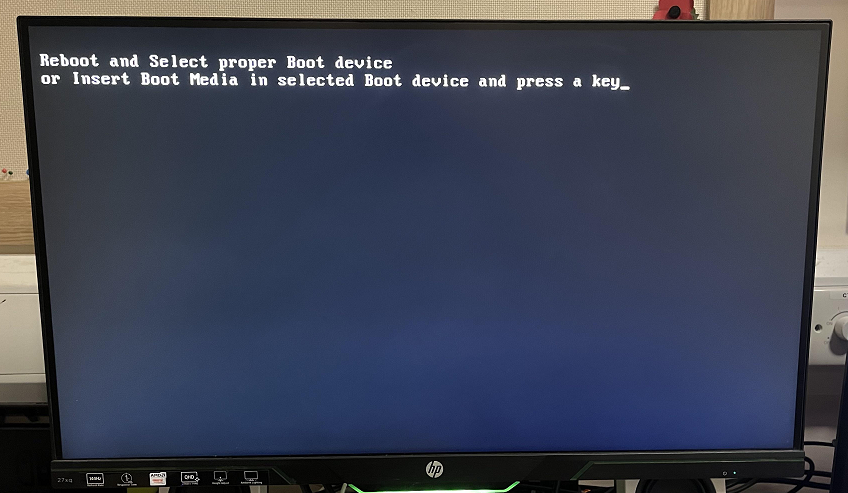
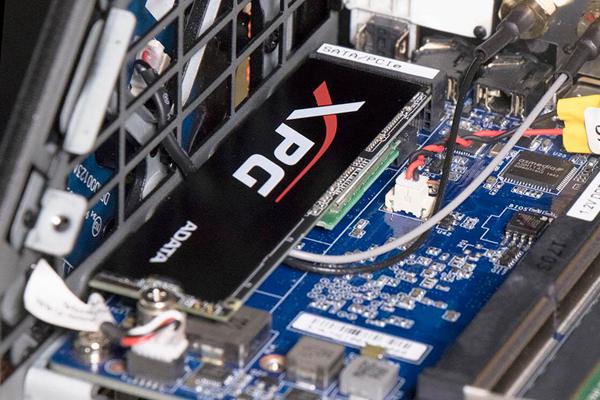
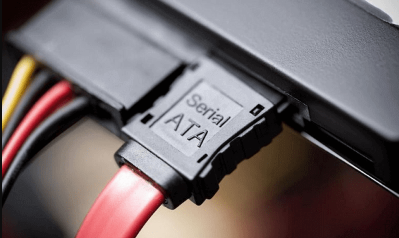
Solution 1: First Aid Steps for When Your SSD Won't Boot

Facing a situation where your cloned SSD won’t boot can be frustrating, especially after meticulously cloning your drive. Improper installation of the cloned SSD is a common cause of boot failures. Ensuring that the SSD is correctly installed and recognized by the system is crucial. Follow these detailed steps to address and prevent this issue.
Step 1: Secure the Hardware
Begin by ensuring that the cloned SSD is properly connected to the computer. Open your computer case and check that the SSD is firmly attached to the SATA port or M.2 slot. If necessary, reinsert the SSD to make sure the connection is secure.
M2 SSD installed desktop
Step 2: Verify BIOS/UEFI Detection
Restart your computer and enter the BIOS/UEFI settings. This can usually be done by pressing the Del, F2, or Esc key during the initial boot screen. Once in the BIOS/UEFI menu, navigate to the area where storage devices are listed.
Check if the cloned SSD is detected. If it is not, ensure that the SATA or M.2 slot is enabled, and that no settings are preventing the SSD from being recognized. Save the changes and exit the BIOS/UEFI.
SSD in BIOS device list
Step 3: Check for Physical Issues
Sometimes, the SSD might not boot due to physical damage or a faulty SATA cable. Inspect the SSD and the connecting cables for any visible damage. If possible, try using a different SATA port or cable to rule out a faulty connection.
SATA cable
By following these steps, you can address and prevent boot failures caused by improper installation of the cloned SSD.
For further troubleshooting, continue to the next chapter where we will discuss the impact of incorrect BIOS settings on the booting process of a cloned SSD. Stay tuned for more valuable insights!

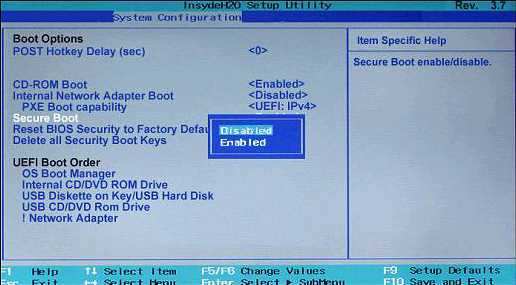
Solution 2: Adjust BIOS Settings on Target PC

Improper BIOS settings can significantly impact the booting process of a cloned SSD. Even if the SSD is perfectly cloned and installed, incorrect BIOS configurations can prevent your system from recognizing or booting from the new drive. Below are detailed instructions to correct these settings and ensure your cloned SSD boots properly.
Step 1: Enter BIOS/UEFI Settings
Restart your computer and enter the BIOS/UEFI settings. You can usually do this by pressing keys like Del, F2, F12, Esc, or other specified keys during the initial boot screen. Refer to the manufacturer’s instructions if unsure.
Step 2: Verify Boot Mode
Check whether your system is set to the correct boot mode—Legacy or UEFI—based on the partition style of your SSD. MBR (Master Boot Record) supports Legacy boot mode, while GPT (GUID Partition Table) supports UEFI boot mode. Navigate to the Boot tab using the arrow keys and locate the option to select UEFI/BIOS Boot Mode. Adjust the setting according to the partition style of your cloned SSD.
If you’ve cloned an Windows in MBR Disk to a GPT SSD, you need to change the boot mode from Legacy to UEFI or vice versa. Incorrect boot mode settings can prevent the SSD from booting.
disable UEFI Secure Boot
Enable Secure Boot to activate UEFI boot mode; disabling it will activate Legacy boot mode.
Step 3: Set the Correct Boot Order
Ensure that the cloned SSD is set as the primary boot device. Navigate to the Boot Order or Boot Priority settings. Find your cloned SSD and move it to the top of the list. This ensures that the system attempts to boot from the SSD first. Save these changes and exit the BIOS/UEFI.
Correcting BIOS settings can often resolve boot issues with a cloned SSD. Pay close attention to the boot mode and order to ensure compatibility and proper system recognition.
For further troubleshooting, continue to the next chapter where we will discuss the impact of setting the system partition as inactive on the booting process of a cloned SSD. Stay tuned for more valuable insights!

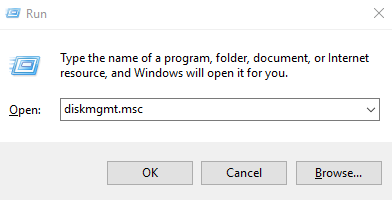
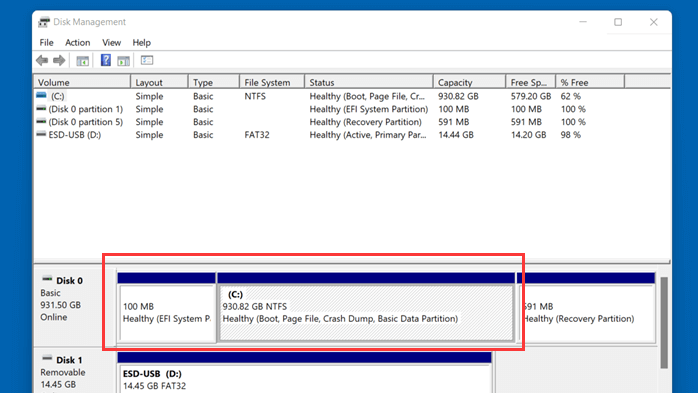
Solution 3: Setting the System Partition as active

Facing a situation where your cloned SSD won’t boot can be frustrating, especially after meticulously cloning your drive. One often-overlooked cause is the system partition being set as inactive. The system partition must be active for the operating system to boot correctly. Here, we delve into steps to ensure that the system partition is set as active to resolve boot issues.
Step 1: Boot into a Live Operating System
If your cloned SSD won’t boot, use a live operating system from another PC. This will allow you to access the Disk Management utility without needing to boot from the problematic SSD.
Step 2: Open Disk Management
Once in the live operating system, press Win + R to open the Run dialog box. Type diskmgmt.msc and press Enter. This will open the Disk Management utility where you can view and manage your storage devices.
run disk management
Step 3: Locate the System Partition
In the Disk Management utility, locate the cloned SSD in the list of disks. Identify the partition marked as System Reserved or the primary C: drive. Right-click on the partition that you believe should be active.
system reserved
Step 4: Set Partition as Active
Right-click on the identified system partition and select Mark Partition as Active. A confirmation dialog may appear; confirm to proceed. This action sets the selected partition as the active boot partition, allowing the system to boot from it.
Step 5: Reboot Your Computer
Exit the Disk Management utility and restart your computer. Make sure to remove the live operating system media so that the system attempts to boot from the cloned SSD. If the system partition was previously inactive, setting it as active should resolve the boot issue.

Solution 4: Re-Cloning the HDD to the SSD may Resolve Boot Issues

Why Re-Cloning Can Resolve Boot Issues
Incomplete clones or clone failures are common reasons why a cloned SSD won’t boot. These issues often arise from errors in the cloning process, missing boot partitions, or corrupt data. By re-cloning the HDD to the SSD, you essentially start fresh and ensure that all necessary files and partitions are copied correctly.
For example, if the initial clone missed critical boot files or if the system partition was not cloned entirely, your SSD would not have the necessary information to boot the operating system. Re-cloning corrects these issues by generating an exact, functional copy of the HDD.

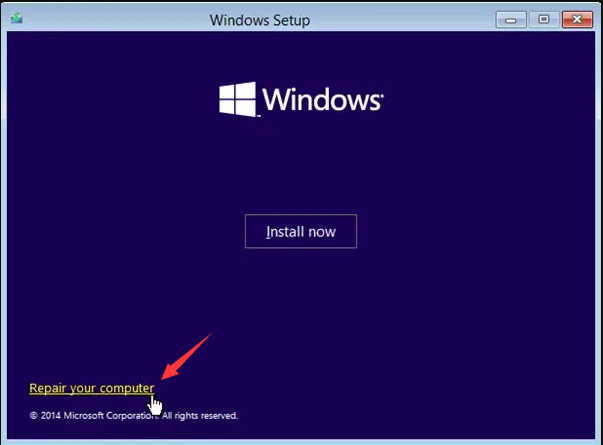
Solution 5: Using the Bootrec.exe Tool Can Fix Cloned SSD Boot Problems

Facing a situation where your cloned SSD won’t boot can be incredibly frustrating. One crucial tool that can often resolve these boot issues is the Bootrec.exe tool. This utility can help repair the Master Boot Record (MBR), Boot Sector, or Boot Configuration Data (BCD) on your cloned SSD, making it a vital part of your troubleshooting process. Below are detailed steps to use the Bootrec.exe tool effectively.
Step 1: Boot from Windows Installation Media. To begin, you must boot your computer using Windows installation media, such as a USB stick or DVD. Insert the media into your computer and restart it. Press the required key (commonly F2, Del, Esc, or F12) to enter the BIOS/UEFI settings and set the boot order to boot from the installation media first. Save the changes and exit the BIOS.
Step 2: Access Command Prompt. Once booted from the installation media, select your language preferences and click on “Next”. On the following screen, click on “Repair your computer” at the bottom-left corner.
windows installation repair your computer
Navigate to “Troubleshoot” > “Advanced options” > “Command Prompt”. This will open a Command Prompt window.
command prompt
Step 3: Scan for Windows Installations. In the Command Prompt, type the following command and press Enter:

bootrec /scanos

This command will scan all disks for Windows installations. Take note of any installations identified, as this information will be useful for subsequent steps.
Step 4: Repair the Master Boot Record (MBR). To repair the MBR, type the following command and press Enter:

bootrec /fixmbr

This command will attempt to fix any issues with the MBR, a common cause of boot problems.
Step 5: Repair the Boot Sector. If the MBR repair was unsuccessful or you are still facing issues, proceed by repairing the boot sector. Type the following command and press Enter:

bootrec /fixboot

This command writes a new boot sector to the system partition, which can resolve issues where the boot sector is corrupted or misconfigured.
Step 6: Rebuild the Boot Configuration Data (BCD). If the problem persists, you may need to rebuild the BCD. Type the following command and press Enter:

bootrec /rebuildbcd

This command scans for Windows installations missing from the BCD and allows you to add them. Confirm any prompts to add identified installations.
Step 7: Exit and Reboot. After performing the necessary repairs, type “exit” in the Command Prompt and press Enter. Remove the installation media and restart your computer, allowing it to attempt to boot from the cloned SSD.
By following these steps, you should be able to resolve most boot issues caused by problems with the MBR, boot sector, or BCD on your cloned SSD.
For further troubleshooting, continue to the next chapter where we will introduce Renee Becca as a recommended tool for cloning SSDs effectively to avoid boot issues. Stay tuned for more valuable insights!

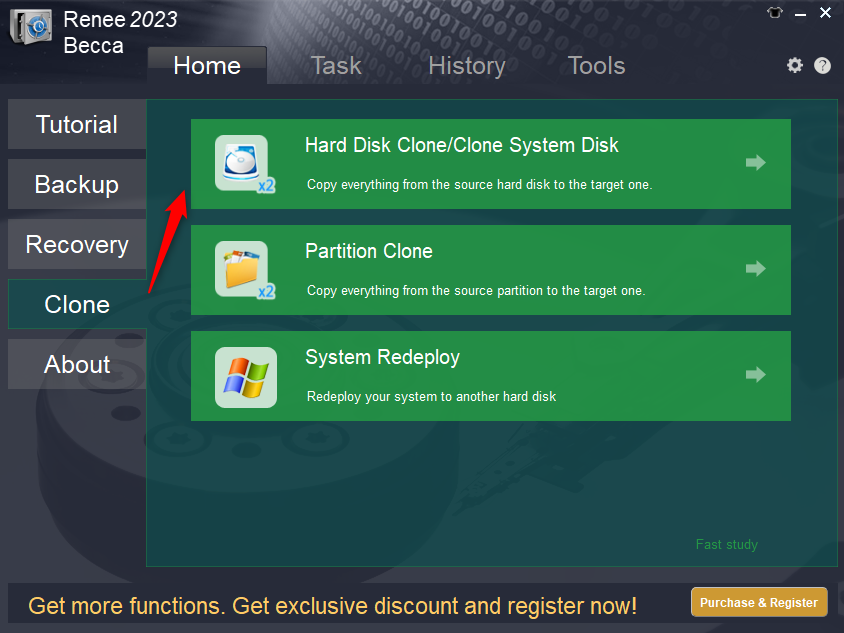
Renee Becca: Cloning SSDs Effectively to Avoid Boot Issues

Renee Becca comes packed with features that ensure a smooth and error-free cloning process. It supports various partition schemes, including MBR and GPT, and can automatically adjust settings to match the target SSD configurations. The tool also offers an intuitive interface, making it easy to set up and execute cloning tasks. Additionally, Renee Becca includes options for system backup, restoration, and disk management, providing an all-in-one solution for managing your storage needs.

Pre-Cloning Preparations

Before you begin cloning using Renee Becca, ensure that your environment is prepared. Start by backing up important data from your source HDD to avoid any potential data loss during the cloning process. Make sure your SSD is properly installed and recognized by your system. If necessary, use the Disk Management utility to initialize the SSD and confirm that it is in good working condition.

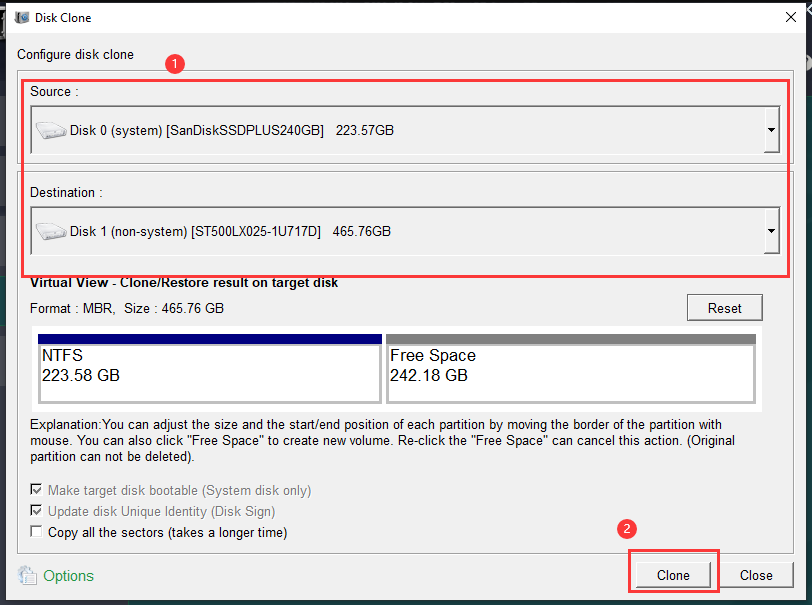
Cloning Process with Renee Becca

To clone your HDD to an SSD using Renee Becca, follow these steps:
Step 1: Download and install Renee Becca from the official website.
Renee Becca - Safe Data Manager for Disk

Safely erase disk data Erase data from disk with an unrecoverable way.

17 data erase standards Overall protection for data security.

Quick access to Disk Management One click for Disk Management to set partitions.

Supports different devices Including hard disk / memory card / USB disk, etc.

User friendly Even newbie can handle it in seconds.

Safety erase Prevent from recovered after erased.

Quick access One click for Disk Management.

Compatible with different devices Hard disk / memory card / USB disk, etc.

Free TrialFree Trial 800 users have downloaded and try Renee Becca
Step 2: Launch the software and select Clone from the main menu. Choose Disk Clone to clone the entire HDD to your SSD.
renee becca disk clone
Step 3: Select your source HDD and target SSD. Make sure to double-check your selections to avoid cloning to the wrong drive.
clone system disk
Step 4: Configure additional settings such as partition alignment and resizing if needed. These options help optimize the SSD’s performance and longevity.
adjust partitions
Step 5: Click on Clone to begin the cloning process. Renee Becca will handle the rest, copying all data and system partitions to the SSD.

Post-Cloning Steps

After the cloning process is complete, you will need to set the SSD as your primary boot drive. Restart your computer and enter the BIOS/UEFI settings by pressing F2, Del, or the key specific to your system. Navigate to the boot order settings and set your cloned SSD as the primary boot device. Save the changes and exit the BIOS.
If your system boots successfully from the SSD, you can repurpose your original HDD as a storage drive. Use the Disk Management utility to format the HDD, creating new partitions as needed to store your media files.

Conclusion

In conclusion, ensuring your cloned SSD boots successfully involves multiple steps: proper installation, correct BIOS settings, and active system partitions. Re-cloning the HDD and using tools like Bootrec.exe can also resolve issues. For a seamless cloning process, consider using Renee Becca. By addressing these aspects, you can prevent boot failures and enjoy a smooth transition to your new SSD.