author avatar
    Senior Product Manager
 

Summary
Discover how to effortlessly clone your boot drive in various Windows versions with our detailed guide. Learn to back up data, choose the best cloning software, and troubleshoot issues for a seamless transition to your new boot drive.


Cloning your boot drive in Windows ensures that you have a perfect backup ready for any eventuality, be it hardware failure or an upgrade. This guide will walk you through each step, making the process seamless even for beginners. Before diving into the cloning process, it’s essential to understand the role of your C drive and whether it serves as the boot drive in your Windows setup.

Is C Drive the Boot Drive in Windows?

Cloning your boot drive in Windows ensures that you have a perfect backup ready for any eventuality, be it hardware failure or an upgrade. This guide will walk you through each step, making the process seamless even for beginners. Before diving into the cloning process, it’s essential to understand the role of your C drive and whether it serves as the boot drive in your Windows setup.
What is the C Drive?
The C drive is typically the primary partition on your Windows computer where the operating system, system files, and most applications are stored. It is often called the “system drive” or “boot drive“, since it contains the critical files necessary for Windows to start and operate effectively.
Is the C Drive Always the Boot Drive (Active Drive)?
In many Windows installations, the C drive is configured as the boot drive by default. However, this is not a hard and fast rule. The actual boot drive can vary depending on how the system was set up initially and any subsequent changes made by the user.  Sometimes, Windows will use a EFI partition as the boot drive to adapt the UEFI computers.
Reserved and EFI System Partitions
How to Verify if C Drive is the Boot Drive
To verify if your C drive is the boot drive, you can check the system configuration. Here are the steps:
1. Press Win + R to open the Run dialog box.
2. Type

msconfig

Click OK.
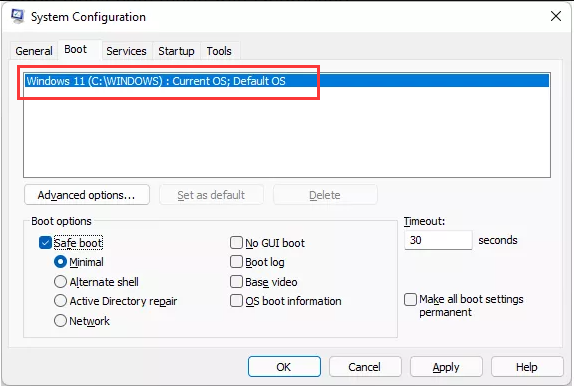
3. In the System Configuration window, go to the Boot tab.
msconfig boot drive
You will see a list of operating systems installed on your computer. The default operating system will usually specify which drive it’s booting from. If it says C:\Windows, then your C drive is indeed the boot drive.

Step 1: Preparing Your New Drive

Before you can clone your boot drive, you need to prepare your new drive by initializing and connecting it to your computer. This step ensures that your system recognizes the new drive and is ready to clone data onto it.
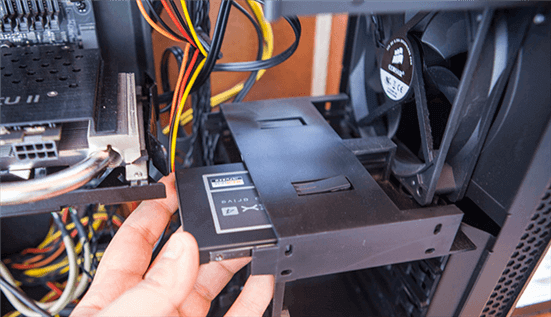
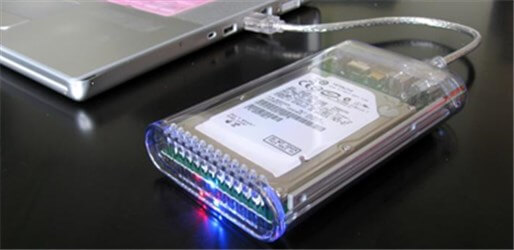
Step 1: Connect your new drive to your computer. You can do this using an internal SATA connection or an external USB-to-SATA adapter. Make sure the new drive is properly connected and powered on.
install-ssd-in-desktop
connect disk to another computer with enclosure
Step 2: Open the Disk Management tool in Windows. Press Win + R to open the Run dialog box, then type diskmgmt.msc and click OK.
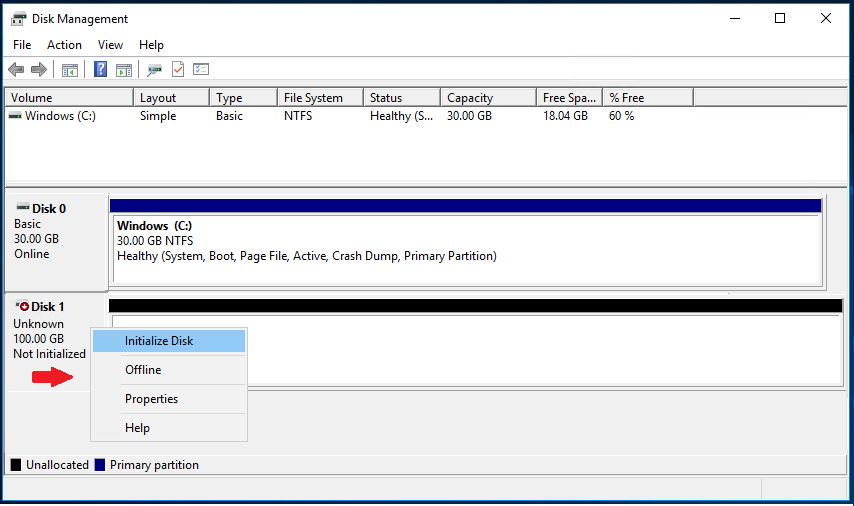
Step 3: In the Disk Management window, you should see a list of all the drives connected to your computer. Locate your new drive, which will usually be listed as Unallocated space.
how to initialize a disk step 2
Step 4: Right-click on the unallocated space of your new drive and select Initialize Disk. This will open the Initialize Disk wizard.
Properly initializing and connecting your new drive is crucial for a successful cloning process. With your new drive prepared, you can proceed confidently to the next step.
To continue, read the chapter on “Detailed Steps to Clone Your Boot Drive Using Renee Becca” to ensure a smooth and effective cloning process.

Step 2: Detailed Steps to Clone Your Boot Drive Using Renee Becca

Cloning your boot drive with Renee Becca is a straightforward process, ensuring you have a ready and reliable backup. Follow these steps to clone your boot drive efficiently.
Step 1: Download and Install Renee Becca
First, download Renee Becca from the official website. Once downloaded, run the installation file and follow the on-screen instructions to install the software on your computer. After installation, launch Renee Becca.
Hot Topic - ADsRenee Becca – Safe and Quick System Migration to SSD

Automatic 4K alignment Improves SSD performance during system migration.

Support GPT and MBR Automatically adapt to the suitable partition format.

Support NTFS and FAT32 Redeploy various files in different file systems.

Back up quickly Back up files at up to 3,000MB/min.

Overall backup schedule Support system redeployment/system backup/partition backup/disk backup/disk clone.

Automatic 4K alignment Improve SSD performance

Support GPT and MBR Intelligently adapt to a partition format

Support NTFS and FAT32 Redeploy files in different file systems

Free TrialFree TrialNow 2000 people have downloaded!
Step 2: Select the System Redeploy Option
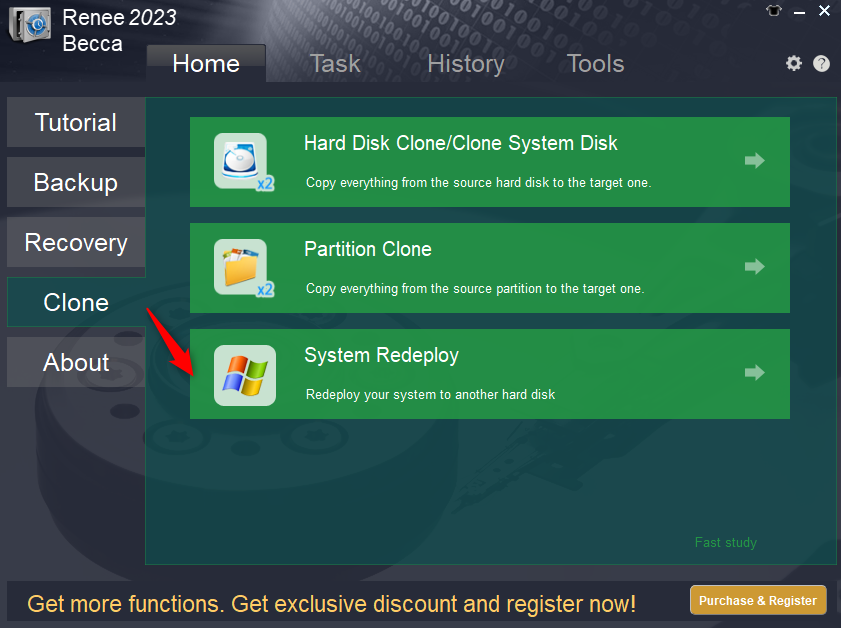
In the Renee Becca main interface, navigate to the Clone option. Choose [System Redeploy] to move the boot drive and system related data.
Tips:If you need to clone another partition simultaneously, consider using the disk clone function.
becca system redeploy
Step 3: Select Source and Target Disks
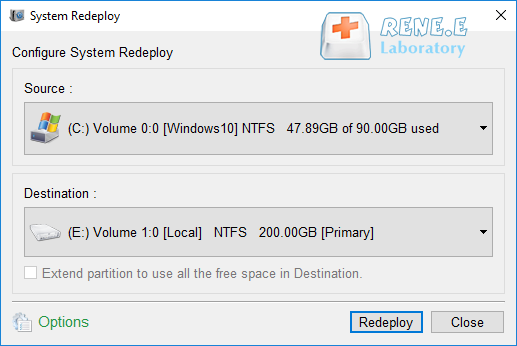
In the [System Redeploy] tab, you need to select the source disk (the current hard drive containing your boot drive) and the target disk (the new Disk Drive). Make sure the correct disks are selected to avoid accidental data loss. Click “Redeploy” to start moving your boot drive.
select a destination to redeploy system with renee becca
Step 4: Wait for the Cloning Process to Complete
Let Renee Becca complete the cloning process. Avoid using your computer during this operation to ensure data integrity. A progress bar will keep you updated on the status of the cloning operation.
Step 5: To verify the success of the cloning process, restart your PC and enter the BIOS settings by pressing F2, Del, or the respective key for your system. Set your newly cloned disk as the primary boot drive and save the settings.
After following these detailed steps, your boot drive should be successfully cloned with Renee Becca. This ensures that you have a ready-to-use backup in case of hardware failure or when upgrading to a new drive.

Step 3: Verifying the Cloned Drive and Adjusting Boot Settings

Once the cloning process is complete, the first step is to ensure that the cloned drive is properly connected to your computer. If you used a SATA cable during the cloning, make sure the cloned Drive is still connected via SATA and not through an external USB adapter. This is crucial for the system to recognize the new drive as the primary boot device.
1. Entering BIOS Setup
After confirming the physical connection, restart your computer and enter the BIOS setup. This is usually done by pressing a specific key during startup, such as Del for desktops or F2 for laptops. The exact key can vary based on your motherboard or laptop manufacturer, so consult your manual if unsure.
Common Server:
Server TypeEnter boot menu method
DELLPress the F12 key repeatedly before the Dell logo appears on the screen.
HPPress the F9 key multiple times when the HP logo is displayed.
Common Computers:
BIOS NameEnter boot menu method
ASRockDEL or F2
ASUSDEL or F2 for PCs, DEL or F2 for Motherboards
AcerDEL or F2
DellF12 or F2
ECSDEL
Gigabyte / AorusDEL or F2
Lenovo (Consumer Laptops)F2 or Fn + F2
Lenovo (Desktops)F1
Lenovo (ThinkPads)Enter then F1
MSIDEL
Microsoft Surface TabletsPress and hold Power and Volume Up buttons
Origin PCF2
SamsungF2
ToshibaF2
ZotacDEL
HPEsc, F9 for "Boot Menu", Esc, F10, Storage tab, Boot Order, Legacy Boot Sources
INTELF10
2. Setting the Cloned SSD as the First Boot Option
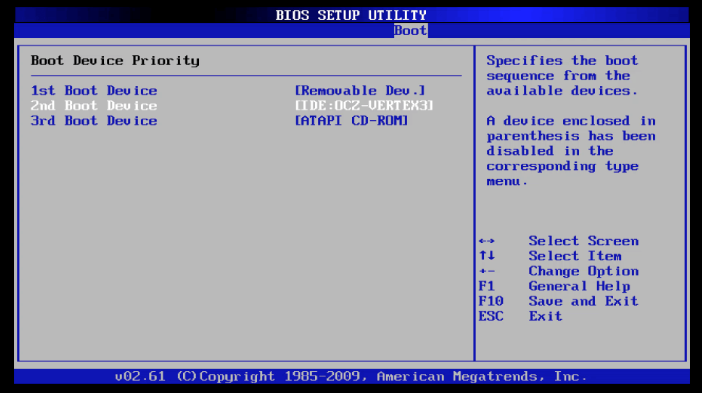
Navigate to the Boot tab in the BIOS setup. Here, you will need to set the cloned SSD as the first boot option. Use the arrow keys to navigate and the + key to move the cloned drive to the top of the list. This ensures that your computer will try to boot from the SSD first.
boot order in BIOS
3. Saving Changes and Exiting BIOS
Press F10 to save the changes made in the BIOS settings and exit. Your computer will now restart, and it should attempt to boot from the cloned Drive. If everything was done correctly, you should see your operating system booting up from the new drive.
After performing the above steps, restart your computer. Boot into your operating system and navigate to Disk Management to reformat the old drive.

Troubleshooting Cloned Drive Boot Issues

If your computer does not boot from the cloned drive, there are several troubleshooting steps you can take. First, recheck the BIOS settings to ensure the correct boot order. If the issue persists, you can use the Windows Recovery Environment (Windows RE) to repair any startup problems. Boot your system with a Windows installation disk, navigate to Repair your computer > Troubleshoot > Advanced options > Startup Repair. This tool can fix many common boot issues automatically.
Using Bootrec.exe for Advanced Troubleshooting
If automatic startup repair does not resolve the issue, you can use Bootrec.exe for more advanced troubleshooting. Open the Command Prompt in the Windows Recovery Environment and enter the following commands:

bootrec /fixmbr

bootrec /fixboot

bootrec /scanos

bootrec /rebuildbcd

These commands will repair the Master Boot Record (MBR), write a new boot sector, scan for operating systems, and rebuild the Boot Configuration Data (BCD) store.

Conclusion

In conclusion, successfully cloning your boot drive in Windows involves selecting suitable cloning software, preparing your new drive, following detailed steps for the cloning process using tools like Renee Becca, and verifying the cloned drive. By meticulously following these steps and troubleshooting common issues, you can ensure a seamless and efficient transition, safeguarding your data and system functionality.