author avatar
    Senior Product Manager
 

Summary
Discover how to manually clone your Western Digital drive using Renee Becca software on Windows 10/11. Follow our step-by-step guide to ensure a smooth and efficient data transfer process.


Western Digital hard drives are widely used worldwide. If you want to upgrade or replace your Western Digital hard drive, cloning software can be useful for seamlessly transferring data from one drive to another. In this post, we provide a step-by-step tutorial for mastering Western Digital cloning software.
Sectors – Western Digital (WDC)
Western Digital does not have its own self-developed cloning software. 

Step 1: Ensuring Both Drives Are Properly Connected and Recognized

Ensuring that both the source and destination drives are properly connected and recognized by your system is crucial for a successful cloning operation using the Western Digital Cloning Software. Failure to do so can lead to errors or incomplete data transfers.
Step 1: Connecting the Drives
First, you need to physically connect both the source and destination drives to your computer. If you are using internal drives, ensure they are securely mounted in your computer case and properly connected to the motherboard via SATA cables. For external drives, use appropriate USB or eSATA connections.
connect external hard drive to mac
Step 2: Powering On and System Recognition
Once the drives are connected, power on your computer. Upon booting up, your operating system should automatically recognize the newly connected drives. Verify this by accessing the system’s disk management utility.
On a Windows computer, right-click on the “Start” button and select “Disk Management”.
windows disk management right click start
A new window will open displaying all connected drives and their partitions. Your new drive should appear as a black block and be labeled Unallocated. Ensure that both your source and destination drives appear in the list.
unallocated disk
Step 3: Verifying Drive Visibility in BIOS/UEFI
If your drives are not recognized by the operating system, you may need to check the BIOS/UEFI settings. Restart your computer and access the BIOS/UEFI menu by pressing a specific key (commonly Delete, F2, or Esc) during the boot process.
Following these steps ensures that your source and destination drives are properly connected and recognized by your system, setting the stage for a smooth data cloning process. Once you have confirmed that both drives are visible and functioning correctly, you can move on to the next critical phase of using the Western Digital Cloning Software.
Tips:Ensure both drives are properly connected and recognized by the system before starting the cloning process.

Step 2: Using Renee Becca to Clone Western Digital Disks

To effectively clone your Western Digital disk using the Renee Becca software, follow the detailed instructions provided below. This step-by-step guide ensures a smooth data transfer process, leveraging the capabilities of Renee Becca to clone your disks efficiently.
Step 1: Download and Install Renee Becca
First, you need to download and install the Renee Becca software on your computer. Visit the official Renee Becca website, download the installer, and follow the on-screen instructions to complete the installation. Once installed, launch the application to proceed with the cloning process.
Hot Topic - ADsRenee Becca – Safe and Quick System Migration to SSD

Automatic 4K alignment Improves SSD performance during system migration.

Support GPT and MBR Automatically adapt to the suitable partition format.

Support NTFS and FAT32 Redeploy various files in different file systems.

Back up quickly Back up files at up to 3,000MB/min.

Overall backup schedule Support system redeployment/system backup/partition backup/disk backup/disk clone.

Automatic 4K alignment Improve SSD performance

Support GPT and MBR Intelligently adapt to a partition format

Support NTFS and FAT32 Redeploy files in different file systems

Free TrialFree TrialNow 2000 people have downloaded!
Step 2: Select the Clone Function
Upon opening Renee Becca, you will see a variety of options. Click on the “Clone” tab from the sidebar, and then select the “Hard Disk Clone/Clone System Disk” option. This will initiate the cloning wizard, guiding you through the necessary steps.
renee becca disk clone
Step 3: Choose the Source Disk
Next, you need to select the source disk that you want to clone. From the list of available drives, choose your Western Digital drive as the source. Ensure that you correctly identify the drive to avoid cloning the wrong disk.
Step 4: Select the Destination Disk
After selecting the source disk, the wizard will prompt you to choose the destination disk. Select the target drive where you intend to clone the data. Verify that this drive has enough storage space to accommodate the data from the source drive.
clone system disk
Step 5: Configure Cloning Options
Renee Becca offers various cloning options to customize the process according to your needs. You can choose to clone the entire disk, specific partitions, or even resize partitions as needed. Configure these options based on your preferences and proceed.
adjust partitions
Step 6: Complete the Cloning Process
Once the cloning process is complete, Renee Becca will notify you. Safely eject the destination drive if it is an external drive, or close the application if you are working with internal drives. Verify that the data has been cloned successfully by checking the contents of the destination drive.
Following these instructions will ensure a successful cloning process of your Western Digital disks using the Renee Becca software. For further information on troubleshooting and additional features, refer to the subsequent chapters about Common Issues Encountered During Cloning and Their Solutions.

Common Issues Encountered During Cloning and Their Solutions

1. Destination Drive won’t boot
One common issue users encounter is the target drive won’t boot.
Solution: Please refer to Cloned SSD Won’t Boot? Discover the Fixes for more.
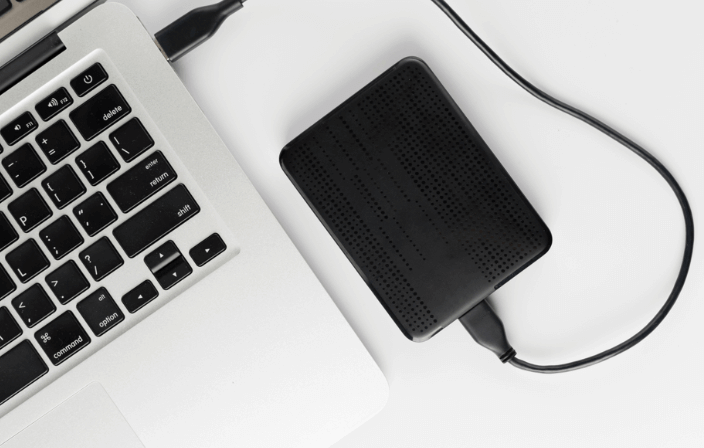
2. Source or Destination Drive Not Recognized
One common issue users encounter is the system’s failure to recognize either the source or destination drive. This can disrupt the cloning process and lead to data transfer errors.
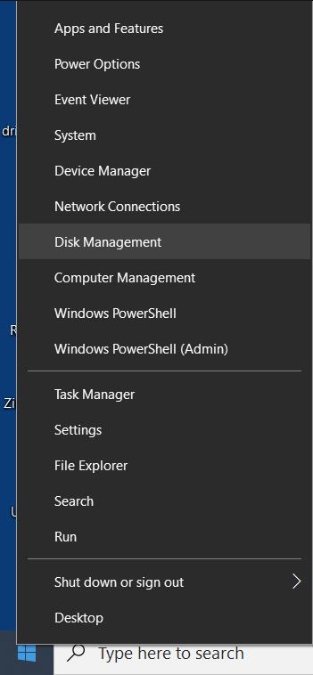
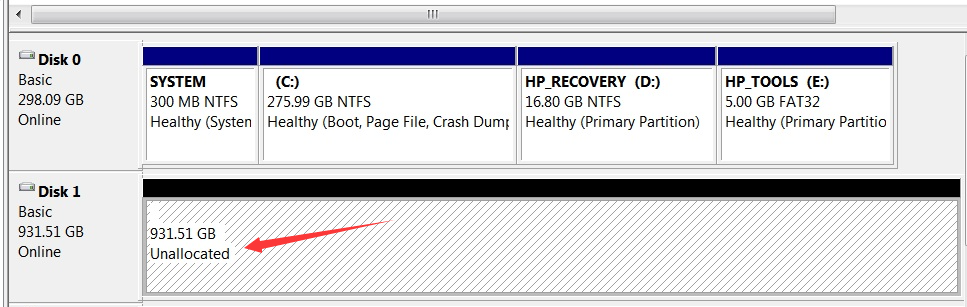
Solution: Ensure that both drives are properly connected and recognized by your system. Use the system’s disk management utility to verify drive visibility. For example, on a Windows computer, right-click on the “Start” button and select “Disk Management”. Ensure both drives appear in the list.
If the drives are not recognized, restart the computer and access the BIOS/UEFI settings by pressing keys like Delete, F2, or Esc during the boot process. Navigate to the “Boot” or “Storage” section and ensure both drives are listed as detected hardware.
Updating your system’s drivers and drive firmware can also resolve recognition issues. Visit the manufacturer’s website to download the latest updates and follow the instructions to install them.
3. Insufficient Storage Space
If the destination drive does not have enough storage space to accommodate the data from the source drive, the cloning process will fail.
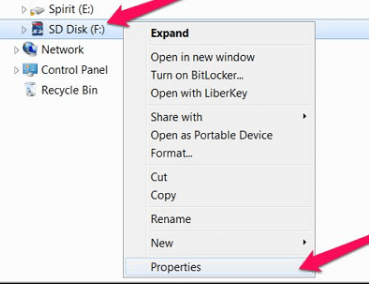
Solution: Verify the storage space on both drives before initiating the cloning process. On a Windows computer, open File Explorer, right-click on the source drive, select “Properties”, and check the “Used space” and “Free space” statistics.
sd card properties
Ensure that the “Free space” on the destination drive is greater than or equal to the “Used space” on the source drive.
If the destination drive lacks sufficient space, consider using a larger drive or free up space by deleting unnecessary files.
4. Data Corruption or Loss
Data corruption or loss during the cloning process can occur due to various reasons, such as drive health issues or interruptions during data transfer.
Solution: Before initiating the cloning process, back up important data to an external drive or cloud storage. This acts as a safeguard against data loss. Additionally, check the health of both the source and destination drives using tools like CrystalDiskInfo or the manufacturer’s utility. Replace any drives in poor health before proceeding.
During the cloning process, avoid interrupting the data transfer. Ensure a stable power supply and avoid disconnecting the drives until the process is complete.
5. Cloning Process Fails or Freezes
Sometimes, the cloning process may fail or freeze due to software glitches or hardware problems.
Solution: Restart the cloning software and try the process again. Ensure that your computer meets the software’s system requirements and that all software updates are installed. If the problem persists, check for any compatibility issues between the drives and the cloning software.
Running a disk check utility on the source and destination drives can also help identify and fix any underlying issues that may be causing the process to fail.
6. Incomplete Data Transfer
Incomplete data transfer can result in missing files or corrupted data on the destination drive.
Solution: After the cloning process is complete, verify the contents of the destination drive. Ensure that all files and folders from the source drive are present and accessible. If any data is missing or corrupted, consider repeating the cloning process.
To minimize the risk of incomplete transfers, avoid using the computer for other tasks during the cloning process and ensure that no background applications interfere with the data transfer.
Addressing these common issues and implementing the recommended solutions will ensure a smoother and more reliable data cloning process using the Western Digital Cloning Software. Proper preparation and troubleshooting can save time and avoid potential data loss, leading to a successful cloning operation.

Conclusion

In summary, this guide walked you through the manual cloning process using Renee Becca for Western Digital drives on Windows. We covered essential preparation steps, ensured proper connection of drives, and provided specific instructions for the cloning process. Additionally, we addressed common issues and their solutions, ensuring a smooth and secure data transfer.